
Main Courses
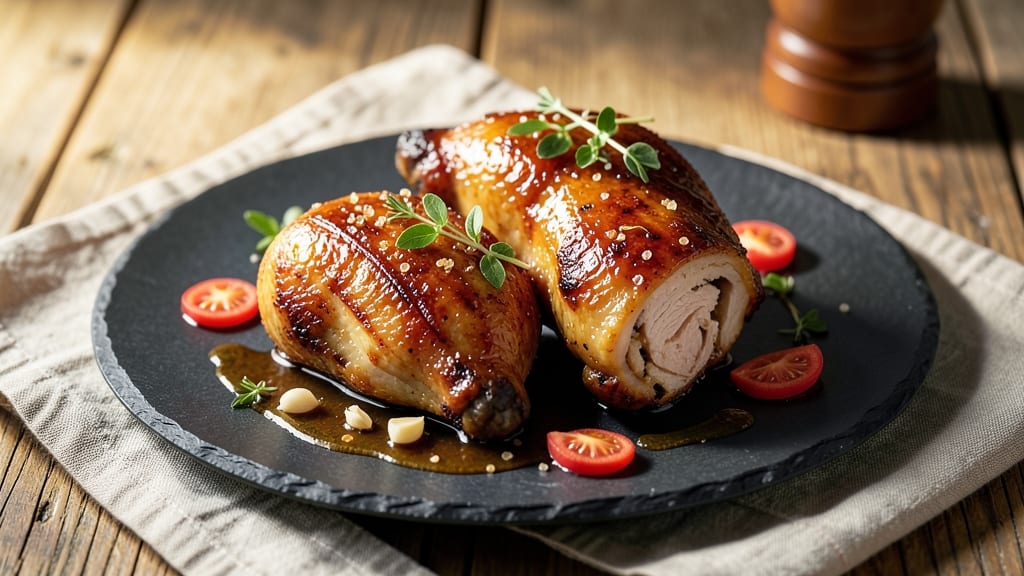
This baked sticky chicken recipe delivers juicy, honey-glazed perfection with a caramelized crust that clings to every bite. The secret lies in a balanced glaze of honey, soy sauce, and spices that creates that signature sticky texture while keeping the meat tender inside.
After testing countless variations, I've perfected a method that requires minimal effort but yields restaurant-quality results every time.
The beauty of this recipe is its versatility—you can adjust the sweetness to your taste or add a touch of heat with chili flakes. We start with chicken thighs, which stay juicy even after baking, then coat them in a sticky glaze that caramelizes beautifully in the oven.
The result is crispy edges with a tender, flavorful interior that practically falls apart.
What makes this dish truly special is how the glaze transforms ordinary chicken into something extraordinary. The honey provides natural sweetness, while the soy sauce adds depth and umami.
Together, they create a glossy, caramelized coating that's both visually stunning and irresistibly flavorful. This recipe is perfect for weeknight dinners or special occasions when you want to impress.
The best part? It comes together in just 45 minutes with minimal hands-on time. Whether you're serving it as a main course or adding it to a meal prep plan, this sticky chicken will become a go-to recipe.
Let's get started on creating a dish that's as delicious as it is foolproof.
Ingredients for baked sticky chicken
Honey, soy sauce, and spices transform simple chicken thighs into restaurant-worthy sticky perfection.
| Ingredient | Amount | Notes |
|---|---|---|
| Chicken Thighs (Bone-In, Skin-On) 🍗 | 1 ½ lb | Trimmed of excess fat |
| Honey 🍯 | ½ cup | Pure, light or dark |
| Soy Sauce 🍶 | ⅓ cup | Low-sodium preferred |
| Brown Sugar 🍚 | ¼ cup | Packed, light or dark |
| Garlic Cloves 🧄 | 4 cloves | Minced for glaze |
| Fresh Ginger 🌿 | 1 tbsp | Grated, fresh preferred |
| Sesame Oil 🫒 | 1 tbsp | Toasted sesame oil |
| Rice Vinegar 🍶 | 1 tbsp | White or seasoned |
| Ground Black Pepper 🌶️ | ½ tsp | Freshly cracked |
| Salt 🧂 | 1 ½ tsp | Kosher or sea salt |
| Cornstarch 🌾 | 1 tbsp | For crispy coating |
| Vegetable Oil 🫒 | 1 tbsp | For greasing pan |
| Red Chili Flakes 🔥 | ½ tsp | Optional for heat |
| Fresh Green Onions 🧅 | 2 whole | Sliced, for garnish |
The chicken thighs are the star—bone-in, skin-on keeps them juicy while the skin crisps beautifully. Trader Joe's and Costco often sell them pre-trimmed, but if you're cutting your own, leave about 1/4-inch of fat for flavor. Look for thighs with a vibrant pink color and firm texture—avoid any with grayish spots or slimy skin. I always grab extra because they're perfect for meal prep too. The glaze works best with thighs around 8-10 oz each, so adjust accordingly if yours are smaller or larger.
No honey? Maple syrup works in a pinch—just reduce the soy sauce by a tablespoon since it's sweeter. Low-sodium soy sauce is ideal, but regular works if you reduce the salt slightly. Fresh ginger is non-negotiable here—dried lacks the zing, but if you must, use half the amount. The cornstarch is key for that crispy coating; if you don't have any, all-purpose flour works too. For extra depth, toast the sesame oil in a dry pan for 30 seconds before adding it to the glaze—trust me, it makes a difference. The chili flakes are optional but add that perfect kick that balances the sweetness.
This glaze keeps for 1 week in the fridge, so make extra—it's amazing on rice or noodles too. The chicken reheats beautifully; just cover with foil and warm in the oven for 10 minutes. For make-ahead prep, bake the chicken, let it cool, then store with the glaze separately. Reheat in a skillet with a splash of water to restore that sticky goodness. The glaze thickens as it cools, so thin with a splash of water if needed before serving.
Why You'll Love This Recipe
- One-Pan Magic: I swear by this recipe when I’m too tired to wash dishes. Just toss the thighs, sauce, and garlic on a sheet pan—no bowls, no mess—and let the oven do the work. That sticky glaze? It caramelizes right on the skin, so you’re left with golden, crispy edges that practically fall off the bone.
- Sweet-Savory Balance: The honey and brown sugar give it this irresistible caramelized crust, while the soy sauce cuts through the richness with that perfect umami punch. Honestly, the first time I tasted it, I thought, “Why haven’t I been making this all along?” The garlic? It’s the little flavor bomb that makes every bite sing.
- Weeknight & Meal Prep Hero: Between us, this is my go-to for busy nights—feed a crowd or just yourself, it works. And here’s the kicker: the leftovers reheat like a dream, whether you’re packing lunches or saving seconds for tomorrow. (Yes, even on a Tuesday night.)
- Budget-Friendly Crowd-Pleaser: Bone-in, skin-on thighs stretch further than breasts, and the ingredients? Pantry staples. I’ve served this to picky eaters, date nights, and even my mom’s book club—no one ever complains. Not the prettiest dish, but the taste makes up for it every time.
Step-by-step instructions for honey-glazed baked chicken
Here's how to achieve that perfect balance of crispy skin and juicy meat with a sticky-sweet glaze.
Prep the Chicken and Make the Glaze
First, trim any excess fat from the 1.5 lb chicken thighs, leaving about ¼ inch of fat cap for flavor. Pat them completely dry with paper towels - this is crucial for crispy skin. Season both sides generously with the 1.5 tsp salt and 0.5 tsp ground black pepper, pressing the seasoning into the meat.
In a small bowl, whisk together the 0.5 cup honey, 0.33 cup soy sauce, 0.25 cup packed brown sugar, minced 4 cloves garlic, and grated 1 tbsp fresh ginger until the brown sugar dissolves completely. This glaze should be smooth and slightly thick - if it's too runny, add 1 tsp cornstarch mixed with 1 tsp water to thicken it slightly.
Coat and Rest the Chicken
Place the seasoned chicken thighs in a bowl and pour the glaze mixture over them, turning to coat evenly. Let them sit for 15 minutes at room temperature - this allows the seasoning to penetrate and the glaze to adhere better. While they rest, preheat your oven to 375°F and line a baking sheet with parchment paper.
Here's a pro tip: I like to brush the chicken with 1 tbsp sesame oil after adding the glaze. This creates an extra crispy texture on the skin while keeping the meat juicy inside. Just be gentle when brushing so you don't tear the skin.
Bake Until Golden and Glossy
Arrange the chicken thighs on the prepared baking sheet, skin-side up. Bake for 25 minutes, then flip each piece and brush with any remaining glaze in the pan. Return to the oven for another 20-25 minutes until the skin is deep golden brown and the internal temperature reaches 175°F in the thickest part of the thigh.
You'll know it's ready when the skin looks crispy and the glaze has thickened to a glossy consistency. The chicken should pull away from the bone slightly when you gently press it. If the glaze starts to burn before the chicken is done, tent loosely with foil for the last 10 minutes of cooking.
Create the Crispy Cornstarch Coating
While the chicken bakes, mix the 1 tbsp cornstarch with 1 tbsp vegetable oil in a small bowl. Once the chicken is done, transfer it to a wire rack set over a plate. Brush the cornstarch-oil mixture all over the chicken, focusing on the skin side. This creates that irresistible crispy texture.
Let the chicken rest for 5 minutes before serving. The cornstarch coating will crisp up during this time, creating that satisfying crunch with every bite. This resting period also lets the juices redistribute, keeping the meat wonderfully moist despite the crispy exterior.
Finish with Glaze and Garnish
Return the chicken to the baking sheet and drizzle any remaining pan juices over the top. Broil for 1-2 minutes until the glaze bubbles and becomes even glossier. Watch closely to prevent burning. Remove from the oven and let cool for 2 minutes before serving.
Garnish with sliced 2 whole fresh green onions and a sprinkle of 0.5 tsp red chili flakes if you like some heat. The finished dish should have perfectly crispy skin that gives way to juicy, flavorful meat with a sticky-sweet glaze that clings to every bite. Serve immediately with steamed rice and roasted vegetables for a complete meal.
Pro Tips For Making Baked Sticky Chicken
- CRANK THE OVEN HIGH FIRST: Start your chicken skin-side down on a cold baking sheet, then blast it at 450°F (230°C) for the first 10 minutes. I learned this the hard way—skipping the high heat means sad, soggy skin instead of crispy, caramelized armor that holds the sticky glaze.
- MINCE THAT GARLIC FINE: Don’t just chop those cloves—smash them with the flat of your knife first, then mince into a paste. This releases more flavor into the honey-soy mix, and trust me, your chicken will taste like it’s been simmering for hours instead of 45 minutes.
- DON’T OVERMIX THE GLAZE: Stir the honey, soy sauce, brown sugar, and garlic together just until combined—lumps are fine. Overworking it turns the glaze into a thin, runny syrup that’ll pool at the bottom instead of clinging to the chicken like it’s supposed to.
- REST UNDER FOIL AFTER BASTING: Once you’ve basted the chicken with that sticky goodness, tent it loosely with foil for the last 10 minutes of cooking. This traps steam and keeps the meat juicy while letting the glaze thicken into something glossy and caramelized—not sticky in the gross way.
Storing and reheating this dish
Refrigerator Storage
Let your sticky chicken cool completely before storing—this prevents condensation that can make the glaze soggy. Transfer to an airtight container with a tight lid and refrigerate for up to 4 days.
The glaze will thicken slightly, so add 1-2 teaspoons of water when reheating to restore its sticky consistency. 🌡️
Freezer Prep Tips
For longer storage, freeze the chicken with the glaze in single-serving portions using quart-sized freezer bags. Press out excess air to prevent freezer burn, and store for up to 3 months. Thaw overnight in the fridge before reheating—never microwave from frozen, as this can make the skin rubbery.
Oven Reheating Method
Preheat your oven to 350°F and place the chicken on a baking sheet lined with parchment paper. Cover loosely with foil and heat for 15-20 minutes until the internal temperature reaches 165°F. The foil traps moisture, keeping the meat juicy while the glaze reheats evenly. 🔥
Skillet Crisp Finish
For extra crispiness, transfer the chicken to a nonstick skillet over medium heat after reheating in the oven. Add 1 tablespoon of water or broth and cover for 2-3 minutes to steam, then uncover and cook for 1 more minute to crisp the glaze. This restores that restaurant-quality texture!
Microwave Shortcut
If you're in a hurry, cover the chicken with a damp paper towel and microwave on 50% power for 1-2 minutes. Stir the glaze with a splash of water to loosen it, then microwave for 30-second intervals until heated through.
The texture won’t be as crisp, but it’s a great option for quick meals.
Glaze Refresh Trick
If the glaze looks dry after reheating, brush the chicken with a mix of 1 tablespoon honey and 1 teaspoon soy sauce before serving. This revives the sticky texture and adds a fresh burst of flavor.
Perfect for meal prep when you want to serve it looking (and tasting) like it was just baked! ✨
Nutrition facts
Frequently asked questions
Can I use chicken breasts instead of thighs for this sticky chicken?
Chicken breasts work, but they'll be drier than thighs since they have less fat and connective tissue. If using breasts, marinate them for 30 minutes in the glaze and bake at 350°F for 20-25 minutes total. For extra juiciness, pound them to an even thickness (½-inch) before baking.
What makes the glaze extra sticky compared to regular baked chicken?
The magic comes from the honey-brown sugar combo, which caramelizes beautifully in the oven. The cornstarch coating creates that crispy texture that contrasts with the sticky glaze. The key is baking at 375°F until the glaze thickens—this creates that signature glossy, clinging texture that makes every bite irresistible.
How do I fix undercooked chicken without drying it out?
If your chicken reaches 165°F internally but feels dry, place it on a baking sheet with 2 tablespoons of water or broth and cover with foil. Bake at 325°F for 5-10 minutes—this steams the meat gently without overcooking it. The glaze will stay sticky while the chicken reabsorbs moisture.
Can I make this recipe in an air fryer?
Yes! Preheat your air fryer to 375°F and spray the basket lightly with oil. Cook the chicken for 12 minutes, flip, then air fry for another 8-10 minutes until the skin is crispy. For extra stickiness, brush with glaze halfway through. The air fryer creates a similar crispy texture but cooks faster than the oven.
What's the best way to serve this sticky chicken?
This dish shines with steamed jasmine rice to soak up the glaze, or try it over coconut rice for a tropical twist. For a complete meal, add roasted broccoli or stir-fried bok choy. The sticky glaze also works perfectly as a dipping sauce for rice bowls or noodles!