
Main Courses
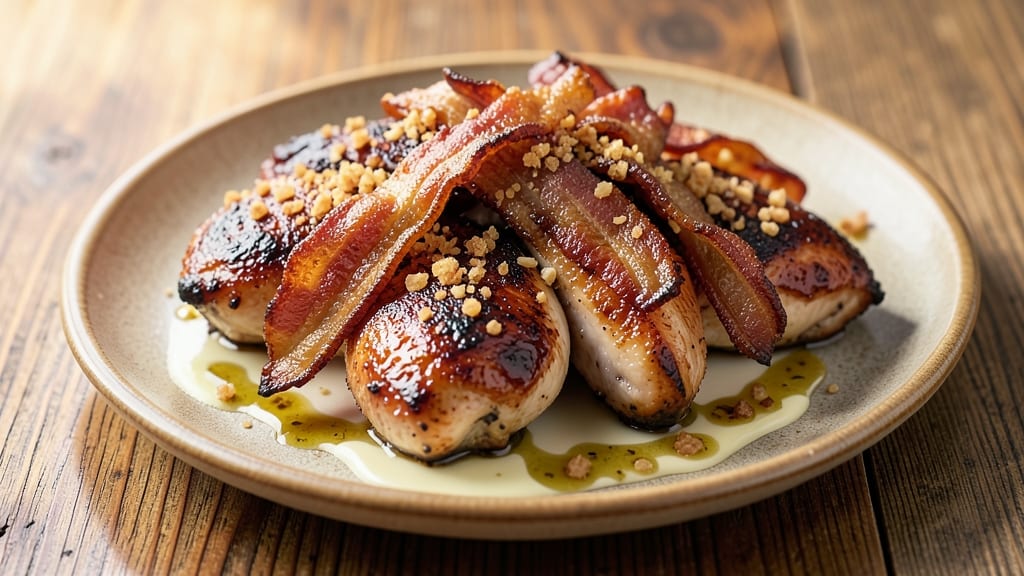
This bacon brown sugar garlic chicken recipe delivers a perfect balance of sweet, smoky, and savory flavors that’ll have everyone asking for seconds. The secret lies in a rich glaze that caramelizes into sticky, irresistible perfection—just like your favorite restaurant dish, but made at home.
With crispy bacon bits, aromatic garlic, and the perfect touch of brown sugar, every bite is a flavor explosion.
What makes this recipe stand out is the two-step cooking process: first, searing the chicken to lock in juices, then basting with the glaze until it’s glossy and caramelized. The bacon adds smoky depth, while the garlic and brown sugar create a sweet-savory contrast that’s impossible to resist.
It’s a foolproof method that works for pan-searing, baking, or even grilling—so you can adapt it to your preferred cooking style.
The result is tender, golden-brown chicken with a glaze that’s both sticky and slightly crispy at the edges.
The aroma alone will have your kitchen smelling like a cozy dinner party, and the flavors are rich enough to stand alone or pair beautifully with mashed potatoes, roasted vegetables, or crusty bread. This dish is perfect for weeknight dinners or special occasions—it’s always a crowd-pleaser.
Ready in about 45 minutes, this recipe is simple enough for a weeknight but impressive enough for guests. The best part? The glaze can be made ahead, so you can focus on cooking without stress. Let’s get started—your taste buds will thank you!
Ingredients for bacon brown sugar garlic chicken
Sweet, smoky, and sticky—these ingredients transform simple chicken into restaurant-worthy perfection.
| Ingredient | Amount | Notes |
|---|---|---|
| Boneless, Skinless Chicken Thighs 🍗 | 1 ½ lb | Cut into even-sized pieces |
| Thick-Cut Bacon 🥓 | 6 oz | Cut into 1/2-inch pieces |
| Light Brown Sugar 🍚 | ½ cup | Packed for accurate measure |
| Garlic Cloves 🧄 | 6 cloves | Minced for glaze |
| Extra-Virgin Olive Oil 🫒 | 2 tbsp | For searing chicken |
| Unsalted Butter 🧈 | 2 tbsp | Full-fat for richness |
| Dijon Mustard 🍯 | 1 tbsp | For glaze depth |
| Balsamic Vinegar 🍶 | 1 tbsp | For tangy balance |
| Kosher Salt 🧂 | 1 ½ tsp | For seasoning |
| Ground Black Pepper 🌶️ | ½ tsp | Freshly cracked |
| Fresh Rosemary 🌿 | ¼ tsp | Chopped, for garnish |
| Fresh Parsley 🌿 | ¼ tsp | Chopped, for garnish |
The bacon is non-negotiable here—thick-cut gives the best crunch and flavor. I always grab Applewood-smoked bacon from the deli counter at Whole Foods or Costco when I'm making a big batch. If you can't find it, regular thick-cut works fine, just cut it a little smaller. The brown sugar? Light or dark doesn't matter, but pack it firmly into your measuring cup for that perfect caramelization. For the chicken, thighs stay juicier than breasts—trust me on this. Cut them into even-sized pieces so they cook at the same rate. Fresh rosemary and parsley? Worth the extra minute to chop—they add that bright finish that makes the dish pop.
No thick-cut bacon? Regular bacon cut into smaller pieces works, but it'll be less crispy. Running low on brown sugar? White sugar plus 1/4 tsp cinnamon gets you close. The Dijon mustard adds depth, but yellow mustard in a pinch still works. Fresh garlic is ideal, but garlic powder at half the amount is better than skipping it. The glaze can be made ahead—just store it in the fridge and reheat gently before using. And if you're feeling fancy, swap the balsamic vinegar for red wine vinegar—same tang, different vibe.
This glaze reheats beautifully—just warm it gently in a small saucepan. The chicken itself keeps 3-4 days in the fridge, and the glaze can be stored separately for up to 1 week. I usually make extra glaze because it's perfect for drizzling over roasted veggies or even toasted bread. Freeze the glaze in ice cube trays for single-use portions—game-changer for quick meals. And if you're prepping ahead, cook the chicken completely, then reheat it gently with a splash of water to keep it moist. The aromas alone will have your kitchen smelling like a cozy dinner party.
Why You'll Love This Recipe
- One-Pan Magic: I swear by this recipe—just toss everything on a sheet pan, and walk away. The bacon renders its fat, the chicken gets sticky-sweet, and the garlic infuses everything without a single pot to wash.
- Sweet & Smoky Bomb: That caramelized brown sugar crust on the chicken? Chef’s kiss. The bacon adds salty depth, while the garlic keeps it bright—it’s like a hug in bite form, but way more delicious.
- Game for Any Night: Need a quick weeknight dinner? Done. Hosting a crowd? Double the recipe. Even my picky teen devours this—it’s that universally loved. Serve it with mashed potatoes or over greens, and you’re golden.
- Budget-Friendly Feast: Chicken thighs and bacon stretch this into a full meal without breaking the bank. Plus, leftovers reheat like a dream—crispy edges stay crispy, and the flavors only get better the next day.
Step-by-step instructions for bacon brown sugar garlic chicken
This recipe delivers irresistible caramelized glaze and crispy bacon—let's make it happen.
Sear the Chicken for Maximum Flavor
Heat a large skillet over medium-high heat and add 2 tablespoons extra-virgin olive oil. Once shimmering, add the 1.5 lb boneless, skinless chicken thighs (cut into even-sized pieces) and sear for 4-5 minutes per side until golden brown. You'll see the edges develop a beautiful crust—that's your signal the chicken is ready for the next step.
Remove the chicken from the skillet and set aside on a plate. Here's the thing—don't crowd the pan. Giving each piece space ensures even browning and prevents steaming, which keeps the meat juicy. The seared crust will lock in all those savory flavors we're about to amplify with our glaze.
Cook the Bacon Until Crispy
In the same skillet (no need to clean it—those browned bits are flavor gold), add the 6 oz thick-cut bacon cut into ½-inch pieces. Cook over medium heat for 8-10 minutes, stirring occasionally, until the bacon is deep golden brown and crispy. You want to render out as much fat as possible—this will form the base of our incredible glaze.
Use a slotted spoon to remove the bacon and drain it on paper towels, leaving behind all that delicious rendered fat in the skillet. If you're worried about too much fat, pour off all but 2 tablespoons—just enough to create that rich, glossy glaze we're after. This bacon fat is the secret weapon that makes our glaze sing.
Make the Sweet-Savory Glaze
Reduce the heat to medium-low and add the ½ cup packed light brown sugar, 6 minced garlic cloves, 2 tablespoons unsalted butter, 1 tablespoon Dijon mustard, and 1 tablespoon balsamic vinegar to the skillet. Stir constantly for 3-4 minutes until the sugar melts and the mixture begins to bubble and thicken.
Here's where the magic happens: the sugar will caramelize, creating that beautiful sticky glaze we all love. You'll see it transform from a liquid to a thick, glossy syrup—this is your reward for paying attention. If the mixture starts to brown too quickly, reduce the heat slightly to prevent burning. The aroma will fill your kitchen—trust me, it's worth it.
Glaze the Chicken and Finish Cooking
Return the seared chicken to the skillet and spoon the caramelized glaze evenly over each piece. Add 1.5 teaspoons kosher salt and ½ teaspoon freshly cracked black pepper, then increase the heat to medium-high. Cook for 4-5 minutes, turning occasionally, until the chicken reaches an internal temperature of 165°F and the glaze is thick and sticky.
You'll know it's perfect when the glaze coats the chicken completely, forming those beautiful caramelized strands. The chicken should be juicy and tender, with a crispy edge where the glaze has set. This is the moment that matters—don't rush it. The combination of sweet, smoky, and savory flavors will make your taste buds dance.
Garnish and Serve with Confidence
Transfer the chicken to a serving platter and sprinkle with ¼ teaspoon chopped fresh rosemary and ¼ teaspoon chopped fresh parsley. The herbs add a bright, fresh contrast to the rich, caramelized flavors. Serve immediately with the crispy bacon scattered on top—those crunchy bits add the perfect textural element.
Each bite should deliver juicy chicken, crispy bacon, and that irresistible sticky glaze that clings to every strand. This dish tastes even better the next day, so if you have leftovers, store them in the fridge and reheat gently in the oven to maintain that perfect texture. You've just created a showstopping centerpiece that will have everyone asking for seconds!
Pro Tips For Making Bacon Brown Sugar Garlic Chicken
- Cook Bacon First: Start with the bacon—no exceptions. Rendering the fat first gives you flavor gold for searing the chicken, and it keeps your pan from becoming a greasy mess when you add the thighs. I used to skip this, and the chicken always tasted underwhelming until I realized the bacon’s fat is the real star here.
- Pat Thighs Dry: Grab paper towels and dry those chicken thighs like you’re polishing silver. Moisture = steam = soggy crust. The thighs will sear better, and the brown sugar will caramelize into a proper glaze instead of turning to mush. I learned this the hard way after a batch came out bland and sticky.
- Smash Garlic Cloves: Skip the mincer—crush those garlic cloves with the flat side of your knife first. It releases more flavor and blends into the brown sugar better, giving you a smoother, deeper taste. My grandmother swore by this, and she was right: the difference is noticeable, even if it’s just a 30-second extra step.
- Rest Chicken Under Foil: Pull the chicken off the heat and tent it with foil for 5 minutes before serving. This lets the juices redistribute so your first bite isn’t a dry surprise. I know, I know—it’s tempting to serve it straight off the pan, but trust me, your fork will thank you.
Pro cooking tips for perfect results
Perfect Sear Technique
Start by heating your skillet over medium-high heat until it's smoking hot—this ensures a proper sear. Add the chicken pieces with enough space between them to prevent steaming, which keeps the meat juicy.
I always use a 12-inch cast iron skillet from Lodge for even heat distribution. Sear each side for exactly 4-5 minutes until golden brown—this creates the perfect crust to lock in flavors. 🔥
Bacon Fat Magic
Never pour out all the bacon fat! Leave about 2 tablespoons in the skillet after removing the crispy bacon—this fat is the base of our glaze. If you're worried about excess fat, pour off all but what you need.
The rendered bacon fat adds incredible depth to the glaze, making it rich and flavorful. Trust me, this step is non-negotiable for that restaurant-quality taste. ⚡
Caramelization Control
When making the glaze, stir constantly over medium-low heat to prevent burning. The sugar should melt and bubble before thickening into a glossy syrup. If it starts to brown too quickly, reduce the heat immediately.
I like to use a wooden spoon for stirring—it won’t scratch the pan. This step is all about patience; rushing will turn your glaze bitter instead of sweet. 💫
Glaze Application
Return the chicken to the skillet and spoon the caramelized glaze evenly over each piece. Cook for 4-5 minutes on medium-high heat, turning occasionally, until the glaze thickens and becomes sticky.
The key here is to let the glaze coat the chicken completely—this ensures every bite is packed with flavor. Don’t skip this step; it’s what makes this dish irresistible. 💪
Resting and Serving
Let the chicken rest for 3-5 minutes before serving—this allows the juices to redistribute, keeping the meat tender. Garnish with fresh rosemary and parsley for a bright finish.
Serve immediately with the crispy bacon scattered on top. The contrast of textures and flavors is what makes this dish a showstopper. 🌟
Nutrition facts
Frequently asked questions
Can I use chicken breasts instead of thighs?
You can try, but thighs are ideal for this recipe. Chicken breasts cook faster and tend to dry out when exposed to high heat for the glaze. If you must use breasts, cut them 1/4-inch thick and cook them for only 3-4 minutes per side before adding the glaze. They'll need about 2 minutes less total cooking time than thighs to reach 165°F. For best results, marinate them for 30 minutes first in a mix of olive oil, garlic, salt, and pepper.
How do I adjust the recipe for a crowd?
Double or triple the ingredients, but use a 14-inch cast iron skillet or divide the cooking between two 12-inch pans to maintain even browning. For large batches, cook the bacon in batches if needed, but keep the rendered fat in the pan for the glaze. Increase cooking time by 2-3 minutes per side for thicker cuts. The glaze can be made ahead in larger quantities and reheated gently—just add 1 tablespoon water per 2 cups of glaze to prevent burning.
What if my glaze isn't caramelizing properly?
If your glaze isn't thickening, you may need to reduce the heat further or cook it longer. The sugar needs time to break down and form syrup—this can take 5-7 minutes of constant stirring over medium-low heat. If it's burning, pour off excess fat and reduce heat to low. For extra richness, add 1 tablespoon honey or 1 teaspoon corn syrup to help the caramelization process. Patience is key here—rushing will make it bitter.
Can I make this recipe in the oven?
Preheat your oven to 375°F. Sear the chicken and cook the bacon as directed, but transfer everything to a baking dish instead of finishing in the skillet. Pour the glaze over the chicken and bake for 15-20 minutes, basting with pan juices every 5 minutes until the chicken reaches 165°F and the glaze is sticky. The oven method works well for larger batches or when you want hands-off cooking.
What are the best sides for this dish?
This rich, sweet-savory chicken pairs perfectly with creamy sides to balance the flavors. Try garlic mashed potatoes, roasted Brussels sprouts with bacon, or buttery corn on the cob. For a lighter option, a crisp green salad with poppy seed dressing cuts through the richness. The crispy bacon bits on top also make this a great sandwich filling—try it on toasted brioche with arugula and balsamic glaze.