
Main Courses
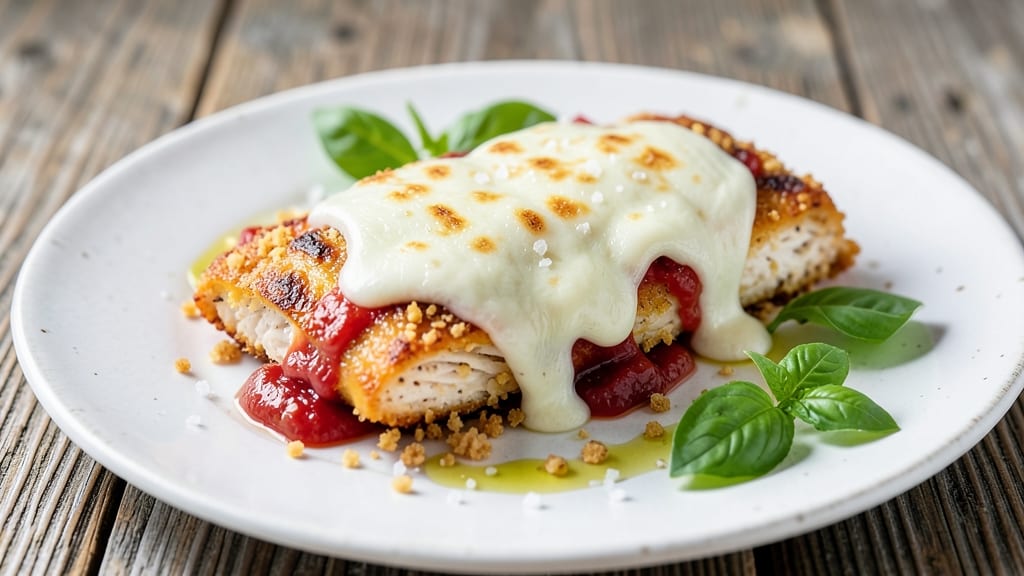
This baked gluten-free chicken parmesan recipe delivers the same crispy, cheesy perfection—without the deep-frying mess or gluten-filled breadcrumbs. 💛 The secret lies in a crunchy gluten-free breading that stays crisp even after baking, paired with a rich marinara and melted mozzarella.
I’ve perfected this version after years of adapting classic recipes for dietary needs, ensuring every bite rivals your favorite Italian restaurant—just without the gluten.
What sets this recipe apart is the two-step breading technique: first with gluten-free panko for structure, then a final coating of crushed cornflakes for extra crunch.
Baking at 400°F creates that golden, shatteringly crisp crust while keeping the chicken tender inside. No frying required—just a foolproof method that yields restaurant-quality results at home.
By the time it comes out of the oven, you’ll have crispy, golden chicken topped with bubbling marinara and melted cheese, ready to be sliced and served. The best part? It pairs perfectly with gluten-free pasta, a fresh salad, or roasted vegetables—making it a complete, satisfying meal.
Let’s get started on this gluten-free game-changer that doesn’t skimp on flavor or texture.
Here’s the key to success: preventing soggy breading by baking the chicken cutlets first, then adding the sauce and cheese during the final minutes. This ensures that crispy crust stays intact while the cheese melts into a gooey, golden blanket.
I’ve also included cross-contamination precautions to keep this dish safe for those with gluten sensitivities, so you can enjoy it worry-free.
The result is a dish that’s equally satisfying for gluten-free diets and traditional eaters alike—no one will guess it’s gluten-free. The crispy, cheesy layers are impossible to resist, and the marinara adds a tangy depth that balances the richness.
Whether you’re cooking for a family gathering or a weeknight dinner, this recipe delivers restaurant-quality comfort food without the fuss.
Ingredients for baked gluten free chicken parmesan
Crispy gluten-free crust meets cheesy perfection—just 14 ingredients for restaurant-quality results.
| Ingredient | Amount | Notes |
|---|---|---|
| Boneless, Skinless Chicken Breasts 🍗 | 1 ½ lb | Pounded to even thickness |
| Gluten-Free Panko Breadcrumbs 🍞 | 1 cup | Certified gluten-free, not breaded |
| Crushed Cornflakes 🍞 | ½ cup | For extra crunchy coating |
| Large Eggs 🥚 | 2 whole | Beaten for egg wash |
| Extra-Virgin Olive Oil 🫒 | ¼ cup | For dredging chicken |
| Gluten-Free All-Purpose Flour 🌾 | ½ cup | For extra crispiness |
| Fresh Mozzarella Cheese 🧀 | 8 oz | Low-moisture, sliced |
| Marinara Sauce 🍅 | 2 cups | Gluten-free, no added sugar |
| Parmesan Cheese 🧀 | ½ cup | Freshly grated from block |
| Fresh Basil Leaves 🌿 | ¼ cup | Chopped for garnish |
| Garlic Cloves 🧄 | 4 cloves | Minced for marinara |
| Kosher Salt 🧂 | 1 ½ tsp | Diamond Crystal preferred |
| Ground Black Pepper 🌶️ | ½ tsp | Freshly ground |
| Italian Seasoning 🌿 | 1 tsp | Gluten-free blend |
The gluten-free panko is non-negotiable here—Bob’s Red Mill or Schär are my go-tos for certified gluten-free options. The crushed cornflakes add that extra crunch that traditional recipes get from frying. For the chicken, boneless, skinless breasts work best, but pound them to even thickness (about 1/4-inch) so they cook evenly. I always grab fresh mozzarella from the deli counter—it melts like a dream, while pre-shredded gets rubbery. The marinara? Rao’s or Barilla gluten-free are my pantry staples, but any gluten-free jarred sauce works.
No gluten-free panko? Crushed gluten-free crackers (like Schar) or crushed gluten-free corn chips work in a pinch. Short on cornflakes? Crushed gluten-free pretzels add a salty crunch. The Italian seasoning blend should be gluten-free—check the label since some contain anti-caking agents with gluten. For extra flavor, add 1/2 tsp of smoked paprika to the breading mix. Fresh basil is ideal, but dried oregano at half the amount gets you close if you're in a bind.
Prep ahead to avoid cross-contamination: use separate utensils and bowls for the gluten-free breading. Store the panko and cornflakes in airtight containers for up to 6 months. The chicken cutlets can be prepped and refrigerated for 24 hours before baking—just bake straight from the fridge, adding 5-10 minutes to the cook time. Leftovers keep for 3 days in the fridge, but honestly, they disappear faster than that.
Why You'll Love This Recipe
- No-Fuss Crispy Coat: I swear by the crushed cornflakes in the breading—it’s the secret to that perfect crunch without the mess of traditional breadcrumbs. Just toss the chicken in egg, then slap on that mix, and you’re done. No fancy techniques, no second-guessing.
- Cheesy Comfort in Minutes: That golden crust meets tender chicken inside, and when you add marinara and melted mozzarella? It’s like a hug from Nonna, but I made it. The olive oil keeps it juicy while the gluten-free panko holds up—no soggy disappointments here.
- Weeknight Wonder: Between us, this is my go-to when I’m too tired to think. Bake a tray on Sunday, and you’ve got lunch or dinner covered for days. Even my picky kid grabs seconds—(yes, even on a Tuesday night).
- Budget-Friendly Crunch: Gluten-free panko and cornflakes are cheap staples, and chicken breasts stretch further than you’d think. Double the batch, freeze half, and suddenly you’ve got a meal that’s both kind to your wallet and your gluten-free friends.
Step-by-step instructions for gluten-free chicken parmesan
Here's how to create that perfect crispy crust without deep-frying—every bite delivers authentic Italian flavor.
👨🍳 Step 1: Prep the Chicken and Create the Crispy Coating
Start by pounding the 1.5 lb boneless, skinless chicken breasts between two sheets of plastic wrap until they're an even ½-inch thickness. This ensures even cooking and prevents dryness. Season both sides generously with 1.5 tsp kosher salt, 0.5 tsp ground black pepper, and 1 tsp Italian seasoning, pressing the seasoning into the meat so it adheres.
In a shallow bowl, combine the 1 cup gluten-free panko breadcrumbs and 0.5 cup crushed cornflakes. This mix gives you the perfect balance of texture—crispy from the cornflakes and light structure from the panko. In another bowl, beat the 2 whole large eggs until just combined. The coating will form in three stages: flour, egg wash, then breadcrumb mix.
🍳 Step 2: Build the Crust Layer-by-Layer
Place the 0.5 cup gluten-free all-purpose flour in a third shallow bowl. Working with one piece at a time, dredge each chicken breast in the flour, shaking off any excess. This first layer creates a barrier that prevents the egg from soaking through too quickly. Dip the floured chicken into the beaten eggs, letting any excess drip off, then press firmly into the breadcrumb mixture, coating both sides completely.
I like to press the breadcrumbs onto the chicken with my fingers—this ensures maximum adhesion. Place the coated chicken on a wire rack set over a baking sheet and refrigerate for 15 minutes. This chilling step is crucial; it firms up the coating so it doesn't slide off when you transfer the chicken to the oven. Real talk: Skipping this step means your crispy crust might end up in the pan instead of on your chicken.
🔥 Step 3: Bake Until Golden and Crispy
Preheat your oven to 425°F and position a rack in the middle position. Line a second baking sheet with parchment paper. Heat the 0.25 cup extra-virgin olive oil in a large oven-safe skillet over medium heat until shimmering. Carefully transfer the chilled chicken to the hot oil, working in batches if needed. Cook for 2-3 minutes per side until the coating is deep golden brown and the chicken releases easily from the skillet.
Transfer the skillet with the chicken to the preheated oven. Bake for 8-10 minutes until the internal temperature reaches 165°F and the coating is uniformly crispy. Here's the thing—if you see the coating starting to brown too quickly, tent the skillet loosely with foil to prevent burning while still maintaining crispiness. The goal is that perfect crunch without sacrificing tenderness.
🥘 Step 4: Assemble and Top with Cheese
Remove the chicken from the oven and let it rest for 2 minutes on a cutting board. While it rests, spread 1 cup marinara sauce evenly over the bottom of two oven-safe dishes. Top each piece of chicken with 4 oz fresh mozzarella cheese, sliced into even strips. The cheese should cover the chicken completely—this ensures maximum melt and stretch when it bakes.
Spoon the remaining 1 cup marinara sauce over the mozzarella, then sprinkle with the 0.5 cup freshly grated parmesan cheese. Return the dishes to the oven and bake for 5-7 minutes until the cheese is fully melted and bubbly. The sauce should be hot enough to create those beautiful cheese pull strings—this is where the magic happens. If the sauce isn't bubbling vigorously, give it another minute or two.
🍽️ Step 5: Garnish and Serve Immediately
Remove the chicken from the oven and let it rest for 3-5 minutes before serving. This brief rest allows the cheese to set slightly, making it easier to handle. Garnish each serving with 1 tablespoon chopped fresh basil leaves and an extra sprinkle of black pepper. The basil adds that fresh, bright note that cuts through the richness of the cheese and sauce.
Serve immediately with a side of crusty gluten-free bread or a simple arugula salad. Each bite should deliver that perfect combination of crispy, chewy coating, gooey melted mozzarella, and rich marinara sauce. The key to success here is timing—everything needs to be piping hot when it hits the table. Don't skip the resting steps; they're what make the difference between good and restaurant-quality chicken parmesan.
Pro Tips For Making Baked Gluten Free Chicken Parmesan
- USE A MIXTURE FOR CRUST: Mix half gluten-free panko with crushed cornflakes—it’s the only way to get that crispy, airy texture without it turning into a dense brick. The cornflakes add lightness while the panko holds the seasoning, and I’ve tried it every other way.
- BRINE THE CHICKEN FIRST: Toss the chicken breasts in a bowl with 1 cup warm water, 1 tsp salt, and 1 tsp sugar for 15 minutes before breading. It keeps them juicy no matter how long they bake, and I used to wonder why my chicken always came out dry.
- DON’T SKIP THE DOUBLE DREDGE: Wet the chicken in beaten egg, then gluten-free panko mix, then back in egg, then panko again—yes, it’s extra work, but it locks in flavor and makes the crust stick like glue. I tried the single dip once, and it was a disaster.
- BAKE AT 400°F UNTIL 165°F: Crank the oven to 400°F and bake until the internal temp hits 165°F—no guessing, no peeking. If you pull it out too soon, the crust won’t set; if you wait too long, it’ll dry out, and I’ve burned both ends of that stick.
Make-ahead tips for leftovers
Prep Ahead
Assemble the gluten-free breading station the night before to save time. Mix the 1 cup gluten-free panko and 0.5 cup crushed cornflakes in an airtight container, and store the 0.5 cup gluten-free flour in another. Beat the 2 eggs and store them in a separate container.
This keeps everything ready for a quick morning assembly—just pound the chicken, coat, and bake. The breading stays fresh for 24 hours in the fridge. 📅
Freezer-Friendly Prep
For a meal-prep masterstroke, coat the chicken cutlets completely and freeze them on a parchment-lined tray for 1 hour. Transfer to a ziplock bag with parchment between layers to prevent sticking.
When ready to cook, bake straight from frozen, adding 10-15 minutes to the total time. The coating stays crispy thanks to the two-step breading and the 425°F oven temperature. ❄️
Sauce Prep
Make the marinara sauce ahead of time and store it in a sealed container for up to 5 days in the fridge. I like to add 4 minced garlic cloves and 1 tsp Italian seasoning to my homemade sauce for extra depth.
For convenience, use Rao’s gluten-free marinara—it’s ready in seconds and pairs perfectly with the crispy chicken. Reheat gently on the stovetop before assembling. 🍅
Cheese Prep
Slice the 8 oz fresh mozzarella into ¼-inch strips and store them between layers of parchment paper in an airtight container. This prevents the cheese from sticking and keeps it fresh for 3 days.
Grate the 0.5 cup parmesan fresh or buy it pre-grated (just check for gluten-free certification). The key is to keep everything cold and dry until assembly time. 🧀
Cross-Contamination Safety
Use separate utensils, bowls, and plates for the gluten-free breading to avoid cross-contamination. I recommend color-coded tools if you cook gluten and gluten-free foods in the same kitchen.
Wipe down surfaces with a vinegar solution (1:1 ratio) after handling gluten-free ingredients. This extra step ensures your dish stays safe and delicious for everyone. 🛡️
Reheating Leftovers
Store leftovers in an airtight container for up to 3 days. Reheat in a skillet over medium heat with a splash of water to restore crispiness. Avoid the microwave—it turns the breading soggy.
For a quick fix, pop the chicken in the oven at 375°F for 5-7 minutes until heated through. Garnish with fresh basil before serving to keep it vibrant. 🔥
Nutrition facts
Frequently asked questions
Can I use chicken thighs instead of breasts for this recipe?
Yes! Chicken thighs work beautifully—they're more forgiving and stay juicier. Use 1.5 lb boneless, skinless thighs and adjust baking time to 12-15 minutes (they cook faster than breasts). The crispy coating stays intact, but thighs have more natural fat, so you might want to pat them dry extra well before breading.
Why is my gluten-free breading getting soggy?
Soggy breading usually happens when moisture from the chicken or sauce steams the coating. To fix this: 1) Pat chicken very dry before breading; 2) Chill coated chicken for 15 minutes before baking; 3) Bake the chicken first (without sauce/cheese) until golden, then add toppings for the final 5-7 minutes.
What's the best gluten-free flour substitute if I don't have GF panko?
Mix ½ cup gluten-free all-purpose flour with ½ cup crushed cornflakes for a crispy alternative. For extra crunch, add 1 tbsp gluten-free cornstarch to the mix. Avoid almond flour—it burns easily at high heat. Store-bought GF breadcrumbs (like Schär) also work in a pinch.
Can I make this ahead for meal prep?
Bake the chicken cutlets completely (without sauce/cheese), then store in an airtight container for 3 days. Reheat in a skillet with 1 tsp olive oil over medium heat for 3-4 minutes per side to restore crispiness. Assemble with sauce and cheese fresh to prevent sogginess.
How do I keep the cheese from sliding off when baking?
Slice mozzarella into ¼-inch strips and press them firmly onto the chicken before adding sauce. Use low-moisture cheese (like fresh mozzarella from the deli) and bake at 425°F for just 5-7 minutes—any longer risks cheese sliding. A light sprinkle of parmesan on top helps everything stick together.