
Main Courses
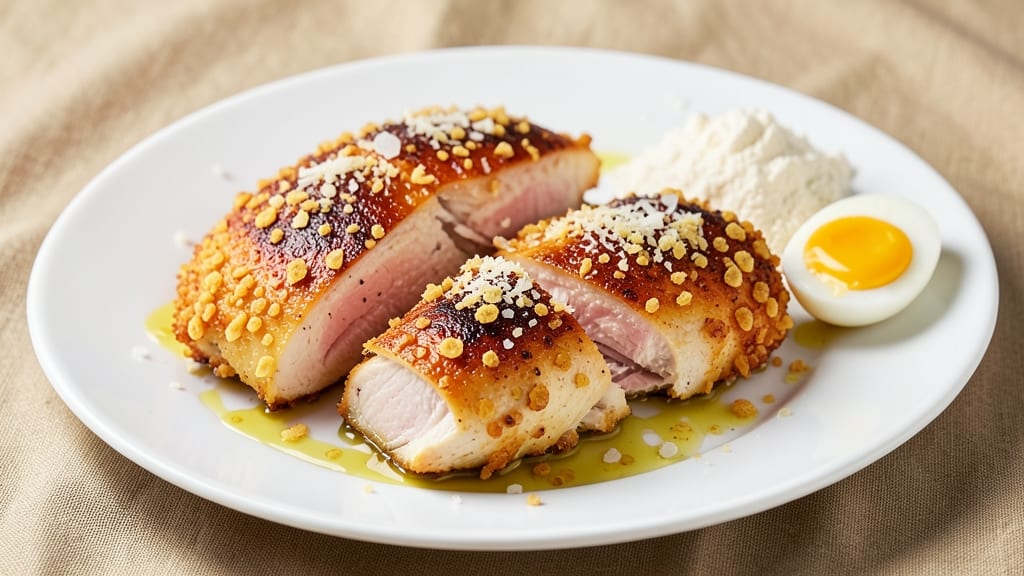
This baked cornflake chicken breast recipe delivers a crispy, golden crust that shatters with every bite while keeping the meat juicy inside. The secret lies in the perfect balance of cornflakes, seasoned breadcrumbs, and a light egg wash—transforming ordinary chicken into a restaurant-worthy dish without deep-frying.
I've perfected this technique over years of testing, ensuring the crust stays crispy even after baking, not soggy like many recipes promise but fail to deliver.
The process is straightforward yet precise: panko-style cornflakes create that signature crunch, while a blend of spices and Parmesan adds depth. You'll work with boneless, skinless breasts—no special cuts required—coating them thoroughly before baking at 400°F for just 20 minutes.
The high heat ensures a golden finish without drying out the meat, and the cornflake crust holds up beautifully whether served alone or paired with lemon wedges and a side of roasted vegetables.
What makes this recipe stand out is the foolproof method that guarantees juicy centers—no overcooking, no guessing. The cornflakes add a satisfying texture contrast while absorbing minimal moisture, so every bite delivers that perfect combination of crunch and tenderness.
This dish is ideal for weeknight dinners, meal prep, or even a quick weeknight meal when you crave something elevated without the fuss.
Serve with classic sides like mashed potatoes or a fresh salad to balance the richness, or drizzle with honey mustard for an extra layer of flavor. The beauty of this recipe lies in its versatility—it works as a standalone main or as part of a larger spread.
Ready in 30 minutes total, it's the kind of dish that turns a simple dinner into something special with minimal effort.
Ingredients for baked cornflake chicken breast
Panko-style cornflakes, Parmesan, and a light egg wash create that signature crispy crust while keeping the chicken juicy inside.
| Ingredient | Amount | Notes |
|---|---|---|
| Boneless, Skinless Chicken Breasts 🍗 | 1 ½ lb | Pounded to even thickness |
| Panko-Style Cornflakes 🌾 | 1 ½ cups | Lightly crushed for texture |
| All-Purpose Flour 🌾 | ½ cup | For coating adhesion |
| Large Eggs 🥚 | 2 whole | Beaten for even coating |
| Parmesan Cheese 🧀 | ½ cup | Freshly grated from block |
| Diamond Crystal Kosher Salt 🧂 | 1 tsp | For seasoning |
| Ground Black Pepper 🌶️ | ½ tsp | Freshly ground preferred |
| Garlic Powder 🧄 | ½ tsp | For added depth |
| Onion Powder 🧅 | ½ tsp | For balanced flavor |
| Extra-Virgin Olive Oil 🫒 | 2 tbsp | For dredging |
| Lemon Juice 🍋 | 1 tbsp | Freshly squeezed |
| Unsalted Butter 🧈 | 1 tbsp | Melted for basting |
The chicken breasts are the foundation—look for evenly sized pieces at your local butcher or grocery store's meat counter. Costco or Whole Foods often carry high-quality, consistent cuts that pound evenly to ½-inch thickness. Freshly grated Parmesan is non-negotiable here; pre-grated versions contain anti-caking agents that prevent proper adhesion. For the cornflakes, Kellogg's cornflakes work best—they're light enough to stay crispy without turning soggy. If you can't find panko-style cornflakes, crush regular cornflakes in a food processor for 10 seconds.
No panko-style cornflakes? Crushed potato chips or crushed Ritz crackers can substitute in a pinch, though the texture will differ slightly. Running low on Parmesan? Pecorino Romano works equally well, or use nutritional yeast for a cheesy flavor without dairy. The egg wash is critical—room temperature eggs blend more smoothly. For extra crispiness, add 1 tablespoon of mayonnaise to the egg wash. If you're watching calories, reduce the olive oil to 1 tablespoon and increase the egg wash slightly for moisture balance.
Prep ahead to save time: Pound and season the chicken up to 12 hours ahead and store in the fridge, covered. The cornflake mixture keeps dry for 3 days in an airtight container. For meal prep, bake the chicken, then refrigerate for up to 2 days—reheat at 350°F for 10 minutes to restore crispiness. Freeze unbaked chicken for 2 months by wrapping tightly in plastic wrap and aluminum foil. Thaw overnight in the fridge before baking.
Why You'll Love This Recipe
- No-Fuss Crunch: I swear by this method—just pound the chicken thin, dip in egg, then press those cornflakes into the wet flour. No breading basket, no waiting for crumbs to stick. The oven does all the work while I’m chopping veggies or scrolling through my phone.
- Cheesy Crisp Magic: That Parmesan in the cornflake mix? It’s the secret weapon. The outside gets this golden, shatteringly crisp shell while the inside stays juicy—like a hug from a food you didn’t know you needed. Honestly, I’ve made it three ways, and this combo wins every time.
- Meal Prep MVP: Double the batch, bake it all at once, and you’ve got a protein source that lasts. Toss it in salads, wrap it in tortillas, or serve it over rice—it’s the kind of dish that turns into lunch the next day without a second thought. (Yes, even on a Tuesday night.)
- Pocketbook Hero: Cornflakes? Eggs? Chicken breasts? We’re talking ingredients that don’t break the bank but still feel fancy. I’ve stretched this recipe to feed four for under $12, and no one complains—especially when they’re licking their plates clean. Budget win.
Step-by-step instructions for baked cornflake chicken breast
Here's the precise method that delivers a perfect balance of crispy crust and moist interior.
Prepare the Chicken and Seasoning Mix
Begin by pounding the 1.5 lb boneless, skinless chicken breasts to an even ½-inch thickness between two sheets of plastic wrap. This ensures even cooking and prevents dryness in the center. Place each breast on a cutting board and season both sides generously with 1 tsp Diamond Crystal kosher salt, ½ tsp ground black pepper, ½ tsp garlic powder, and ½ tsp onion powder. Press the seasoning into the meat so it adheres completely—this creates a flavorful base before the crust.
In a shallow bowl, combine 1.5 cups panko-style cornflakes, ½ cup all-purpose flour, and ½ cup freshly grated Parmesan cheese. The cornflakes should be lightly crushed between your fingers to create a mix of fine crumbs and larger pieces for texture contrast. This blend will form the crispy crust while the flour and Parmesan bind everything together.
Create the Coating Station
Set up three separate bowls for the breading process. In the first bowl, crack the 2 whole large eggs and whisk them vigorously with 1 tbsp freshly squeezed lemon juice until fully combined. The acidity in the lemon juice helps create a brighter flavor and prevents the coating from becoming too heavy. In the second bowl, place the 2 tbsp extra-virgin olive oil to create a light dredge that enhances crispiness.
Arrange the bowls in this order: flour mixture first, then egg wash, then cornflake blend. This sequence ensures each piece gets properly coated without over-saturating. The olive oil in the third bowl acts as a barrier that prevents the cornflakes from absorbing too much moisture during baking, which is crucial for maintaining that perfect crunch.
Bread the Chicken for Maximum Crispiness
Working with one piece at a time, dredge each seasoned chicken breast in the ½ cup all-purpose flour, shaking off any excess. This initial flour coating helps the egg adhere more evenly. Next, dip the floured breast into the egg wash, allowing any excess to drip off. The goal is a thin, even coating—this prevents a soggy crust later.
Finally, press the egg-washed chicken into the cornflake mixture, ensuring complete coverage on all sides. The pressure helps the coating adhere tightly to the meat. Place the breaded breasts on a wire rack set over a baking sheet lined with parchment paper. This elevation is critical—it allows hot air to circulate around the chicken, preventing steam buildup that would otherwise soften the crust.
Bake to Golden Perfection
Preheat your oven to 400°F while the chicken rests for 5 minutes on the rack. This resting period helps the coating adhere more securely. Once preheated, carefully transfer the rack with chicken to the oven. Bake for 20-25 minutes, checking at the 18-minute mark. The chicken is done when the internal temperature reaches 165°F and the crust is a deep golden brown with crisp edges that hold their shape when pressed gently with tongs.
For the final touch, remove the chicken from the oven and brush the tops with 1 tbsp melted unsalted butter. Return to the oven for 1-2 minutes to create a glossy finish. This basting step not only enhances flavor but also ensures that final layer of crispiness. The butter should sizzle slightly when applied—this indicates the crust is properly heated for that satisfying crunch.
Rest and Serve for Juicy Results
Transfer the baked chicken to a cutting board and let it rest for 5 minutes before slicing. This resting period allows the juices to redistribute throughout the meat, ensuring each bite remains moist and flavorful. The crust will maintain its crispiness during this time, so there's no need to worry about it becoming soft.
Slice the chicken against the grain for maximum tenderness, and serve immediately with your choice of complementary sides. The combination of crispy cornflake crust and juicy interior makes this dish perfect for meal prep or a special dinner. The lemon-infused coating adds a subtle brightness that balances the richness of the Parmesan and butter.
Pro Tips For Making Baked Cornflake Chicken Breast
- Pound Chicken Evenly: I learned this the hard way—uneven thickness means some parts dry out while others stay raw. Use a meat mallet or rolling pin to tap the breasts to ¼-inch thickness before breading, or they’ll cook at wildly different rates.
- Toast Cornflakes First: Cold cornflakes won’t crisp up right. Spread them on a baking sheet and toast in a 350°F oven for 3–4 minutes until golden and fragrant—this makes the crust actually crunchy, not soggy.
- Skip the Double-Dipping: Dredge the chicken in flour, dip in egg, then stop—no need to roll in cornflakes twice. The extra egg just weighs down the crust and makes it gluey. One pass is enough for a perfect, shatterable coat.
- Bake on Wire Racks: Does it look weird? Yes. Does it work? Every single time. Elevate the chicken on wire racks over a baking sheet so air circulates—no more steaming, no more sad, limp crusts. Just crispy, golden perfection.
Creative variations of baked cornflake chicken breast
Spicy Southwest Twist
Transform your cornflake chicken into a fiesta-worthy dish by adding 1 tbsp chili powder and ½ tsp smoked paprika to the cornflake mixture. For extra heat, stir in 1 tsp cayenne pepper and ½ tsp ground cumin.
Serve with a side of salsa verde or avocado crema to balance the flavors. I like to add ¼ cup chopped cilantro on top right before serving for a fresh finish. 🌶️
Honey Mustard Glaze
Create a sweet-savory contrast by brushing the baked chicken with a honey mustard glaze made from 2 tbsp Dijon mustard, 1 tbsp honey, and 1 tsp apple cider vinegar.
Mix these ingredients in a small bowl, then brush over the chicken during the last 2 minutes of baking. The glaze adds a sticky, caramelized finish that pairs perfectly with the crispy cornflake crust. Garnish with toasted sesame seeds for added texture.
Herb & Lemon Variation
For a lighter, brighter flavor profile, replace half of the cornflakes with ½ cup crushed Ritz crackers and add 2 tbsp chopped fresh parsley and 1 tbsp chopped fresh dill to the cornflake mixture.
Increase the lemon juice in the egg wash to 2 tbsp for a zesty kick. This version works beautifully with a lemon-herb butter sauce on the side. Perfect for summer dinners or picnics!
Cheesy Jalapeño Crunch
Elevate the dish with a cheesy jalapeño twist by adding ½ cup shredded cheddar cheese and 2 sliced jalapeños (seeds removed) to the cornflake mixture. For extra crunch, sprinkle ½ cup crushed tortilla chips on top before baking.
The jalapeños add a subtle heat that pairs wonderfully with the cheesy, crispy crust. Serve with a cool ranch or chipotle aioli for dipping.
Breakfast-Style Crust
Turn this into a breakfast sensation by adding 2 tbsp grated onion and 1 tsp dried thyme to the cornflake mixture. For a richer flavor, fold in ¼ cup crushed potato chips along with the cornflakes.
Serve with crispy hash browns and a side of sugar-free maple syrup for dipping. The savory-sweet combo makes this a fun brunch option that’s sure to impress.
Meal Prep Adaptation
For meal prep, bake the chicken as directed, then store in an airtight container with parchment paper between layers to maintain crispiness. Reheat at 350°F for 10 minutes before serving.
To keep the cornflake crust intact, reheat in a skillet over medium heat for 2-3 minutes per side instead of the microwave. Pair with prepped quinoa or roasted veggies for a complete meal that’s ready in minutes. 📅
Nutrition facts
Frequently asked questions
Why do I need to pound the chicken breasts to even thickness?
Pounding creates even cooking surfaces so the chicken doesn't dry out in some areas while staying undercooked in others. A ½-inch thickness ensures perfect doneness at the center while achieving that crispy crust. Uneven thickness is the #1 reason for dry baked chicken—this step solves that problem completely.
Can I use regular cornflakes instead of panko-style?
Yes, but you'll need to crush them first in a food processor for 10-15 seconds to get a similar texture. Regular cornflakes are more uniform, so they won't provide the same airy crunch as panko-style. For extra crispiness, lightly toast the crushed cornflakes in a dry skillet for 2 minutes before using.
How do I keep the cornflake crust from getting soggy?
The secret is baking on a wire rack over parchment paper to allow air circulation. Also, use room temperature eggs in your wash and avoid overcrowding the baking sheet. If you notice softness, broil for 1-2 minutes at the end—just watch closely to prevent burning.
What's the best way to reheat leftovers without losing crispiness?
Skip the microwave! Instead, reheat in a skillet over medium heat for 2-3 minutes per side until the crust is golden again. For oven reheating, bake at 350°F for 10 minutes on a wire rack. The key is high heat and quick cooking to restore that satisfying crunch.
Can I make this recipe with chicken thighs instead?
Yes, but adjust the baking time to 25-30 minutes since thighs cook slower. Skin-on thighs will need 30-35 minutes to reach 165°F internally. The cornflake crust works beautifully on thighs, but expect a slightly thicker coating to handle the longer cooking time.