
Main Courses
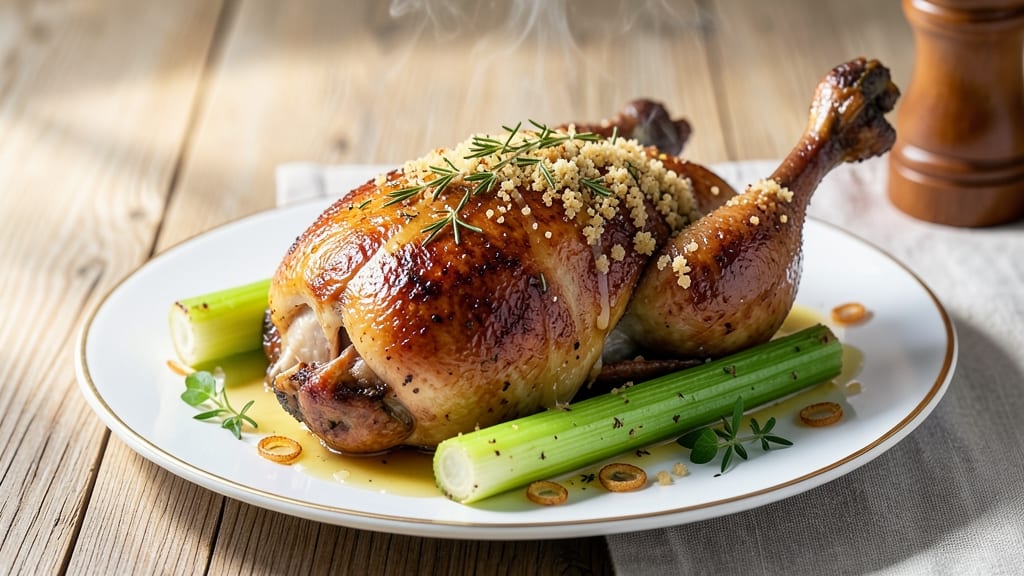
This baked chicken and celery recipe delivers restaurant-quality results with crispy skin, juicy meat, and a surprising celery surprise that transforms a simple roast into an elegant centerpiece. 💛 The secret lies in stuffing the cavity with celery stalks—tender after baking—while the herb crust ensures every bite is packed with flavor.
Perfect for family dinners or special occasions, this method guarantees a showstopping main course without the fuss of complicated techniques.
The recipe begins with a simple yet effective seasoning blend of garlic, thyme, and rosemary, which infuses the chicken as it roasts. While the bird bakes to golden perfection, the celery inside softens just enough to add subtle crunch and freshness to each bite.
The crisp herb crust, made from panko and melted butter, adds texture and depth, ensuring the chicken stays juicy while delivering satisfying crunch with every slice.
What makes this dish truly special is how effortlessly it comes together—just 30 minutes of prep and 1 hour 15 minutes of baking time. The result is a tender, flavorful roast with a celery surprise that elevates the dish beyond ordinary roasted chicken.
Serve with roasted potatoes or a fresh green salad to round out the meal, and watch as everyone at the table raves about the unexpected texture and taste.
This method works beautifully with whole chickens, but you can also adapt it for chicken breasts or thighs by adjusting the cooking time. The celery stuffing adds a unique twist that makes this recipe stand out, proving that simple ingredients can create a dish that feels both comforting and impressive.
Let’s get started on a meal that will impress even the most discerning guests.
Ingredients for baked chicken and celery
Restaurant-quality roast chicken with celery surprise—just 12 ingredients for an elegant centerpiece.
| Ingredient | Amount | Notes |
|---|---|---|
| Whole Chicken 🍗 | 4 lb | Fresh, preferably organic |
| Fresh Celery Stalks 🥬 | 4 whole | Trimmed, firm stalks |
| Unsalted Butter 🧈 | ½ cup | Cold, cut into pieces |
| Japanese Panko Breadcrumbs 🍞 | ¾ cup | For crispy herb crust |
| Fresh Rosemary 🌿 | ¼ cup | Chopped finely |
| Fresh Thyme 🌿 | ¼ cup | Leaves only, chopped |
| Garlic Cloves 🧄 | 4 cloves | Minced finely |
| Kosher Salt 🧂 | 1 ½ tsp | Diamond Crystal preferred |
| Ground Black Pepper 🌶️ | ½ tsp | Freshly ground |
| Olive Oil 🫒 | 2 tbsp | Extra-virgin for basting |
| Lemon Juice 🍋 | 1 tbsp | Freshly squeezed |
| Fresh Parsley 🌿 | ⅛ cup | Chopped, for garnish |
The chicken is the star, so look for a fresh, plump bird—around 4 pounds gives perfect portions. Whole Foods or local butchers often carry organic options with better flavor. Celery should be crisp and firm, not limp or woody. The celery stalks will soften beautifully during baking, adding a subtle crunch and freshness to every bite. For the butter, Plugrá or Land O'Lakes unsalted work perfectly—just make sure it's cold when you cut it into pieces for the crust. Fresh herbs are non-negotiable here; dried won't give that same vibrant flavor. If you can't find fresh rosemary or thyme, dried works at one-third the amount, but it's worth hunting down the fresh stuff.
No panko? Toasted breadcrumbs work too—just pulse them in a food processor for a finer texture. Short on celery? Substitute with leeks or fennel, but celery's unique flavor is what makes this dish special. The garlic can be roasted ahead of time for a deeper flavor—just toss minced cloves with a drizzle of olive oil and roast at 375°F for 10 minutes before using. For extra crispiness, pat the chicken dry with paper towels before applying the butter mixture. And if you're feeling fancy, add a pinch of smoked paprika to the herb crust for an extra layer of flavor. The lemon juice brightens everything up, so don't skip it—freshly squeezed is best, but bottled works in a pinch.
This chicken reheats beautifully—just cover with foil and warm in the oven at 350°F for 15-20 minutes. Keeps for 3-4 days in the fridge, though it's best enjoyed fresh. For meal prep, remove the celery before storing to keep it crisp. The herb crust stays crunchy if you reheat it uncovered for the last 5 minutes. Freeze the whole chicken (uncooked) for up to 3 months—just thaw overnight in the fridge before roasting. Leftovers make amazing sandwiches or salads, and the celery adds a refreshing twist to both.
Why You'll Love This Recipe
- One-Pan Magic: I swear by this recipe for lazy nights—just toss the chicken and celery on a sheet, drizzle with butter, and let the oven do the work. No chopping boards full of mess, no pots to scrub.
- Crispy-Creamy Dream: That panko crust on the chicken? Chef’s kiss. The butter melts into the celery while the rosemary infuses everything with a bright, herby punch—like a hug in bite form.
- Leftovers That Don’t Suck: Between us, most baked chicken turns dry the next day. Not this. The celery stays crisp, the chicken stays juicy, and I’ve reheated these leftovers for lunch three times without judgment.
- Weeknight Hero: Honestly, this is my go-to when I’m too tired to think. Feeds four but costs less than takeout, and the celery adds that fresh crunch no one expects—my kids actually eat their veggies this way.
Step-by-step instructions for celery-stuffed roast chicken
Here's how to create a showstopping herb-crusted roast with celery-stuffed cavity and crispy golden skin.
👨🍳 Step 1: Prepare the Celery and Herb Stuffing
Start by trimming the 4 whole fresh celery stalks and cutting them into ½-inch chunks. I like to use a sharp chef's knife for this—it gives you clean cuts without crushing the celery. In a small bowl, combine the celery with the finely chopped fresh rosemary, finely chopped fresh thyme, and minced garlic cloves. This aromatic mix will infuse the chicken with bright, herbal notes as it roasts.
Add 1 tablespoon lemon juice and 1 teaspoon kosher salt to the celery mixture. Toss everything together until the herbs are evenly distributed. The acidity from the lemon juice helps tenderize the celery slightly while adding brightness to the stuffing. Set this aside while you prepare the chicken.
🔪 Step 2: Season and Stuff the Chicken
Remove the 4 lb whole chicken from its packaging and place it breast-side up on a clean cutting board. Pat the chicken dry inside and out with paper towels—this is crucial for achieving crispy skin. I can't emphasize enough how important this drying step is; any moisture will steam the skin instead of crisping it.
Season the chicken generously with the remaining ½ teaspoon kosher salt and ½ teaspoon ground black pepper on both the inside and outside. Then, stuff the cavity with the celery-herb mixture, pressing it gently into the neck cavity and around the legs. This ensures the stuffing cooks evenly and infuses the meat with maximum flavor.
🔥 Step 3: Create the Herb Crust and Roast
Preheat your oven to 425°F—this high temperature is key for achieving that beautiful golden crust. In a small bowl, mix the 0.75 cup Japanese panko breadcrumbs with the 0.5 cup cold unsalted butter, cutting the butter into small pieces with your fingers until it resembles coarse crumbs. The cold butter will melt during roasting, creating a rich, flavorful crust.
Place the stuffed chicken on a rack set inside a rimmed baking sheet. Rub the herb butter mixture all over the chicken, pressing it firmly into the skin, especially on the breast and drumstick areas. This creates a flavorful barrier that locks in moisture while forming a crispy crust. Drizzle 2 tablespoons olive oil evenly over the top for extra browning.
⏰ Step 4: Roast to Perfect Doneness
Roast the chicken for 1 hour 15 minutes, then reduce the oven temperature to 375°F. Continue roasting for another 45-60 minutes or until the internal temperature reaches 165°F when measured at the thickest part of the thigh. The skin should be deep golden brown and crispy, with no pink remaining in the meat.
Here's the thing about timing—your oven might run hot or cold, so I always recommend checking the temperature after 45 minutes at 375°F. The celery stuffing should be tender but still hold its shape, and the juices should run clear when you pierce the thickest part of the thigh with a meat thermometer. Let the chicken rest for 15 minutes before carving to ensure juicy, evenly cooked meat.
🍽️ Step 5: Garnish and Serve
After resting, transfer the chicken to a serving platter. Use kitchen shears to trim any excess skin or crispy bits if desired. Sprinkle the 0.125 cup chopped fresh parsley evenly over the top for a pop of color and fresh herb flavor. This final garnish not only looks beautiful but also adds a bright contrast to the rich, herby crust.
The result should be a golden-brown roast with crispy skin, tender meat infused with celery and herbs, and a rich herb butter crust that's packed with flavor. Serve with roasted vegetables or a fresh salad to complement the herbaceous notes in the chicken. The celery stuffing adds a subtle sweetness that pairs perfectly with the savory crust.
Pro Tips For Making Baked Chicken And Celery
- Salt the Celery First: I used to skip this, but salting the celery stalks (lightly, with just a pinch of flaky salt) 10 minutes before baking draws out moisture and concentrates their flavor—especially when paired with rosemary. The butter will cling better to the crisped edges later, and you’ll notice the difference in that first bite of caramelized celery.
- Use Cold Butter for Crust: Pat the panko-butter mixture onto the chicken with cold butter—about 3 tablespoons, shaped into a thick paste. The cold fat melts slower during baking, giving you that shatteringly crisp crust on the skin while keeping the meat juicy. (Yes, it looks messy at first, but it’s worth it.)
- Don’t Overcrowd the Pan: If you’re baking multiple chickens, spread them out on a single sheet pan with at least 1 inch between pieces. I learned this the hard way—crowding steams the celery instead of browning it, and the panko turns soggy. A wire rack over the pan helps even more.
- Sear the Chicken First: Before baking, hit the chicken with a quick sear in a hot skillet—just 2 minutes per side—until the skin starts to pull away. The Maillard reaction jumpstarts the flavor, and the celery underneath won’t need as long to crisp. (Pro move: Toss the seared chicken directly into the baking dish with the celery.)
Common mistakes when making great baked chicken and celery
Overcooking the Celery
Celery can turn mushy and lose its texture if left in the oven too long. I’ve learned the hard way—when the chicken reaches 165°F, pull it out immediately. Overcooking the celery by even 10 minutes turns it into a sad, watery mess.
The goal is tender but still slightly crisp, so aim for a 1 hour 15 minutes total bake at 425°F followed by 45 minutes at 375°F. If your oven runs hot, check the celery at 30 minutes into the second phase. 💫
Skipping the Drying Step
Pat drying the chicken is non-negotiable for crispy skin. I once rushed this step and ended up with soggy skin—no matter how much butter or panko I used. Use paper towels and press firmly all over, including the cavity.
The moisture evaporates during roasting, creating that perfect crust. If you’re short on time, let the chicken air-dry in the fridge uncovered for 30 minutes before seasoning. 🔥
Uneven Butter Coating
The herb butter crust needs to be evenly applied to prevent dry spots. I’ve seen chicken where the butter clumped in certain areas, leaving patches of bland skin. Cut the ½ cup cold butter into small pieces and mix it thoroughly with the panko.
Use your fingers to press the mixture into the skin, especially on the breast and thighs. A light coat of olive oil helps it spread evenly. Don’t skip this step—it’s what locks in flavor and moisture! ⚡
Not Resting the Chicken
Carving the chicken too soon causes juices to spill out, leaving you with dry meat. Always let it rest for 15 minutes before slicing. I’ve made this mistake when serving guests—cutting early means losing half the flavor.
Use this time to prep sides or garnish with fresh parsley. Trust me, the wait is worth it for juicy, tender slices. 💡
Using Wet Celery
Wet celery releases moisture during baking, steaming the chicken instead of crisping it. Choose firm, dry celery stalks and pat them dry with a paper towel before chopping. If you’re using pre-cut celery from a bag, drain and dry it thoroughly.
The celery should hold its shape when squeezed—if it feels limp, it’s too wet. This small step makes a huge difference in texture. 🥬
Overstuffing the Cavity
Stuffing the cavity too tightly can prevent the chicken from cooking evenly. The celery-herb mixture should fit loosely, not packed like a Thanksgiving turkey. Press it gently into the neck cavity and around the legs, but leave room for the chicken to expand.
Overstuffing can also cause the skin to tear during roasting. Aim for a ½-inch layer of stuffing—just enough to infuse flavor without overcrowding. 🌟
Nutrition facts
Frequently asked questions
Why does this recipe use celery inside the chicken?
The celery adds a subtle sweetness and fresh herbal notes that infuse the meat as it roasts. When baked, it softens just enough to create a tender surprise in every bite while maintaining a pleasant texture. This technique elevates simple roast chicken into something special with minimal effort.
Can I use chicken breasts instead of a whole chicken?
Yes, but you'll need to adjust the cooking time. For 4 boneless breasts (about 6 oz each), bake at 425°F for 20-25 minutes until internal temp reaches 165°F. Stuff the cavity of each breast with a small amount of the celery-herb mixture before roasting.
How do I know when the celery is done?
Look for celery that's tender but still holds its shape—it should be soft enough to pierce with a fork but not mushy. The chicken should reach 165°F at the thickest part of the thigh. If the celery seems underdone, return it to the oven for 5-10 minutes at 375°F.
What sides pair best with this dish?
Roasted potatoes or garlic mashed potatoes complement the herby flavors beautifully. For a lighter option, try a crisp green salad with lemon vinaigrette. The celery's subtle sweetness also pairs well with tangy sauces like chimichurri or a simple white wine reduction.
Can I make this ahead of time?
Cook the chicken up to 2 days ahead and store it in the fridge. Reheat covered in the oven at 350°F for 15-20 minutes. For best texture, remove the celery stuffing before storing and add it back just before serving to maintain crispness.