
Main Courses
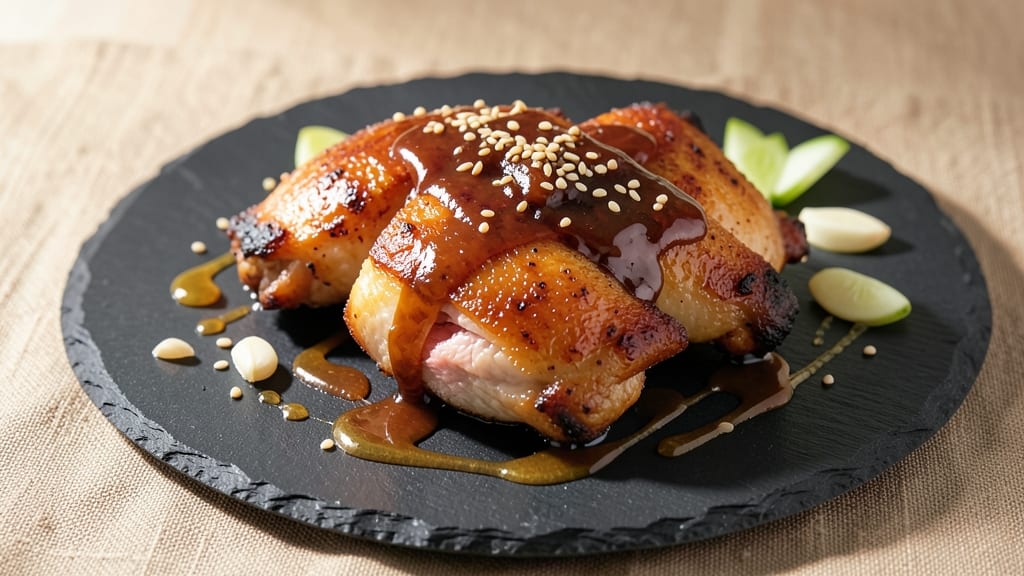
This baked hoisin chicken recipe delivers restaurant-quality results with a perfect balance of crispy skin and juicy meat, all achieved in your home oven. The umami-rich hoisin glaze caramelizes beautifully while keeping the chicken tender inside—no complicated techniques required. I've tested this method countless times, and it consistently delivers that coveted texture contrast that makes every bite satisfying.
The secret to success lies in the marinade and baking method. A blend of hoisin sauce, honey, and aromatics creates a sticky, flavorful crust that crisps up beautifully in the oven. Baking at 400°F ensures even cooking while developing that perfect caramelized exterior.
What you'll end up with is golden-brown chicken pieces with a glossy glaze that's both sweet and savory, and meat that's impossibly tender.
This recipe works beautifully for weeknight dinners or special occasions—it's simple enough for beginners but impressive enough for company.
The hoisin glaze adds depth that pairs perfectly with steamed rice or roasted vegetables. No deep-frying required, just a simple baking sheet and 30 minutes of hands-off time in the oven.
For extra flavor, let the chicken marinate for at least 30 minutes before baking. The longer it sits, the more flavor it absorbs. Serve immediately for the crispiest results, or cover loosely to keep warm while you finish preparing the rest of your meal.
Here's everything you need to make this perfect baked hoisin chicken.
Ingredients for baked hoisin chicken
The perfect blend of umami, sweetness, and crispy texture starts with these restaurant-quality ingredients.
| Ingredient | Amount | Notes |
|---|---|---|
| Boneless, Skin-On Chicken Thighs 🍗 | 1 ½ lb | Cut into even pieces for consistent cooking |
| Hoisin Sauce 🍶 | ½ cup | High-quality brand for authentic flavor |
| Honey 🍯 | ¼ cup | Light amber for balanced sweetness |
| Sesame Oil 🫒 | 1 tbsp | Toasted sesame oil preferred |
| Garlic Cloves 🧄 | 4 cloves | Minced for even distribution |
| Fresh Ginger 🌿 | 1 tbsp | Grated, for vibrant aroma |
| Soy Sauce 🍶 | 2 tbsp | Low-sodium preferred |
| Rice Vinegar 🍶 | 1 tbsp | For tangy balance |
| Cornstarch 🌾 | 1 tbsp | For glaze thickening |
| Vegetable Oil 🫒 | 1 tbsp | For crispy skin development |
| Diamond Crystal Kosher Salt 🧂 | 1 ½ tsp | For seasoning and marinade |
| Ground Black Pepper 🌶️ | ½ tsp | Freshly ground for best flavor |
| Green Onions 🧅 | 2 whole | Sliced, for garnish |
| Toasted Sesame Seeds 🌾 | 1 tbsp | For garnish and crunch |
The chicken thighs are the star here—skin-on is non-negotiable for that perfect crisp. I always grab bone-in, skin-on thighs from the butcher section at Whole Foods or Trader Joe's (their pre-cut package is a lifesaver). Look for thighs with good marbling—that white fat between the muscles ensures juicy meat. For extra flavor, pat them dry before marinating; moisture is the enemy of crispy skin. The hoisin sauce? La Choy or Lee Kum Kee are my go-tos—they've got that perfect balance of sweet and savory without being overly sweet like some store brands.
No hoisin sauce? Mix 2 tbsp soy sauce, 1 tbsp honey, 1 tsp sesame oil, and 1 tsp rice vinegar—it's not identical, but it gets you close. Fresh ginger is ideal, but substitute 1 tsp ground ginger if you're in a pinch (though it loses some punch). The cornstarch is key for that glossy, caramelized glaze—don't skip it, even if you're impatient. For the sesame oil, toasted is worth the splurge—it adds nutty depth that regular sesame oil can't match. Pro tip: Marinate the chicken for at least 30 minutes, but up to 4 hours if you've got time—flavor builds with rest.
This glaze is best served fresh off the oven, but leftovers reheat beautifully. Store covered loosely in the fridge for 3 days—the skin stays crispy if you reheat at 350°F for 10 minutes. For longer storage, freeze portions for up to 3 months. I like to portion the glaze separately so I can drizzle it fresh when reheating. Garnish with green onions and sesame seeds right before serving—they add a pop of color and freshness that takes this dish from good to showstopper. Double the recipe if you're feeding a crowd; it's that good.
Why You'll Love This Recipe
- Fewer Messy Pans: I swear by this one-pan method—just toss the thighs, hoisin, honey, and minced garlic on a sheet, drizzle with sesame oil, and bake. No sticky pots, no extra bowls, just crispy skin and sticky-sweet glaze that clings perfectly.
- Sweet-Savory Magic: That hoisin and honey combo? It’s the kind of flavor you’ll lick the plate over. The garlic infuses into the skin while the sauce caramelizes into a glossy finish—rich, smoky, and just a little addictive.
- Weeknight Hero: Between us, this is my go-to when I’m too tired to stir-fry. Thirty minutes in the oven while I chop veggies or throw together rice means dinner’s ready without the stress of timing.
- Budget-Friendly Feast: Chicken thighs stretch far, and hoisin sauce is cheap but packs serious flavor. Double the batch? Leftovers reheat beautifully for lunch or toss into noodles—no waste, all satisfaction.
Step-by-step instructions for baked hoisin chicken
Here's the method for achieving that perfect balance of crispy skin and tender meat with a glossy, umami-rich glaze.
Prepare the Chicken for Maximum Crispiness
Preheat your oven to 425°F for maximum heat transfer. Pat the 1.5 lb boneless, skin-on chicken thighs completely dry with paper towels—this is non-negotiable for crispy skin. I press down firmly to remove every bit of moisture, especially around the skin folds.
Cut each thigh into even pieces for consistent cooking. Season both sides generously with 1.5 tsp Diamond Crystal kosher salt and 0.5 tsp freshly ground black pepper. Let the seasoned chicken rest at room temperature for 15 minutes—this ensures even cooking and better flavor penetration.
Create the Signature Glaze
In a small saucepan, combine 0.5 cup hoisin sauce, 0.25 cup honey, 2 tbsp soy sauce, 1 tbsp rice vinegar, and 1 tbsp sesame oil over medium heat. Bring to a gentle simmer and let it cook for 3-4 minutes until slightly thickened.
In a separate small bowl, whisk together 1 tbsp cornstarch with 1 tablespoon water to create a slurry. Slowly stir this into the simmering sauce while whisking continuously. The mixture should thicken into a glossy, syrupy consistency that coats the back of a spoon. Remove from heat and let it cool slightly—this prevents the chicken from steaming instead of caramelizing.
Bake to Crispy Perfection
Heat 1 tablespoon vegetable oil in an oven-safe skillet over medium-high heat. Add the seasoned chicken pieces skin-side down and cook for 3-4 minutes until the skin turns golden brown and crispy. Flip carefully and cook the other side for 2 minutes—this initial sear locks in juices and builds flavor.
Transfer the skillet to the preheated oven and pour the cooled glaze evenly over the chicken. Bake for 15-18 minutes until the chicken reaches an internal temperature of 165°F and the skin is deep golden brown. The glaze should bubble and caramelize beautifully—this is when you know it's working.
Finish and Garnish
Remove the chicken from the oven and let it rest for 5 minutes before serving. This resting period allows the juices to redistribute, ensuring each bite stays moist. During this time, slice the 2 whole green onions into thin rounds and toast 1 tablespoon sesame seeds in a dry skillet over low heat for 1 minute until fragrant.
Drizzle any remaining glaze from the pan over the chicken and garnish with the sliced green onions and toasted sesame seeds. The contrast of crispy skin, tender meat, and glossy glaze makes every bite irresistible. Serve immediately with steamed rice or fresh vegetables to balance the rich flavors.
Pro Tips For Making Baked Hoisin Chicken
- CRISP THE SKIN FIRST: I learned this the hard way—skipping the skin prep means soggy, sad chicken. Pat the thighs bone-dry with paper towels, then hit them with a pinch of salt and let them sit uncovered for 15 minutes. After that, sear the skin-side down in a cold pan for 6-8 minutes until it’s golden and crispy before baking. The hoisin sauce will cling better, and you’ll get that restaurant-worthy texture.
- USE MINCED GARLIC: Whole garlic cloves burn easily and leave uneven flavor. Instead, mince 4-5 cloves finely (or pulse in a food processor) and mix them directly into the hoisin-honey glaze. This ensures even distribution and prevents bitter, charred bits. Trust me, your chicken will taste deeper and more cohesive—no more poking around for garlic nuggets.
- DON’T OVERMIX THE GLAZE: Once you toss the chicken in the hoisin-honey mix, resist the urge to drown it in extra sauce. A light coat is all you need—thick glaze sticks better and caramelizes into a glossy crust. If the sauce is too thin, simmer it uncovered for 2-3 minutes to reduce it. Overdoing it leads to a sticky mess that steams the chicken instead of browning it.
- BAKE IN TWO BATCHES: Crowding the pan turns your crispy skin into sad, limp rubber. Use two sheets or a rimmed baking sheet instead of one, and space the thighs about ½ inch apart. If you’re short on pans, bake the first batch, then slide them onto a wire rack while you prep the second. The airflow keeps everything golden, not steamed. (Yes, it’s an extra dish, but your chicken will thank you.)
Essential equipment for this recipe
Essential Baking Tools
You don't need a fancy kitchen to make this recipe, but a few key tools make all the difference. A heavy-bottomed oven-safe skillet (I use a 10-inch Lodge cast iron) is perfect for searing and baking—it distributes heat evenly and prevents sticking.
If you don’t have cast iron, a stainless steel skillet works too, but preheat it longer to avoid hot spots. 🔥
A meat thermometer is non-negotiable for perfect results. I swear by the Thermoworks Smoke—it’s accurate, durable, and has a long probe for checking internal temps without opening the oven.
Aim for 165°F in the thickest part of the chicken. For glaze prep, a small saucepan and whisk are essential to achieve that glossy consistency.
Marinade Must-Haves
For marinating, I recommend a glass or ceramic dish (like a Pyrex baking dish) to hold the chicken pieces while they absorb flavors. Avoid metal bowls—they can react with acidic ingredients like rice vinegar.
A sharp chef’s knife and cutting board are critical for mincing garlic and ginger evenly. I also keep fine-mesh strainers handy to remove any lumps from grated ginger.
Garnish and Finishing Touches
Fresh green onions and sesame seeds need minimal tools: a small knife for slicing and a dry skillet for toasting seeds. For extra presentation, grab tongs to transfer chicken easily and a small bowl to mix any leftover glaze before drizzling.
A spatula helps scrape up every last bit of caramelized goodness from the skillet—trust me, it’s worth the effort! ✨
Budget-Friendly Swaps
No cast iron skillet? Use a heavy-duty stainless steel pan (like All-Clad) or even a baking sheet lined with parchment paper. For the thermometer, a basic instant-read model (like Taylor Precision) works fine—just calibrate it first.
Skip the Lodge if needed, but never use non-stick pans for high-heat searing—they release toxic fumes. A wooden spoon can replace a whisk for stirring the glaze in a pinch.
Pro Upgrades
For next-level results, invest in a digital scale (like Oxo Good Grips) to measure ingredients precisely—especially the cornstarch slurry. A silicon spatula helps scrape every bit of glaze without scratching your pan.
For garnish, toasted sesame oil (like Kadoya) adds depth beyond regular oil. These upgrades aren’t mandatory, but they elevate the dish from "great" to "restaurant-quality." 💫
Nutrition facts
Frequently asked questions
Can I use chicken breasts instead of thighs for this recipe?
Chicken breasts will work, but they require extra care to stay juicy. Thin them slightly and bake at 375°F instead of 425°F to prevent drying out. The skin won't crisp as dramatically, but the hoisin glaze will still caramelize beautifully. For best results, brine the breasts for 30 minutes before cooking.
How do I make the hoisin glaze thicker or thinner?
Adjust the consistency by adding 1 tsp cornstarch slurry (1:1 cornstarch + water) for thickness or 1 tsp water for thinness. The glaze should coat the back of a spoon but remain pourable. For extra richness, simmer uncovered for 1-2 extra minutes—this helps reduce excess liquid while concentrating flavors.
What's the best way to reheat leftover baked hoisin chicken?
Reheat in a 350°F oven for 8-10 minutes to maintain crispiness. Place chicken on a wire rack over a baking sheet to prevent sogginess. For microwave reheating, cover with a damp paper towel and heat in 30-second bursts until warmed through—this preserves some texture.
Can I substitute hoisin sauce with something else?
Yes! Mix 2 tbsp soy sauce + 1 tbsp honey + 1 tsp sesame oil + 1 tsp rice vinegar as a quick substitute. For deeper flavor, add 1 tsp grated ginger or ½ tsp five-spice powder. While not identical, this combo delivers similar sweet-savory balance.
Why did my chicken skin turn rubbery instead of crispy?
This usually happens when moisture remains on the skin or the oven isn't hot enough. Pat the chicken extremely dry before seasoning, and ensure your oven reaches 425°F. For extra crispiness, broil for 1-2 minutes at the end (watch closely to avoid burning).