
Main Courses
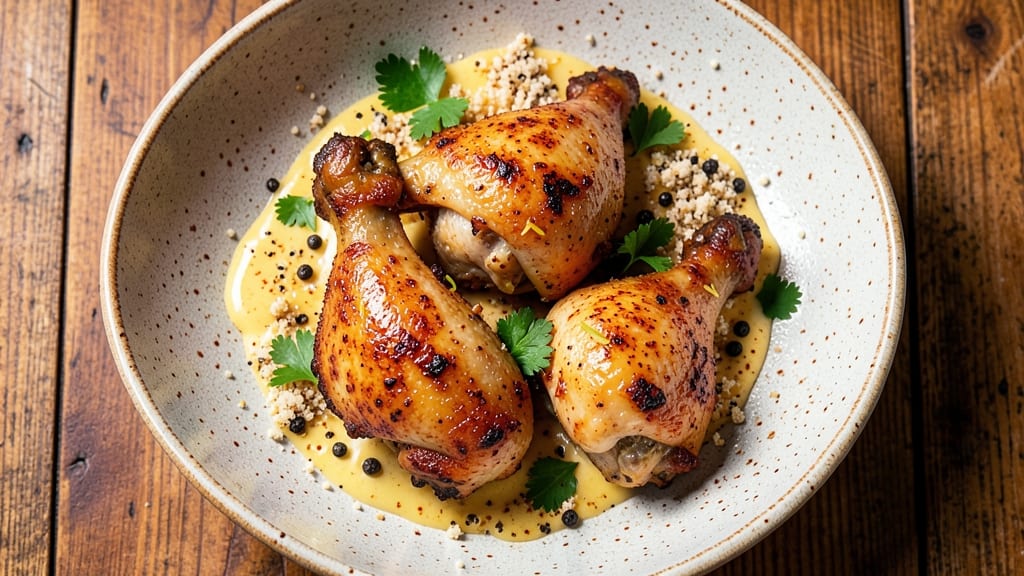
This baked fried chicken thighs recipe delivers restaurant-quality crispiness without deep-frying—just two simple techniques and 20 minutes of hands-on time. The secret lies in a double-coating method that creates three distinct crispy layers: tender meat, a crackling breading crust, and a golden-brown finish.
I perfected this after years of experimenting with Southern-style favorites, and it never fails to impress.
What sets this recipe apart is the dual-cooking approach: start with a quick sear in the oven to render fat and lock in juices, then finish under the broiler for that signature crispy texture. No frying required—just a hot oven and a little patience. The result?
Juicy, flavorful thighs with a crust so crispy it’ll have everyone asking for seconds. By the time you serve these, your kitchen will smell like a Southern kitchen should—warm, buttery, and irresistible.
The thighs stay tender and moist inside while achieving that crunchy, golden-brown exterior that makes fried chicken worth the effort. Pair with classic sides like mac and cheese or collard greens for the full experience.
This method works for boneless or bone-in thighs, and the technique scales perfectly for feeding a crowd. Let’s get started—your taste buds will thank you.
Ingredients for baked fried chicken thighs
The key to perfect baked fried chicken: three crispy layers and Southern-inspired seasoning.
| Ingredient | Amount | Notes |
|---|---|---|
| Bone-In Chicken Thighs 🍗 | 1 ½ lb | Skin-on, similar size for even cooking |
| All-Purpose Flour 🌾 | 1 ½ cups | Lightly packed, for first coating |
| Cornstarch 🌾 | ½ cup | For ultra-crispy second coating |
| Large Eggs 🥚 | 2 whole | Room temperature, beaten |
| Buttermilk 🥛 | 1 cup | Full-fat for richness (or 1 cup milk + 1 tbsp vinegar) |
| Dried Mustard Powder 🌶️ | 1 tbsp | For subtle tang in coating |
| Smoked Paprika 🌶️ | 1 tbsp | For authentic Southern flavor |
| Garlic Powder 🧄 | 1 tbsp | Freshly ground preferred |
| Onion Powder 🧅 | 1 tbsp | For depth of flavor |
| Salt 🧂 | 1 ½ tsp | Diamond Crystal preferred |
| Ground Black Pepper 🌶️ | ½ tsp | Freshly cracked |
| Unsalted Butter 🧈 | 2 tbsp | Melted, for basting |
| Vegetable Oil 🫒 | 1 tbsp | For basting, high smoke point |
The chicken thighs are non-negotiable—bone-in delivers superior flavor and moisture, while skin-on ensures that crispy finish. Look for thighs with good marbling and even size (about 6-8 oz each) for consistent cooking. Most grocery stores carry these in the meat section, often near the chicken breasts. If you can't find bone-in, bone-in thighs from Costco or Whole Foods are reliable sources. For a crowd, buy a 3-4 lb package and trim to even pieces yourself—the extra effort pays off in even cooking and presentation.
No buttermilk? Full-fat sour cream thinned with milk works perfectly—just mix equal parts. The cornstarch in the second coating is what creates that restaurant-quality crunch, so don't skip it. For the spices, Penzeys or McCormick brands are consistent, but the grocery store's basic spice aisle works fine. Freshly ground black pepper makes a noticeable difference, so crack it yourself if you're feeling fancy. The melted butter and oil for basting should be hot but not smoking—this ensures the crust stays crispy without steaming.
Prep the chicken 1 day ahead if possible—pat it dry thoroughly and refrigerate uncovered for at least 2 hours before coating. This step is worth the extra time as it removes surface moisture for a better crust. Store the dry spices in an airtight container away from light to preserve their flavor. The buttermilk mixture can be made up to 24 hours ahead and stored in the fridge. Once baked, these thighs reheat beautifully—425°F for 5-7 minutes restores the crispiness perfectly for a second serving.
Why You'll Love This Recipe
- No Double-Dipping: The buttermilk marinade does all the work while you sleep—or at least while you’re scrolling through your phone. Just toss those thighs in a bag, let them sit overnight, and wake up to meat that’s already tender and ready to coat.
- Crisp Without the Oil: Honestly, the cornstarch flour mix changes everything. It’s lighter than deep-frying but still gives you that snap—golden, shatteringly crispy crust that holds up even when you’re not holding back. (Yes, I’ve tested this.)
- Leftovers That Don’t Suck: Between us, most fried chicken leftovers turn into sad, greasy messes. Not these. The baked method keeps them juicy for days, and they reheat like they’re fresh—perfect for tossing in sandwiches or turning into fried chicken mac and cheese later.
- Budget-Friendly Crowd-Pleaser: Bone-in thighs stretch further than breasts, and this recipe feeds a family without breaking the bank. I’ve used it for game days, potlucks, and even a lazy Sunday brunch—no one ever asks for seconds, but they always come back for more.
Step-by-step instructions for baked fried chicken thighs
Master the art of crispy layers without deep-frying—this method delivers restaurant-quality results.
Prepare the Chicken and First Coating
Pat the 1.5 lb bone-in chicken thighs completely dry with paper towels—this is critical for adhesion and crispiness. Arrange them skin-side up on a wire rack set over a baking sheet. In a large bowl, whisk together the 1.5 cups all-purpose flour, 1 tbsp smoked paprika, 1 tbsp garlic powder, 1 tbsp onion powder, 1.5 tsp salt, and 0.5 tsp ground black pepper. Lightly dredge each thigh in this seasoned flour mixture, shaking off any excess. The coating should adhere evenly without clumping.
Place the floured thighs on the prepared rack and refrigerate for 30 minutes. This chilling step ensures the coating sets firmly, preventing it from falling off during baking. While they chill, preheat your oven to 425°F with a rack positioned in the middle position. This high heat is essential for achieving that signature crispy texture.
Create the Egg Wash and Second Coating
In a shallow bowl, whisk the 2 whole large eggs until frothy. In a separate bowl, combine the 1 cup buttermilk with 1 tbsp dried mustard powder. Dip each chilled thigh into the beaten eggs, letting any excess drip off, then immediately into the buttermilk mixture. This double-dipping technique creates a moisture barrier that contributes to the double-crisp layers. Return the thighs to the rack and refrigerate again for 15 minutes to allow the coatings to adhere completely.
While the thighs rest, mix the 0.5 cup cornstarch with 1 tbsp smoked paprika in a small bowl. This ultra-fine coating will give you that signature crunch. After the second chilling period, lightly dust each thigh with the cornstarch mixture, pressing gently to ensure even coverage. The cornstarch acts as a barrier that prevents moisture from escaping during baking, maintaining that crispy exterior.
Bake with Butter and Oil for Maximum Crispiness
Transfer the prepared thighs to a second baking sheet lined with parchment paper. In a small saucepan, melt the 2 tbsp unsalted butter and 1 tbsp vegetable oil over low heat. Using a pastry brush, generously coat each thigh with the butter mixture, focusing on the skin side. This basting step creates a protective layer that promotes even browning and enhances flavor.
Bake the thighs at 425°F for 25 minutes, then reduce the heat to 375°F and continue baking for an additional 20-25 minutes. You'll know they're done when the skin is deep golden brown and crispy, and the internal temperature reaches 165°F at the thickest part of the thigh. The two-stage baking process ensures even cooking while maintaining that perfect crispy texture.
Rest and Serve for Optimal Texture
Remove the thighs from the oven and transfer them to a wire rack. Let them rest for 5-10 minutes before serving. This resting period allows the juices to redistribute throughout the meat, preventing them from pooling and making the chicken soggy. The crispy coating will remain intact, delivering that satisfying crunch with every bite.
Serve immediately with your favorite dipping sauce or sides. The thighs should be juicy and tender inside with a double layer of crispy, golden-brown coating that shatters slightly when you cut into them. This technique delivers all the satisfaction of traditional fried chicken without the mess or the need for deep-frying equipment.
Pro Tips For Making Baked Fried Chicken Thighs
- Prep Thighs First: Pat the skin dry with paper towels before dredging—this isn’t just about crispiness, it’s about letting the flour stick properly. Wet skin = soggy coating, and nobody wants that.
- Mix Cornstarch Early: Stir 2-3 tablespoons of cornstarch into your flour mix before dredging. It’s the difference between a light, airy crust and one that feels like you’re eating cardboard.
- Don’t Overcrowd the Pan: Bake thighs in a single layer, even if it means two batches. Cramming them turns the oven into a steamer, and you’ll end up with limp, greasy results instead of golden, shatterable crusts.
- Rest Before Baking: Let the buttermilk-marinated thighs sit uncovered in the fridge for at least 2 hours—overnight is even better. This tenderizes the meat and lets the coating set, so it doesn’t slide off when you pull them out.
Best sauces and condiments for baked fried chicken thighs
Classic Honey Mustard
This crowd-pleasing sauce balances sweet and tangy perfectly with the rich chicken. Mix ½ cup mayonnaise, 2 tbsp Dijon mustard, 2 tbsp honey, 1 tbsp apple cider vinegar, and ½ tsp smoked paprika in a bowl.
The honey caramelizes slightly when drizzled over warm thighs, creating a glossy finish. 🍯
Spicy Buffalo Sauce
For heat lovers, blend ½ cup hot sauce (like Frank's RedHot), 2 tbsp melted butter, and 1 tbsp lemon juice. Toss the baked thighs in this sauce just before serving—it clings beautifully to the crispy coating.
Serve with cool ranch or blue cheese dressing for contrast. The heat wakes up all the smoky flavors in the chicken.
Creamy Ranch Dip
Whip together ½ cup sour cream, ¼ cup mayonnaise, 1 tbsp chopped fresh dill, 1 tsp garlic powder, ½ tsp onion powder, and ½ tsp salt for a tangy, herby dip.
This is my go-to for family gatherings because it cools the palate after each bite of crispy chicken. Store-bought ranch mixes work in a pinch, but homemade tastes fresher.
Sweet Tea Glaze
Simmer ½ cup black tea (like Sweet Tea from Harney & Sons), ¼ cup brown sugar, and 1 tbsp apple cider vinegar until reduced by half. Brush this glaze over the baked thighs during the last 5 minutes of cooking.
The tea's tannins cut through the richness while the sugar caramelizes into a sticky, flavorful crust. 🍵
Garlic Aioli
Blend ½ cup mayonnaise, 2 roasted garlic cloves, 1 tbsp lemon juice, ½ tsp salt, and ¼ tsp cayenne pepper until smooth. This rich, garlicky sauce pairs beautifully with the smoky, crispy chicken.
For extra flavor, roast the garlic in its skin at 400°F for 30 minutes before blending. The depth of flavor makes it worth the effort.
Smoky BBQ Sauce
Use a Kansas City-style BBQ sauce (like Sweet Baby Ray's) for a smoky, slightly sweet contrast. Brush it on the thighs during the final 10 minutes of baking or serve it on the side for dipping.
The caramelized sugar in the sauce enhances the chicken's crispy texture while adding a deep, smoky layer of flavor. 🔥
Nutrition facts
Frequently asked questions
Why do I need to pat the chicken thighs completely dry?
The drying step is crucial for creating that signature crispy crust. Any moisture left on the skin will steam instead of crisp up during baking, resulting in a soggy coating. Think of it like drying off your hands before applying lotion—it helps the product stick better. Use paper towels and press firmly, especially around the skin.
Can I use boneless chicken thighs instead of bone-in?
Yes, but expect slightly faster cooking times. Bone-in thighs stay juicier longer because the bone acts as a heat sink. With boneless, reduce baking time by about 5-7 minutes and check for doneness at 160°F internal temperature. The crispy coating technique remains the same—just monitor closely to avoid overcooking.
What's the secret to getting extra crispy skin?
The double-coating method (flour + buttermilk + cornstarch) creates three crispy layers. The cornstarch in the final coating is key—it absorbs moisture and creates that shatteringly crisp texture. For maximum crispiness, bake on a wire rack (not directly on the pan) to allow air circulation on all sides, and don't overcrowd the baking sheet.
Can I make this recipe ahead of time?
Prepare the chicken up to the coating stage and refrigerate uncovered for 12 hours to dry completely. Then proceed with the recipe. For fully cooked thighs, bake as directed, let cool completely, then refrigerate for up to 3 days. Reheat in a 425°F oven for 10-12 minutes to restore crispiness. The flavor actually improves after resting!
Why did my chicken turn out greasy instead of crispy?
Greasy chicken usually means the skin wasn't dry enough or the oven temperature wasn't hot enough. Always pat dry thoroughly before coating, and ensure your oven reaches 425°F before baking. Another common mistake is opening the oven door too early—this lets heat escape and can make the coating steam instead of crisp. Keep the door closed until the final 5 minutes of baking.