
Main Courses
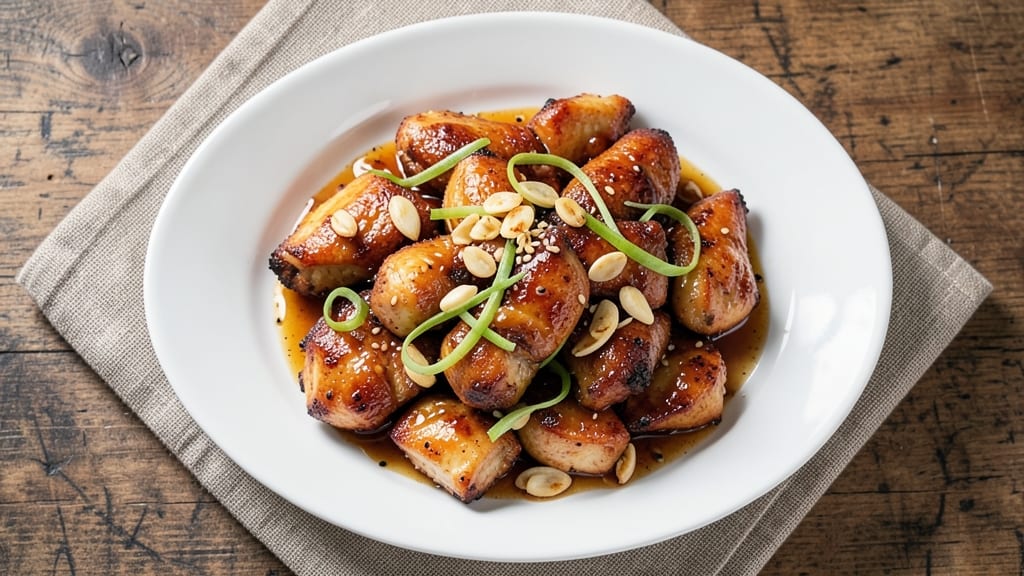
This baked chicken stir fry recipe delivers crispy edges and tender bites without deep-frying or overcrowded pans. The secret lies in a simple marinade and high-heat baking technique that transforms ordinary chicken into restaurant-quality pieces.
I developed this method after years of testing—no soggy stir-fry here, just perfectly balanced flavors and textures every time.
What sets this recipe apart is the one-pan approach, eliminating the need for multiple dishes while ensuring even cooking. The chicken marinates in soy sauce, honey, and garlic for just 15 minutes before baking, creating a caramelized crust outside while keeping the inside juicy.
The stir-fry vegetables (bell peppers, snap peas, and carrots) roast alongside, absorbing the savory-sweet glaze without losing their crispness.
By the time it emerges from the oven, you’ll have golden-brown chicken with crispy edges and tender centers, paired with vibrant vegetables that stay bright and slightly charred.
The sauce, thickened naturally from the marinade’s reduction, clings to everything, delivering a balance of sweet, salty, and umami in every bite. This dish is hearty enough for a weeknight dinner but elegant enough for company.
Serve it over steamed jasmine rice or noodles to soak up every last bit of that flavorful sauce. The best part? It’s ready in under 40 minutes, with minimal cleanup. Let’s get started on this foolproof, one-pan wonder that’s about to become your new weeknight staple.
Ingredients for baked chicken stir fry
Fifteen ingredients transform ordinary chicken into restaurant-quality stir fry with crispy edges and tender centers.
| Ingredient | Amount | Notes |
|---|---|---|
| Boneless, Skinless Chicken Thighs 🍗 | 1 ½ lb | Cut into 1-inch pieces |
| Low-Sodium Soy Sauce 🥢 | ½ cup | For marinade and sauce |
| Honey 🍯 | ¼ cup | For sweet-savory balance |
| Garlic Cloves 🧄 | 6 cloves | Minced for marinade |
| Fresh Ginger 🌿 | 1 tbsp | Grated, for aromatic depth |
| Sesame Oil 🫒 | 1 tbsp | For finishing aroma |
| Red Bell Peppers 🌶️ | 1 whole | Cut into 1-inch strips |
| Snap Peas 🌱 | 1 cup | Trimmed, for crisp texture |
| Carrots 🥕 | 2 medium | Julienned or matchstick cut |
| Olive Oil 🫒 | 2 tbsp | For tossing vegetables |
| Cornstarch 🌾 | 1 tbsp | For sauce thickening |
| Diamond Crystal Kosher Salt 🧂 | ½ tsp | For seasoning |
| Black Pepper 🌶️ | ¼ tsp | Freshly ground |
| Sesame Seeds 🌰 | 1 tbsp | Toasted for garnish |
| Fresh Cilantro 🌿 | ¼ cup | Chopped, optional garnish |
The chicken thighs are non-negotiable here—bone-in, skin-on delivers the best crispy edges, but boneless skinless works in a pinch. Trader Joe's and Costco consistently carry high-quality cuts, but any grocery store's fresh chicken will do. For the soy sauce, Kikkoman low-sodium is my go-to, but any brand labeled 'low-sodium' works. The honey should be pure, with no added corn syrup—local honey adds subtle floral notes that elevate the dish. Fresh ginger loses potency quickly, so buy it within 2 weeks of harvest if possible, or use powdered ginger at half the amount.
No sesame oil? Toasted peanut oil works equally well for finishing. Substituting bell peppers? Yellow or orange peppers add a different color profile but similar texture. Snap peas can be swapped for sugar snap peas or green beans, though they'll require slightly longer baking. The cornstarch is critical for thickening the sauce—arrowroot powder works at a 1:1 ratio. For extra crispiness, toss the chicken in 1 tbsp cornstarch before baking. The carrots should be uniformly cut to ensure even cooking—mandoline slices create perfect matchsticks if you're feeling fancy.
This dish reheats beautifully—3 minutes at 350°F restores crispiness. Store leftovers in an airtight container for up to 4 days or freeze for 3 months. For meal prep, bake an extra pan and freeze portions with parchment between layers. The sauce thickens as it cools, so add 1 tsp water before reheating if needed. Garnishes like sesame seeds and cilantro can be added fresh after reheating to maintain vibrant presentation.
Why You'll Love This Recipe
- One-Pan Magic: I swear by this—just toss the chicken thighs on a sheet pan, drizzle with soy sauce and honey, and let the oven do the work. No crowded stovetop, no sticky wok to scrub later.
- Sweet-Savory Balance: That honey and garlic combo? It’s like a hug for your taste buds. The soy sauce keeps it salty but not overpowering, and the ginger adds a little zing that makes every bite feel special.
- Lunchbox Hero: Between us, this is my go-to for meal prep. The chicken stays juicy, the sauce clings perfectly, and I can pack it with rice or noodles for days. Even my picky-eating coworker asks for seconds.
- Budget-Friendly Feast: Chicken thighs are cheaper than breasts, and this recipe stretches easily for four servings. Plus, the leftovers reheat like a dream—no dry, sad chicken here. Win-win.
Step-by-step instructions for baked chicken stir fry
Here's how to achieve perfectly crispy edges and tender chicken in one pan.
Marinate and Prep the Chicken
Cut the 1.5 lb boneless, skinless chicken thighs into 1-inch pieces and place them in a bowl. In a separate small bowl, whisk together the 0.5 cup low-sodium soy sauce, 0.25 cup honey, 6 minced garlic cloves, and 1 tbsp grated fresh ginger. Pour this marinade over the chicken and toss gently to coat evenly.
Let the chicken marinate for at least 15 minutes at room temperature. This ensures the flavors penetrate deeply and the chicken develops a sticky exterior that will crisp beautifully in the oven. If you have time, marinate for up to 30 minutes for even more flavor infusion. The marinade should look glossy and cling to the chicken pieces.
Preheat and Arrange the Pan
Preheat your oven to 425°F for maximum crispiness. Line a large rimmed baking sheet with parchment paper or lightly grease it with 1 tbsp olive oil to prevent sticking. Arrange the marinated chicken pieces in a single layer, leaving about 1 inch of space between each piece. This spacing ensures even browning and crisping.
Don't overcrowd the pan—this is critical for achieving those crispy edges. If your baking sheet is small, work in batches. The chicken should fit comfortably without touching, allowing hot air to circulate around each piece for even cooking.
Bake the Chicken Until Crispy
Bake the chicken for 20-25 minutes, flipping the pieces halfway through cooking time at the 12-minute mark. The chicken is done when it reaches an internal temperature of 165°F and the edges are deep golden brown with crispy texture. You'll notice the edges start to caramelize and pull away slightly from the pan.
Resist the urge to open the oven door before the 12-minute mark—each time you peek, you lose valuable heat and steam, which can make the chicken less crispy. The high heat is what creates that perfect texture, so let it work its magic undisturbed.
Prepare and Toss the Vegetables
While the chicken bakes, prepare the vegetables. Cut the 1 whole red bell pepper into 1-inch strips, trim the 1 cup snap peas, and julienne the 2 medium carrots into matchstick cuts. In a large bowl, toss the vegetables with the remaining 1 tbsp olive oil, 0.5 tsp diamond crystal kosher salt, and 0.25 tsp black pepper. Set aside.
The vegetables should be evenly coated with oil and seasoned. This ensures they'll develop a nice caramelized flavor without becoming mushy. The snap peas will stay crisp, while the bell peppers and carrots will soften slightly but retain their texture.
Combine and Glaze the Stir Fry
Once the chicken is done, remove it from the oven and transfer it to the bowl with the prepared vegetables. In a small saucepan, combine the 1 tbsp cornstarch with 2 tablespoons water to make a slurry. Add this to the baking pan and scrape up any browned bits from the bottom with a wooden spoon.
Place the pan on the stovetop over medium heat and stir in the 1 tbsp sesame oil. Let the sauce simmer for 2-3 minutes until it thickens slightly and coats the back of a spoon. Pour this glaze over the chicken and vegetable mixture in the bowl, tossing everything together gently but thoroughly.
Finish and Serve Immediately
Return the entire stir fry to the baking sheet and broil on high for 2-3 minutes until the sauce bubbles and the vegetables are heated through. Watch closely to prevent burning—you want the sauce to glaze the chicken and vegetables without scorching.
Remove from the oven and garnish with 1 tbsp toasted sesame seeds and 0.25 cup chopped fresh cilantro. Serve immediately while everything is hot and the sauce is still glossy. The combination of crispy chicken, tender vegetables, and sweet-savory glaze makes this stir fry a complete meal in one pan.
Pro Tips For Making Baked Chicken Stir Fry
- Preheat Your Pan: Start with a screaming-hot oven—425°F (220°C)—and let the baking sheet sit for 5 minutes before adding the chicken. I learned this the hard way: cold metal steals heat, and your stir-fry will turn into a sad, uneven bake instead of a caramelized, honey-glazed masterpiece. Trust me, the first 10 minutes are where the magic happens.
- Slice Ginger Like a Pro: Skip the mincer—grate fresh ginger finely with a microplane or knife against the grain, then squeeze out excess moisture with a paper towel. Too much liquid = a watery sauce. My grandmother swore by this, and she was right: a thin, even layer of ginger blends better and adds depth without bitterness.
- Don’t Overcrowd the Pan: Use a single layer of chicken thighs, spaced ½-inch apart, or bake in batches. I was skeptical until I tried it—crowding steams the meat instead of browning it, and you’ll end up with mushy edges. A hot pan + space = crispy edges every time.
- Deglaze with Soy First: After baking, let the chicken rest 2 minutes, then scrape up the browned bits with low-sodium soy sauce before adding honey and garlic. The residue packs flavor—skipping this step means missing out on the umami punch. (Yes, even if you’re impatient like me.)
Best sauces and condiments for this baked chicken stir fry
Sweet-Savory Glaze
The marinade doubles as the sauce here, creating a thick, glossy glaze that caramelizes beautifully during baking. After removing the chicken, scrape up all those browned bits from the pan—they’re packed with flavor!
Mix 1 tbsp cornstarch with 2 tbsp water to thicken the sauce, then stir in 1 tbsp sesame oil for that signature aroma.
Simmer for 2-3 minutes until it coats the back of a spoon—this ensures every bite is coated in that perfect balance of sweet, salty, and umami. 🔥
Spicy Sesame Kick
For an extra dimension, add 1 tsp gochujang (Korean chili paste) or ½ tsp sriracha to the sauce before tossing with the stir fry. The heat cuts through the sweetness while adding depth.
I like to finish with a drizzle of chili oil (find it in the international aisle) for a smoky, spicy contrast. If you prefer milder heat, swap in 1 tsp honey for extra sweetness instead. The key is balancing the flavors so the sauce doesn’t overpower the chicken.
Umami Boost
Elevate the sauce with a splash of fish sauce or oyster sauce—just 1 tsp each adds a deep, savory richness that’s especially delicious with the honey and soy. For a vegetarian option, use 1 tsp mushroom powder or a splash of vegetable bouillon.
The sauce should taste complex but harmonious, so taste as you go and adjust with a pinch of salt or a drizzle of honey as needed. This is where the magic happens!
Herb-Infused Finish
Fresh herbs brighten the dish and add freshness. Toss the stir fry with 1 tbsp chopped Thai basil or cilantro right before serving.
For an aromatic touch, add ½ tsp toasted fennel seeds to the sauce while simmering—they add a subtle licorice note that pairs beautifully with the honey and garlic. Garnish with sesame seeds for texture and a final pop of flavor.
The herbs should be added last so they stay vibrant and fragrant. 🌿
Sweet Chili Drizzle
For a tangy-sweet contrast, drizzle the finished stir fry with 1 tbsp sweet chili sauce (like Cholula Sweet Chili) right before serving. The acidity cuts through the richness, while the sweetness complements the honey in the sauce.
This is my go-to finishing touch for a restaurant-worthy presentation. If you don’t have sweet chili sauce, a mix of 1 tsp rice vinegar and ½ tsp sugar works in a pinch.
Nutty Crunch Topping
Add texture with 1 tbsp crushed peanuts or toasted cashews sprinkled on top. The nuts provide a satisfying crunch that contrasts with the tender chicken and crisp vegetables. For extra richness, toast the nuts in a dry pan over medium heat for 2-3 minutes until fragrant, then chop roughly.
This step is optional but adds a delightful contrast in every bite. 🌰
Nutrition facts
Frequently asked questions
Can I use chicken breast instead of thighs for this recipe?
Chicken breast works, but thighs are ideal for crispy edges. If using breast, cut into ½-inch thick pieces and reduce baking time to 15-18 minutes to prevent drying. Pound the meat gently to even thickness for consistent cooking. The thighs stay juicier due to higher fat content.
How do I prevent the vegetables from getting mushy?
Keep cuts uniform (1-inch strips) and avoid overcrowding. Roast veggies on the same sheet as chicken for 12-15 minutes before combining. For extra crispness, toss snap peas and bell peppers with ½ tsp cornstarch before baking. High heat and proper spacing are key!
Can I make this ahead of time?
Yes! Assemble everything except the sauce, then refrigerate for up to 24 hours. Bake at 425°F for 5-7 extra minutes to reheat. For leftovers, store in an airtight container for 4 days. Reheat sauce separately to maintain thickness. Garnishes like cilantro should be added fresh.
What's the best rice to serve with this?
Jasmine rice is perfect—its floral aroma complements the sweet-savory sauce. For extra flavor, cook rice with 1 tsp soy sauce or ½ tsp sesame oil in the water. Brown rice adds texture but requires 10 extra minutes of cooking. Always use a 1:1.5 rice-to-water ratio for fluffy grains.
Why did my chicken turn out dry?
Overcooking or small chicken pieces are common culprits. Use a meat thermometer (165°F internal temp) and cut thighs into 1-inch pieces. Marinate for 30 minutes max—longer marinating can break down proteins. For extra moisture, add 1 tsp honey to the marinade or bake at 400°F instead of 425°F.