
Main Courses
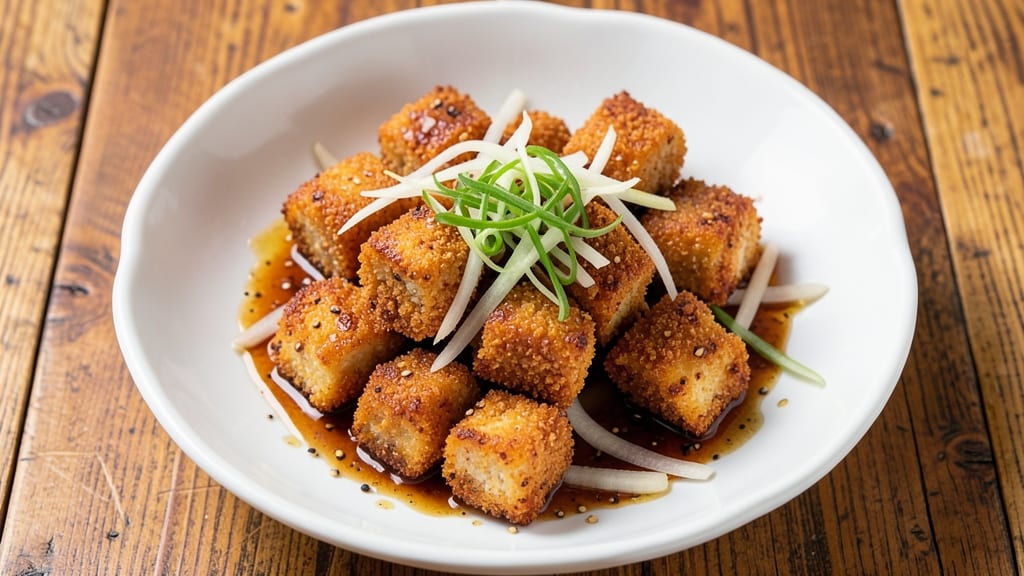
This baked chicken karaage recipe delivers the same crispy-fried Japanese crunch without deep-frying—just 25 minutes and a single sheet pan. The secret lies in the double-dredge technique and high-heat baking, which creates that signature golden, shatteringly crispy exterior while keeping the meat juicy inside.
I developed this method after years of perfecting homemade karaage, and it never fails to impress. What sets this recipe apart is the simplicity of the process: tender chicken thighs get marinated in a light soy-ginger-garlic blend, then coated in a crispy panko-cornstarch mixture before baking.
The result is restaurant-quality karaage with zero mess and no deep-fryer required. The crispy coating stays crunchy even after serving, making it perfect for sharing. By the time you're done, you'll have perfectly golden, crispy chicken pieces that are addictively crunchy on the outside and tender on the inside.
The marinade infuses subtle Japanese flavors without overpowering the natural taste of the chicken, creating a balance that's both familiar and exciting. Serve with a side of steamed rice, pickled vegetables, and a cold Japanese beer for the full karaage experience. Here's how to make it!
Ingredients for baked chicken karaage
Japanese-inspired ingredients for crispy, juicy karaage without deep-frying. Simple yet precise for perfect texture.
| Ingredient | Amount | Notes |
|---|---|---|
| Boneless, Skinless Chicken Thighs 🍗 | 1 ½ lb | Cut into 1-inch pieces |
| Japanese Breadcrumbs (Panko) 🍞 | 1 ½ cups | Not regular breadcrumbs |
| Cornstarch 🌾 | ½ cup | For extra crispiness |
| All-Purpose Flour 🌾 | ½ cup | For double-dredge coating |
| Soy Sauce 🍶 | ½ cup | Japanese-style preferred |
| Fresh Ginger 🌿 | 1 tbsp | Grated, not powdered |
| Garlic Cloves 🧄 | 4 cloves | Minced for marinade |
| Sesame Oil 🫒 | 1 tbsp | For authentic flavor |
| Neutral Oil (Avocado or Vegetable) 🫒 | 2 tbsp | For light coating |
| Salt 🧂 | 1 tsp | Kosher or sea salt |
| Black Pepper 🌶️ | ½ tsp | Freshly ground preferred |
| Japanese Mayonnaise (Optional) 🥛 | 2 tbsp | Kewpie brand recommended |
The chicken thighs are key—bone-in, skin-on if you can find them, but boneless works too. Look for thighs with good marbling at Whole Foods or your local butcher shop. The panko should be light and airy—the cheap stuff gets soggy. Trader Joe's has a great brand for this. For the cornstarch, Bob's Red Mill is my go-to—it's fine and consistent. If you can't find Japanese breadcrumbs, use regular panko mixed with a little extra cornstarch to compensate.
No Japanese soy sauce? Kikkoman is widely available and works well. Fresh ginger is a must—powdered lacks the zing. Garlic should be minced finely for even flavor distribution. Sesame oil adds depth, but if you're avoiding it, toasted sesame seeds sprinkled on top at the end give a similar effect. For the optional mayo, Kewpie is the gold standard, but regular mayo in a pinch works too. Double-dredging is non-negotiable—flour first, then panko mix—this creates that signature crispy shell.
Marinate the chicken for at least 30 minutes (overnight is better) to maximize flavor. Store leftover cooked karaage in an airtight container for 3 days—it reheats beautifully in a 350°F oven for 5-7 minutes. For extra crispiness, re-crisp under the broiler for 1-2 minutes before serving. The coating stays crunchy for hours if kept in a warm oven set to 200°F.
Why You'll Love This Recipe
- No-Fuss Crispiness: I swear by the cornstarch trick—just toss those thighs in a bag with flour and cornstarch, shake it out, then let the panko stick like magic. No messy bowls or overworked hands here.
- Umami Bomb: That soy sauce marinade? It’s the MVP. The thighs stay juicy inside while the panko gets gloriously crispy, and the flavor? Salty, savory, and just a little addictive—no fancy seasoning blends needed.
- Lunchbox Hero: Between us, this is my secret weapon for meal prep. Bake a big batch on Sunday, and you’ve got crispy, portable protein for lunches all week. Packs well, stays crisp, and even my picky kid grabs it first.
- Budget Win: Chicken thighs stretch further than breasts, and panko costs less than half the price of pre-breaded nuggets. For under $10, you feed four people dinner that actually tastes like you put effort in—(yes, even on a Tuesday night).
Step-by-step instructions for baked chicken karaage
Here's how to achieve that signature Japanese crunch without deep-frying.
Prepare the Chicken Marinade
In a medium bowl, whisk together the 0.5 cup soy sauce, 1 tablespoon grated fresh ginger, 4 minced garlic cloves, and 1 tablespoon sesame oil. Add the 1.5 lb boneless, skinless chicken thighs cut into 1-inch pieces and toss gently to coat evenly. Let the mixture marinate for at least 15 minutes at room temperature—this ensures maximum flavor penetration and tender meat.
While marinating, preheat your oven to 425°F. The high heat is crucial for achieving that signature crispy exterior without deep-frying. I like to use a wire rack on a baking sheet for optimal airflow, which prevents the breading from becoming soggy.
Create the Double-Dredge Coating
In a shallow bowl, combine the 0.5 cup all-purpose flour and 0.5 cup cornstarch. This combination creates a lighter, crispier crust than flour alone. In another shallow bowl, place the 1.5 cups Japanese breadcrumbs (panko)—these stay crispy even when baked, unlike regular breadcrumbs.
Working in batches to avoid overcrowding, remove the chicken from the marinade (reserve the marinade) and dredge each piece first in the flour mixture, shaking off any excess. Then dip into the panko, pressing gently to adhere the crumbs evenly. Place the coated chicken on a clean plate and let it rest for 5 minutes—this helps the coating adhere better before baking.
Bake for Maximum Crispiness
Lightly coat a wire rack with 2 tablespoons neutral oil (avocado or vegetable) using a paper towel—this prevents sticking and adds to the crispiness. Arrange the chicken pieces in a single layer on the rack, leaving space between them for proper air circulation. This is critical for even browning and crisping.
Bake for 12-15 minutes until the chicken reaches an internal temperature of 165°F and the breading is deep golden brown with visible crispy edges. If the edges aren't brown enough after 12 minutes, return the tray to the oven for an additional 2-3 minutes—don't walk away, as ovens vary in heat distribution.
Optional Mayo Glaze and Serving
For that authentic karaage finish, whisk together the 2 tablespoons Japanese mayonnaise (Kewpie brand recommended) with 1 teaspoon salt and 0.5 teaspoon black pepper. Drizzle this mixture over the hot chicken just before serving—it adds a tangy, creamy contrast to the crispy exterior and tender meat.
Serve immediately while the breading is still crisp. The chicken should be golden brown with a satisfying crunch that gives way to juicy, flavorful meat. Pair with steamed rice and a simple cucumber salad for a complete Japanese-inspired meal.
Pro Tips For Making Baked Chicken Karaage
- Pound the Thighs: Hit those chicken thighs with a meat mallet until they’re paper-thin—about ¼-inch. I learned this the hard way after serving rubbery karaage that looked like it had been through a war. Even thickness means even cooking, and that crispy crust won’t turn into a sad, greasy mess.
- Skip the Double-Dredge: One coating of flour, one of cornstarch, then panko—no need to go back for a second dip. I used to think extra layers meant extra crunch, but it just turns into gluey, soggy armor. The first layer sticks; the second just steams your breadcrumbs.
- 425°F, No Less: Preheat your oven to 425°F and don’t skimp. I was lazy once and baked at 400°F, and the result was a sad, pale, undercooked pile. High heat sears the cornstarch into a golden crust in the first 10 minutes—once it’s golden, you can drop the temp to 375°F to finish.
- Rest the Chicken: Pat those thighs bone-dry with paper towels, then let them sit on a wire rack for 15 minutes before coating. I used to skip this, and my panko would clump like wet sand. Dry meat = crispy karaage. (Yes, even if you’re impatient like me.)
Troubleshooting great baked chicken karaage
Pale, Soggy Breading
The #1 reason karaage loses its crispiness is steam getting trapped under the coating. Always use a wire rack on your baking sheet—this lifts the chicken above the pan, allowing air to circulate and preventing moisture buildup.
If you don’t have a rack, mound the chicken pieces on top of crisscrossed aluminum foil to create airflow. 🌡️
Another culprit is overcrowding the pan. Leave at least ½ inch between pieces so heat can reach all sides evenly. I’ve seen home cooks fit too much on one tray, resulting in uneven cooking and soggy spots. For large batches, bake in two rounds rather than risking uneven results.
Uneven Cooking
If some pieces are undercooked while others burn, your oven’s heat distribution might be the issue. Rotate the baking sheet halfway through cooking (around 8 minutes for a 425°F oven) to ensure even browning.
I also recommend placing a thermometer probe in the thickest piece to monitor 165°F internal temperature—this is more reliable than visual cues alone.
For ovens with hot spots, try using the middle rack instead of the top. If your chicken browns too quickly but isn’t fully cooked inside, tent it loosely with aluminum foil for the last 3-5 minutes to finish cooking without burning.
Dry or Tough Meat
Chicken thighs are forgiving, but over-baking turns them dry. Remove the chicken from the oven as soon as it hits 165°F—even a minute longer can make a difference. If your pieces are consistently dry, reduce the oven temperature to 400°F and extend baking time by 2-3 minutes.
The marinade should help retain moisture, but don’t skip it!
For extra juiciness, marinate overnight in the fridge (covered) instead of just 15 minutes. The acid in soy sauce tenderizes the meat, and cold storage slows down protein breakdown. If you’re short on time, at least 30 minutes of marinating makes a noticeable difference. 💡
Coating Falls Off
If the panko crumbles or detaches during baking, the chicken wasn’t rested long enough after dredging. Let the coated pieces sit on a clean plate or rack for 5-10 minutes before baking—this gives the coating time to adhere properly.
Press the crumbs gently but firmly when dredging, especially around the edges.
Another fix: Chill the coated chicken for 15-20 minutes in the fridge before baking. The cold slows down cooking initially, helping the coating set more securely. This trick is especially useful in humid kitchens where coatings tend to soften faster.
Blanding Flavor
If your karaage tastes flat, the marinade might not have enough time to penetrate. Always marinate for at least 15 minutes—overnight is ideal. For extra depth, add ½ teaspoon grated lemon zest or 1 teaspoon mirin to the marinade.
The umami from soy sauce should shine, but if it’s too salty, balance it with a touch of sugar (½ teaspoon).
For a quick flavor boost, brush the baked chicken with a mix of 1 tablespoon melted butter and 1 teaspoon soy sauce before serving. This adds richness without overpowering the crispy texture. 🌟
Nutrition facts
Frequently asked questions
Can I use chicken breasts instead of thighs for this recipe?
Chicken breasts work, but thighs are ideal for karaage because they stay juicier when baked. If you use breasts, cut them into ½-inch thick pieces and bake for 10-12 minutes at 425°F—they cook faster and can dry out. For extra moisture, marinate for 30+ minutes or add 1 tablespoon honey to the marinade.
How do I make this recipe gluten-free?
Replace the flour with ½ cup gluten-free all-purpose flour and use 1 cup gluten-free panko (or crush gluten-free crackers into fine crumbs). For extra crispiness, add ¼ cup cornstarch to the panko mix. The texture will be slightly different but still delicious!
Can I bake this karaage ahead of time?
Yes! Cook the chicken fully, then let it cool completely. Store in an airtight container for up to 3 days in the fridge. To reheat, bake at 375°F for 8-10 minutes on a wire rack to restore crispiness. For the best texture, serve fresh if possible.
Why does my panko coating get soggy?
Soggy coatings happen when steam gets trapped under the breading. Always bake on a wire rack (or crisscrossed foil) to allow airflow. Avoid overcrowding—leave ½ inch between pieces. If your kitchen is humid, chill the coated chicken for 15 minutes before baking to help the coating set.
What's the best way to serve baked karaage?
Pair with classic Japanese sides: steamed rice, quick-pickled cucumbers, or a simple miso soup. For extra flair, drizzle with Japanese mayo (Kewpie) mixed with 1 tsp rice vinegar. The crispy chicken also works great in salads, rice bowls, or even as a taco filling!