
Main Courses
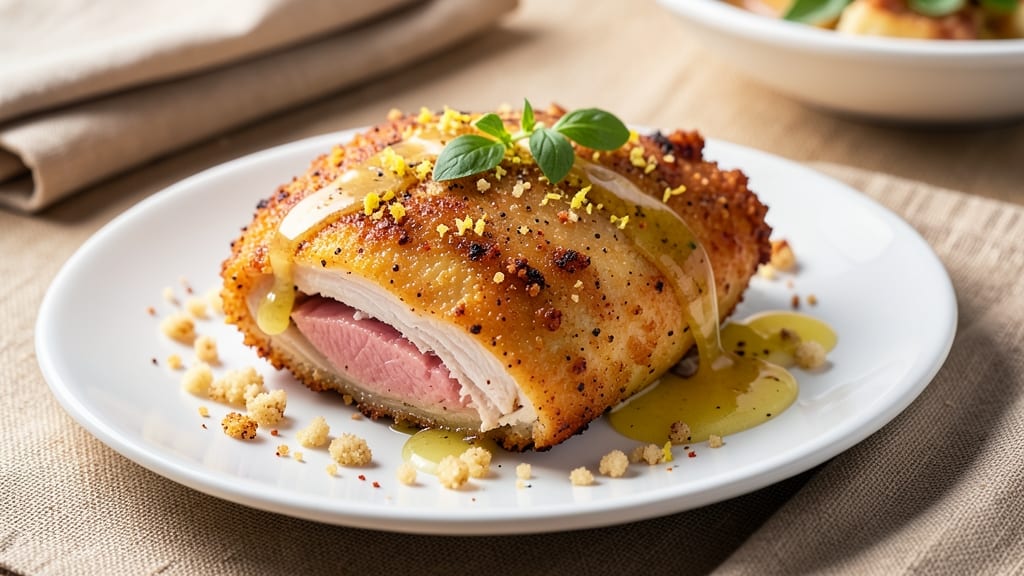
This baked breaded lemon chicken recipe delivers the perfect balance of crispy golden crust and juicy centers with bright citrus flavor. 💛 The secret lies in a double-breading technique that creates an irresistible texture while keeping the meat tender.
I've perfected this method after years of testing—no frying required, just oven magic.
The process starts with a simple marinade that infuses the chicken with lemon's tangy brightness before a light coating of flour and beaten egg creates the ideal base. The real game-changer is the second breading layer, which locks in moisture while achieving that coveted restaurant-style crispiness.
At 400°F, the chicken bakes in just 25 minutes, making this a weeknight-friendly showstopper.
What you'll end up with is golden-brown chicken pieces that shatter at every bite, revealing tender, flavorful meat underneath. The lemon zest in the breading adds a subtle citrus aroma that pairs beautifully with the crispy exterior.
This recipe serves four and comes together in under an hour—ideal for family dinners or meal prep.
The beauty of this method is its versatility. Serve with roasted potatoes, a fresh salad, or your favorite pasta to complete the meal. The crispy breading stays intact even when reheated, making leftovers just as satisfying as the first serving. Let's get started on creating this crowd-pleasing dish!
Ingredients for baked breaded lemon chicken
Twelve ingredients transform simple chicken into restaurant-worthy crispy lemon perfection.
| Ingredient | Amount | Notes |
|---|---|---|
| Boneless, Skinless Chicken Breasts 🍗 | 1 ½ lb | Pounded to even 1/4-inch thickness |
| All-Purpose Flour 🌾 | ¾ cup | For first breading layer |
| Large Eggs 🥚 | 2 whole | Beaten until frothy |
| Panko Breadcrumbs 🍞 | 1 ½ cups | For second crispy layer |
| Fresh Lemon Zest 🍋 | 2 tbsp | From 1 large organic lemon |
| Fresh Lemon Juice 🍋 | ½ cup | Plus 1 tbsp for marinade |
| Extra-Virgin Olive Oil 🫒 | 2 tbsp | For marinade and coating |
| Diamond Crystal Kosher Salt 🧂 | 1 ½ tsp | Divided for seasoning |
| Ground Black Pepper 🌶️ | ½ tsp | Freshly cracked |
| Dried Parsley Flakes 🌿 | 1 tbsp | For breading flavor |
| Garlic Powder 🧄 | 1 tsp | For breading depth |
| Paprika 🌶️ | ½ tsp | Smoked for color |
| Cornstarch 🌾 | 1 tbsp | For extra crispiness |
The chicken breasts are the foundation—organic free-range from Whole Foods delivers the juiciest results, but any boneless, skinless will work if pounded evenly. Look for breasts with minimal connective tissue for consistent tenderness. I always use a meat mallet to pound them to exactly 1/4-inch thickness; this ensures even cooking and crispiness. The lemon should be organic when possible—the zest contains the most potent citrus oils, which are essential for that bright, aromatic crust. Store lemons in the fridge for maximum zest potency, and zest just before using to preserve freshness.
No panko? Regular breadcrumbs plus an extra 1 tbsp cornstarch mimics the light, airy texture. The lemon juice marinade can be prepped 24 hours ahead—store it in an airtight container in the fridge. For extra depth, add 1 tsp of lemon extract to the marinade, though fresh juice is always preferred. If you're short on time, substitute 1/2 cup Greek yogurt for the egg wash—it creates a similar crispy barrier. The cornstarch in the final breading is non-negotiable for that signature crunch; don't skip it. And while smoked paprika adds color, regular paprika works in a pinch.
Marinate the chicken for at least 30 minutes before breading—this ensures maximum flavor infusion. Store breaded chicken pieces on a wire rack in the fridge for up to 4 hours before baking to maintain crispiness. Leftovers keep for 3 days in the fridge, though they're best reheated in a 350°F oven for 10 minutes to restore crispiness. For meal prep, portion into airtight containers with parchment paper between layers to prevent sticking. The lemon zest loses potency after 2 days, so use it fresh whenever possible for optimal flavor.
Why You'll Love This Recipe
- No-Fuss Coating: I swear by the three-step breading trick—flour, beaten egg, panko—and it stays crispy without frying. No messy deep-fryer here, just a sheet pan and 20 minutes of hands-off baking.
- Zesty Crunch Magic: That lemon zest in the panko mix? It’s the secret weapon. Bright, crispy, and packed with flavor—every bite tastes like a sunlit afternoon, not just another breaded chicken.
- Weeknight Hero: Between us, this is my go-to when I’m starving but don’t want to slave over dinner. Double the batch, reheat for lunch, and suddenly you’ve got two meals solved. (Yes, even on a Tuesday night.)
- Budget Meal Stretch: Chicken breasts and pantry staples mean this feeds four for under $15. The leftovers reheat like a dream—crispy outside, juicy inside—so you’re not stuck ordering takeout when you’re tired of eating the same thing.
Step-by-step instructions for baked breaded lemon chicken
Here's how to achieve that perfect balance of crispy, golden crust and tender, juicy chicken.
👨🍳 Step 1: Prepare the Lemon Marinade
In a small bowl, whisk together the 0.5 cup fresh lemon juice, 2 tbsp extra-virgin olive oil, 1 tbsp lemon zest, 0.5 tsp paprika, and 0.75 tsp diamond crystal kosher salt. This marinade infuses the chicken with bright citrus flavor while tenderizing the meat. Place the 1.5 lb boneless, skinless chicken breasts in a resealable plastic bag and pour the marinade over them.
Massage the marinade into the chicken, making sure it coats all surfaces evenly. Seal the bag and refrigerate for at least 30 minutes (or up to 4 hours for maximum flavor penetration). This step ensures your chicken stays juicy while developing that zesty foundation for the breading.
🔪 Step 2: Pound and Season the Chicken
Remove the chicken from the marinade and pat it dry with paper towels—this is CRITICAL for crispy breading. Place each breast between two sheets of plastic wrap and pound to an even ¼-inch thickness using a meat mallet. This ensures even cooking and prevents thick spots that might stay undercooked.
Divide the remaining 0.75 tsp diamond crystal kosher salt and 0.5 tsp ground black pepper evenly between the chicken breasts. Sprinkle both sides generously, then let them rest for 10 minutes at room temperature. The salt will begin seasoning the meat while the pepper adds subtle warmth that pairs perfectly with the lemon.
🍳 Step 3: Create the Breading Station
Set up three shallow bowls. In the first, whisk together the 0.75 cup all-purpose flour, 1 tbsp dried parsley flakes, 1 tsp garlic powder, and 1 tbsp cornstarch. The cornstarch creates that extra-crispy texture you're after. In the second bowl, beat the 2 whole large eggs until frothy but not fully mixed. In the third bowl, combine the 1.5 cups panko breadcrumbs with the remaining 0.5 tsp paprika.
Here's the thing—work quickly once you start breading. The chicken should be dry when it hits the flour, so pat it dry again right before dipping. This three-step breading process (flour, egg, panko) creates that perfect crispy-yet-light crust that stays crunchy even after baking.
🔥 Step 4: Bake to Golden Perfection
Preheat your oven to 425°F and line a baking sheet with parchment paper. Arrange a wire rack on top of the parchment to allow air circulation underneath the chicken. Working in batches if needed, dip each chicken breast first into the flour mixture, shaking off any excess. Then dip into the beaten eggs, letting any excess drip off. Finally, press firmly into the panko breadcrumb mixture, coating all sides completely.
Place the breaded chicken on the prepared rack, spacing them about 1 inch apart. Bake for 20-25 minutes until the chicken reaches an internal temperature of 165°F and the breading is deep golden brown with crispy edges. Don't overcrowd the pan—this prevents steam buildup that makes breading soggy. If the breading browns too quickly, tent loosely with foil for the last 5 minutes of baking.
⏰ Step 5: Rest and Serve
Transfer the chicken to a cutting board and let it rest for 5 minutes before slicing. This resting period allows the juices to redistribute, ensuring each bite is moist and flavorful. The breading will stay crispy while the chicken maintains its juicy perfection—this is where the magic happens.
Slice the chicken against the grain for maximum tenderness and serve immediately. The combination of crispy, lemon-infused breading and juicy centers creates a dish that's both elegant and satisfying. Pair with a simple arugula salad or roasted vegetables to let the chicken shine as the star of the meal.
Pro Tips For Making Baked Breaded Lemon Chicken
- Pound Chicken Evenly: I learned this the hard way—uneven thickness means some parts cook faster, others stay dry. Use a meat mallet or rolling pin to tap the breasts to ¼-inch thickness, then flip and repeat. No mallet? A heavy skillet works, but go slow to avoid tearing.
- Mix Lemon Zest with Panko: Sounds weird, but it works: fold the lemon zest into the panko before coating. This locks in flavor so it doesn’t just sit on top like afterthought seasoning. Pro move: Toast the panko first—just 2 minutes in a dry pan—so the crust stays crisp instead of soggy.
- Bake on Wire Racks: Skip the baking sheet if you can. Place chicken on a wire rack set over a tray to let air circulate underneath. This prevents the bottom from steaming and turning rubbery. (Yes, even if you’re impatient like me—trust the process.)
- Rest Before Breading: Pat the chicken completely dry with paper towels, then let it sit uncovered on a plate for 10 minutes before dredging. This step makes all the difference—wet chicken absorbs too much egg and flour, leading to a gummy crust instead of crispy.
Wine and beer pairings for this recipe
Crispy White Wine
For this bright, lemony chicken, I always reach for a dry Riesling—specifically a German or Austrian example like Dr. Loosen Blue Slate or F.X. Pichler. The wine's crisp acidity mirrors the lemon's tang while its subtle mineral notes complement the crispy breading beautifully.
Serve it slightly chilled (50-55°F) to enhance its refreshing qualities. 🍷
Citrusy Sauvignon Blanc
A New Zealand Sauvignon Blanc from Marlborough—think Cloudy Bay or Oyster Bay—is my go-to for this dish. The wine's zesty citrus and herbal notes harmonize perfectly with the lemon chicken's bright profile.
Look for bottles with "Sauvignon Blanc" prominently labeled to ensure you're getting the classic style. The wine's high acidity cuts through the richness of the breading.
Light-Bodied Pinot Grigio
When I want something even lighter, I turn to a crisp Italian Pinot Grigio like Santa Margherita or Santa Lucia. These wines offer delicate almond and pear notes that won't overpower the dish but instead enhance its freshness.
Opt for one from Friuli-Venezia Giulia—this region produces some of the finest examples with excellent balance. Serve at 45-50°F for optimal enjoyment.
Hoppy American Pale Ale
For beer lovers, a light American pale ale with citrusy hops—like Fat Tire or Allagash White—works surprisingly well. The beer's bright hop character complements the lemon's acidity, while its crisp finish cleanses the palate between bites.
Avoid heavy IPAs or stouts that would overwhelm the delicate chicken flavors. A 45-50°F serving temperature brings out the best in both the beer and the dish.
Lemon-Infused Craft Beer
If you're feeling adventurous, try a lemon IPA like New Belgium's Fat Tire Amber Ale (which has subtle citrus notes) or Modern Times' Lemon Drop IPA. The beer's tart, hoppy profile mirrors the chicken's lemony brightness while adding a fun, unexpected twist.
Serve these beers at 40-45°F to enhance their refreshing qualities. The carbonation helps cut through the richness of the breaded chicken.
Non-Alcoholic Pairings
For a refreshing non-alcoholic option, I recommend sparkling lemonade made with fresh-squeezed lemon juice and San Pellegrino Limonata. The effervescence and citrus notes create a perfect match for the dish's bright flavors.
Alternatively, a cucumber-mint infused water with a splash of lemon juice provides a crisp, palate-cleansing accompaniment. Both options keep the meal light and refreshing.
Nutrition facts
Frequently asked questions
Why does the recipe use both flour and cornstarch in the breading?
The flour creates structure while the cornstarch adds that signature crispiness you crave. The cornstarch absorbs moisture and creates a lighter, more delicate crust that stays crunchy even after baking. Using both gives you the best of both worlds—structure from flour and that restaurant-quality crunch from cornstarch.
Can I use chicken thighs instead of breasts for this recipe?
Chicken thighs work beautifully and stay juicier longer. For best results, bake them at 375°F for 30-35 minutes (they take longer than breasts) until the internal temperature reaches 165°F. The thicker cut benefits from the longer baking time, resulting in even more flavorful, tender meat.
How do I keep the breading from getting soggy?
Three key steps: pat the chicken dry before breading, space pieces 1 inch apart on the rack, and bake at high heat (425°F). The wire rack allows air circulation underneath, preventing steam buildup. If the breading browns too quickly, tent loosely with foil for the last 5 minutes of baking.
Can I make this recipe ahead of time?
Yes! Bread the chicken and refrigerate on a wire rack (not touching) for up to 4 hours before baking. For make-ahead meals, bake completely, then store in an airtight container with parchment between layers. Reheat at 350°F for 10 minutes to restore crispiness. The flavor actually improves overnight!
What's the best way to slice the chicken?
Slice against the grain for maximum tenderness. Look for the direction of the muscle fibers—cutting perpendicular creates shorter muscle fibers that result in a more tender bite. For even slices, use a sharp chef's knife and cut through the thickest part first, then follow through to the thinner edges.