
Main Courses
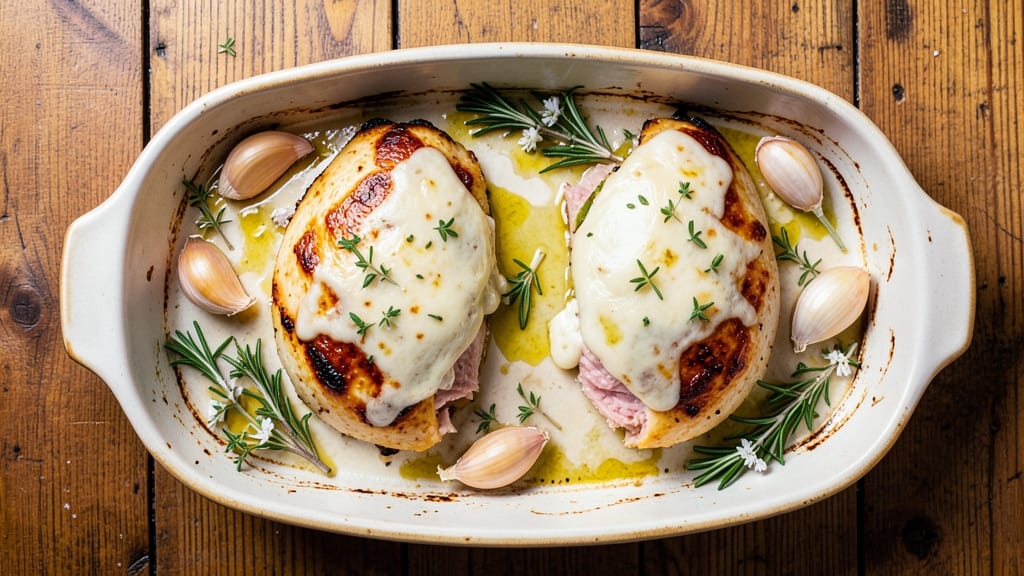
This baked Asiago chicken recipe delivers a juicy, golden crust of melted cheese that hides perfectly tender meat inside. The secret lies in a simple marinade that tenderizes while allowing the Asiago to create that irresistible, bubbling exterior.
I developed this method after years of experimenting with baked chicken—balancing crispy cheese with moist centers proved trickier than it seemed.
The process starts with a foolproof marinade of olive oil, garlic, and herbs that infuses the chicken while keeping it tender. A generous layer of grated Asiago cheese transforms into a crispy, caramelized shell during baking, creating a texture that's both satisfying and elegant.
The result is a dish that feels restaurant-worthy but comes together in just 45 minutes with minimal effort.
What makes this recipe stand out is how the cheese crust enhances rather than overwhelms the natural flavor of the chicken. Each bite offers a perfect balance—crispy cheese giving way to succulent meat—making it ideal for family dinners or special occasions.
The technique works equally well with thighs or breasts, ensuring consistent results every time.
Pair with roasted vegetables or a fresh salad to complete the meal. The rich, cheesy flavor makes this chicken a crowd-pleaser, and leftovers reheat beautifully. Here's how to achieve that perfect melt-in-your-mouth texture without any shortcuts that compromise quality.
Ingredients for baked asiago chicken
Juicy chicken and crispy Asiago crust—this recipe balances restaurant-quality texture with simple ingredients.
| Ingredient | Amount | Notes |
|---|---|---|
| Boneless, Skinless Chicken Breasts 🍗 | 1 ½ lb | Pounded to even thickness |
| Extra-Virgin Olive Oil 🫒 | ½ cup | High-quality, fruity variety |
| Asiago Cheese 🧀 | 1 ½ cups | Freshly grated, fine texture |
| Garlic Cloves 🧄 | 6 cloves | Minced for marinade |
| Fresh Rosemary 🌿 | ¼ cup | Finely chopped, stems removed |
| Fresh Thyme 🌿 | ¼ cup | Leaves only, chopped |
| Diamond Crystal Kosher Salt 🧂 | 1 tbsp | For seasoning and marinade |
| Ground Black Pepper 🌶️ | 1 tsp | Freshly ground preferred |
| All-Purpose Flour 🌾 | ¼ cup | For dredging chicken |
| Large Eggs 🥚 | 2 whole | Beaten for egg wash |
| Fresh Lemon Juice 🍋 | 2 tbsp | Bright, freshly squeezed |
| Garlic Powder 🧄 | 1 tsp | For added depth |
| Red Bell Pepper 🌶️ | 1 whole | Optional, sliced for garnish |
The quality of your Asiago cheese makes all the difference here. Whole Foods or specialty cheese shops carry the best varieties, but Trader Joe's has a surprisingly good pre-grated option that works in a pinch. Look for cheese with vibrant color and minimal additives—it should melt smoothly without separating. For the chicken, organic, free-range breasts from Costco or local butchers ensure better flavor and texture. Pounding the chicken to an even thickness guarantees even cooking, preventing dry spots underneath the cheese crust. Fresh herbs are non-negotiable—dried thyme or rosemary won't deliver the same aromatic punch, though you can use them at half the amount if you're in a bind.
No fresh rosemary? Dried rosemary at one-third the amount will work, but the flavor profile shifts slightly. For the olive oil, California-based brands like Corto or Bertolli offer excellent quality, though any extra-virgin will suffice. Substituting Asiago? Parmesan or mozzarella blends can mimic the flavor, but none will replicate that perfect melt-and-crisp balance. The lemon juice can be swapped for white wine vinegar, though the acidity level will differ slightly. If you're using thighs instead of breasts, increase the baking time by 5-7 minutes to account for their denser texture. The red bell pepper is completely optional but adds a vibrant garnish that brightens the dish's presentation.
Prep the chicken and marinade up to 24 hours ahead—the flavors meld beautifully overnight. Store the marinating chicken in a sealed container in the fridge. The grated Asiago should be kept in an airtight container with parchment paper between layers to prevent clumping. This dish reheats exceptionally well—350°F for 10-12 minutes restores the crispy crust while keeping the chicken moist. Leftovers keep for 4 days in the fridge or 3 months frozen. For freezing, portion the chicken into individual servings before baking to maintain texture when reheated. The cheese crust loses its crispiness when reheated, so it's best enjoyed fresh from the oven.
Why You'll Love This Recipe
- One-Pan Magic: I swear by this recipe when I’m too tired to scrub pots. Toss the chicken breasts in olive oil, garlic, and rosemary, then top with asiago—throw it in the oven and forget about it until the timer goes off. That’s it. No stovetop babysitting, no messy sauces.
- Cheesy-Garlicky Bliss: The asiago melts into this golden, crispy crust while the garlic infuses every bite. Honestly, the first time I made it, my husband stole half before it even cooled. That crispy edge with the creamy center? Chef’s kiss—no fancy ingredients, just pure flavor.
- Weeknight to Weekend: Between us, this recipe works for everything. Weeknights when I’m starving but short on time? Done. Bringing a dish to a potluck? This is my go-to. Even my picky teen devours it—(yes, even on a Tuesday night).
- Leftovers That Don’t Suck: Most baked chicken turns into sad, dry rubber the next day. Not this. The asiago keeps it tender, so I meal prep it all the time. Slice it for sandwiches, toss it in salads, or just reheat it straight up—it’s always a win. And since it’s budget-friendly, I don’t feel guilty making extra.
Step-by-step instructions for baked Asiago chicken
Here's how to achieve that signature melted cheese crust while keeping the centers perfectly juicy.
Prepare the Herb Marinade
In a small bowl, combine the 0.5 cup extra-virgin olive oil, 2 tbsp fresh lemon juice, 1 tsp garlic powder, 1 tbsp diamond crystal kosher salt, 1 tsp ground black pepper, 0.25 cup finely chopped fresh rosemary, and 0.25 cup fresh thyme. Whisk vigorously until fully emulsified and the herbs are evenly distributed. This marinade infuses the chicken with bright, aromatic flavors while preventing dryness during baking.
Place the pounded 1.5 lb boneless, skinless chicken breasts in a shallow dish and pour the marinade over them, ensuring complete coverage. Cover and refrigerate for at least 30 minutes (up to 4 hours) to allow the flavors to penetrate. The acidity from the lemon juice helps tenderize the meat while the olive oil creates a protective barrier against drying out.
Create the Cheese Coating
Preheat your oven to 400°F and position a rack in the center position. Line a baking sheet with parchment paper for easy cleanup. In a separate bowl, combine the 1.5 cups freshly grated asiago cheese, 0.25 cup all-purpose flour, and 6 minced garlic cloves. Mix until the cheese is evenly coated with flour and garlic, creating a fine, powdery texture that will adhere perfectly to the chicken.
Remove the chicken from the marinade (reserve the marinade for later use) and pat dry with paper towels to remove any excess moisture. This step is crucial—wet surfaces prevent the cheese from sticking properly. Working quickly, press the flour-cheese mixture firmly onto both sides of each chicken breast until fully coated. The coating should be thick enough to create a golden crust but not so thick that it falls off during baking.
Bake with the Egg Wash
In a small bowl, beat the 2 whole large eggs until frothy. Brush the egg wash generously over each coated chicken breast, ensuring complete coverage. This step creates a glossy finish that helps the cheese crust brown beautifully and adds an extra layer of protection against drying out. Transfer the prepared chicken to the baking sheet and bake for 20 minutes.
After 20 minutes, the cheese should begin to melt and form a bubbly, golden crust. Here's the key moment: use a spoon to gently press down on the cheese coating to help it adhere more firmly to the chicken. This prevents the cheese from sliding off during the final stages of baking. Continue baking for an additional 10-12 minutes or until the internal temperature reaches 165°F and the cheese is fully melted and golden brown.
Rest and Serve
Remove the chicken from the oven and let it rest on the baking sheet for 5 minutes. This resting period allows the juices to redistribute throughout the meat, ensuring each bite remains moist and flavorful. The cheese will continue to set slightly as it cools, creating that perfect crispy-yet-melty texture we're after.
Slice the chicken into ½-inch thick portions and serve immediately. The exterior should have a beautiful golden-brown crust with melted asiago cheese clinging to each piece, while the interior remains tender and juicy. Garnish with slices of the whole red bell pepper for a pop of color and freshness. The reserved marinade can be drizzled over the top for added brightness if desired.
Pro Tips For Making Baked Asiago Chicken
- USE HIGH HEAT FIRST: Start your chicken breasts on the hottest oven rack for the first 5 minutes—this seals the surface and prevents a sad, gummy center. After that, drop to 375°F (190°C) to let the cheese melt properly without burning.
- GRATE THE ASIAGO FINE: Skip the big chunks—grate the Asiago yourself (or buy pre-grated) so it melts evenly into a glossy, velvety blanket. I learned this the hard way: store-bought shavings clump and look messy.
- PAT THE CHICKEN DRY: Wipe down those breasts with paper towels before seasoning—moisture keeps the rosemary from sticking and makes the crust uneven. Trust me, it’s worth the extra 30 seconds of effort.
- ADD GARLIC LAST: Toss the minced garlic and rosemary over the chicken after it’s been baking for 10 minutes. This keeps the aroma locked in and prevents the garlic from burning before the cheese even melts.
Wine and beer pairings for this baked asiago chicken
Italian White Wines
For this rich, cheesy dish, Italian whites shine brightest. A crisp Pinot Grigio from Alto Adige—like Santa Margherita—cuts through the fat beautifully with its bright acidity and citrus notes.
The mineral finish helps cleanse your palate between bites of creamy Asiago. I always reach for a bottle chilled to 45-48°F for optimal balance. 🍷
Crisp Lager Pairings
If you prefer beer, a German Pilsner or Italian Peroni works wonders. The effervescence and subtle malt sweetness complement the dish without overpowering it. For something more local, try a Belgian Witbier like Stella Artois—the coriander and citrus notes mirror the lemon in the marinade.
Serve these beers well-chilled at 40-42°F to enhance their refreshing qualities.
Bold Red Alternatives
For red wine lovers, a light-bodied Chianti or Valpolicella offers enough acidity to stand up to the cheese. Look for Sangiovese-based wines from Tuscany—their bright cherry notes contrast nicely with the savory Asiago.
Keep these wines slightly cooler than room temperature (55-60°F) to soften their tannins and enhance their food-friendly qualities.
Non-Alcoholic Options
Don't overlook sparkling water with lemon or a sparkling apple cider like Martinelli's. The bubbles and citrus complement the dish's richness while keeping it refreshing. For something more substantial, try an Italian blood orange soda—the bittersweet flavor pairs surprisingly well with the cheesy crust.
These options work especially well for kids or designated drivers.
Wine Service Tips
For wine pairings, serve whites and beers in chilled glasses—use ISO-standard glasses to maintain proper temperature. For reds, decant for 15-20 minutes to soften tannins before serving.
I always keep a wine aerator handy for quick service when entertaining. Pair your wine with the reserved marinade for an extra layer of flavor harmony. 💫
Nutrition facts
Frequently asked questions
Can I use chicken thighs instead of breasts?
Thighs work beautifully but require a few adjustments. Increase baking time by 5-7 minutes (up to 30-32 minutes total) to account for their denser texture. The extra fat in thighs makes them more forgiving if slightly overcooked, but always check for 165°F internal temperature. The cheese crust will be even more decadent with the richer chicken base.
What if my cheese doesn't melt properly?
This usually happens if the cheese is too cold or the oven temperature isn't hot enough. First, make sure your Asiago is at room temperature before coating. If the cheese slides off during baking, try pressing it gently with a spoon after 20 minutes to help it adhere. For extra insurance, broil for 1-2 minutes at the end to melt any stubborn spots.
How do I keep the chicken moist?
The marinade and egg wash create a moisture barrier, but proper timing is key. Never skip the 5-minute rest after baking—this lets juices redistribute. For extra juiciness, pound the breasts to an even ½-inch thickness and avoid overbaking. If using thighs, consider brining them for 30 minutes before marinating for maximum moisture.
Can I make this ahead of time?
Yes, but with some strategy. Assemble the chicken (coated but unbaked) up to 24 hours ahead and refrigerate uncovered to prevent sogginess. Bake straight from the fridge, adding 5 minutes to the total time. For leftovers, reheat at 350°F for 10-12 minutes—the cheese will soften but won't regain full crispiness.