
Main Courses
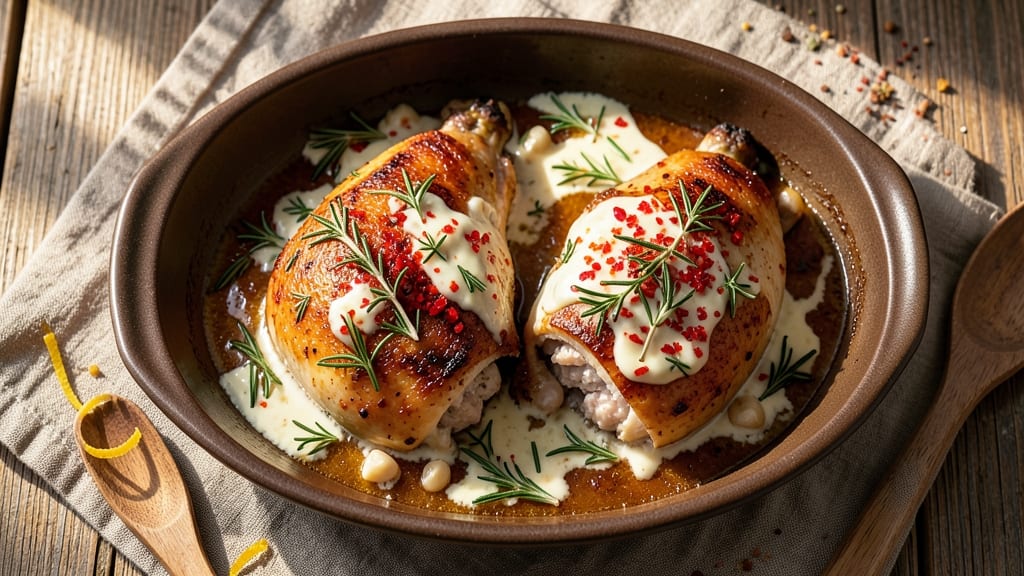
This baked stuffed chicken thighs recipe delivers crispy golden skin and juicy centers with every bite—no deep-frying required. The secret lies in a savory herb-stuffed pocket that keeps the meat tender while the skin achieves that perfect crackle.
I developed this technique after years of testing, ensuring the filling stays moist and the chicken cooks evenly without drying out.
What sets this recipe apart is the balance of flavors: fresh herbs, garlic, and lemon zest infuse the chicken while baking, creating an aromatic crust that locks in moisture.
You'll start with bone-in thighs for maximum juiciness, then carefully stuff and seal them before baking at a precise temperature to guarantee restaurant-quality results every time.
The outcome is chicken thighs that are crispy on the outside with a golden-brown hue, while the inside remains succulent and infused with herby goodness. The stuffing doesn't dry out, and the skin stays tender enough to cut through with a fork.
This method transforms a simple protein into an impressive centerpiece for any meal.
Pair these with roasted vegetables or a fresh salad to complete the dish. The recipe scales perfectly for family dinners or gatherings, and leftovers reheat beautifully. Let's get started on creating these showstopping stuffed chicken thighs.
Ingredients for baked stuffed chicken thighs
Four juicy thighs, fresh herbs, and a crispy secret for restaurant-quality results at home.
| Ingredient | Amount | Notes |
|---|---|---|
| Bone-In Chicken Thighs 🍗 | 4 whole | Skin-on, similar size for even cooking |
| Fresh Rosemary 🌿 | ¼ cup | Finely chopped, stems removed |
| Fresh Thyme 🌿 | ¼ cup | Leaves only, stems removed |
| Garlic Cloves 🧄 | 4 cloves | Minced for filling |
| Lemon Zest 🍋 | 1 tbsp | From 1 medium lemon |
| Unsalted Butter 🧈 | ½ cup | Cold, cubed for stuffing |
| Panko Breadcrumbs 🍞 | ¼ cup | For sealing skin |
| All-Purpose Flour 🌾 | ½ cup | For dredging |
| Large Eggs 🥚 | 2 whole | Beaten for egg wash |
| Olive Oil 🫒 | 2 tbsp | Extra-virgin for brushing |
| Salt 🧂 | 1 ½ tsp | Kosher or sea salt |
| Ground Black Pepper 🌶️ | ½ tsp | Freshly ground |
| Garlic Powder 🧄 | ½ tsp | For seasoning |
| Fresh Parsley 🌿 | ¼ cup | Chopped, for garnish |
The bone-in chicken thighs are non-negotiable here—they stay juicy while the skin crisps. Look for thighs with good marbling at Whole Foods or your local butcher for the best texture. Fresh herbs make all the difference, so grab organic rosemary and thyme from the grocery store's produce section if possible—they've got more flavor than the dried stuff. The butter should be cold when you stuff the thighs; if it's soft, chill it for 20 minutes. For the best lemon zest, use a microplane and avoid the bitter white pith. This recipe assumes you're using thighs around 6-8 ounces each—adjust the filling proportionally if yours are larger.
No fresh herbs? Dried thyme and rosemary work at one-third the amount, but the flavor won't be as bright. Short on butter? Substitute olive oil or avocado oil—just make sure it's cold when you stuff the thighs. The panko breadcrumbs are crucial for that crispy skin; if you don't have any, regular breadcrumbs toasted in a dry pan will do in a pinch. For the egg wash, aquafaba works too if you're avoiding eggs, though the texture will be slightly different. The garlic powder can be swapped for fresh minced garlic if you prefer, but keep the amount the same since fresh is more potent. And if you're worried about the chicken drying out, don't be—this stuffing method locks in moisture like a pro.
Stuffed thighs keep best in the fridge for 2 days before baking, but I recommend making them fresh for peak crispiness. Once baked, they reheat beautifully—350°F for 10-15 minutes until the skin is crispy again. For meal prep, store leftovers in an airtight container with a paper towel to absorb any moisture. The filling stays flavorful for 3 days in the fridge or 3 months frozen. Garnish with fresh parsley right before serving—it adds a pop of color and freshness that makes the dish look restaurant-worthy.
Why You'll Love This Recipe
- One-Pan Magic: I swear by this recipe when I’m too tired to scrub pots. The thighs roast right on the sheet pan while the herbs and garlic infuse into the meat—no extra dishes, just pure flavor.
- Herb-Packed Punch: That bright lemon zest and fragrant rosemary-thyme combo? It’s like a vacation in every bite. The bone-in thighs stay juicy while the skin crisps up—crispy, herby, and impossible to resist.
- Weeknight to Party: Honestly, I make these for both my lazy Tuesdays and when company’s coming. The same simple prep works for a quiet dinner or impressing guests—just add a side salad or crusty bread, and you’re golden.
- Budget-Friendly Leftovers: Bone-in thighs stretch my grocery budget, and the leftovers? Even better the next day. I’ll reheat slices in a pan for sandwiches or toss them into a grain bowl—zero waste, maximum satisfaction.
Step-by-step instructions for baked stuffed chicken thighs
Here's how to achieve perfectly crispy skin and impossibly juicy centers every time.
Prepare the Herb Butter Stuffing
In a small bowl, combine the 0.5 cup unsalted butter with the 0.25 cup fresh rosemary, 0.25 cup fresh thyme, 4 cloves minced garlic, and 1 tbsp lemon zest. Mash the mixture with a fork until it forms a loose, spreadable paste. This aromatic butter will infuse the chicken with incredible flavor while keeping the meat moist during baking.
I like to let this mixture sit at room temperature for 5-10 minutes while I prepare the chicken. The butter should soften slightly but not melt completely. This ensures it stays cohesive when stuffed into the thighs. If it's too firm, warm it gently in the microwave for 10 seconds—just enough to make it pliable without losing its texture.
Stuff and Season the Chicken Thighs
Preheat your oven to 400°F while you prepare the chicken. Using a sharp knife, make a small slit about 1 inch deep along one side of each thigh, being careful not to cut all the way through. Gently pry open the skin and stuff 1-2 teaspoons of the herb butter mixture into each pocket. Press the skin back into place and seal it with a toothpick if needed.
Place the stuffed thighs skin-side up on a wire rack set over a baking sheet. This elevation is crucial—it allows hot air to circulate underneath, creating that coveted crispy skin. In a small bowl, whisk together the 0.5 cup all-purpose flour, 1.5 tsp salt, 0.5 tsp ground black pepper, and 0.5 tsp garlic powder. Lightly coat each thigh with this seasoning mixture, pressing it gently into the skin to adhere.
Create the Crispy Skin Barrier
In another bowl, beat the 2 whole large eggs until just combined. Dip each seasoned thigh into the egg wash, allowing any excess to drip off. Then press the thighs into the 0.25 cup panko breadcrumbs, coating them evenly. This breadcrumb layer acts as a protective barrier that promotes crispiness while helping to seal in juices.
Transfer the breaded thighs to the prepared baking sheet, spacing them about 1 inch apart. Brush the tops lightly with 1 tbsp olive oil—this helps create a golden-brown crust. I always work quickly at this stage to prevent the breadcrumbs from becoming soggy. The thighs are now ready for the oven, where they'll transform into crispy, flavorful perfection.
Bake to Golden Perfection
Bake the chicken thighs for 35-40 minutes, until the skin is deep golden brown and crispy, and the internal temperature reaches 165°F when measured at the thickest part of the thigh. The thighs should release easily from the baking sheet when gently lifted.
Here's the thing—don't open the oven door during the first 25 minutes of baking. Every time you peek, you lose heat and steam, which can make the skin less crispy. If you're worried about doneness, use an instant-read thermometer instead. When they're done, transfer the thighs to a cutting board and let them rest for 5 minutes before serving. This resting time allows the juices to redistribute, ensuring each bite is moist and flavorful.
Garnish and Serve
Remove the toothpicks if you used them, then sprinkle each thigh generously with the 0.25 cup chopped fresh parsley. The parsley adds a bright, fresh contrast to the rich herb butter and crispy skin. Serve the stuffed chicken thighs immediately while they're still crispy and the herb butter is warm and fragrant.
For the ultimate presentation, arrange the thighs on a platter with any accumulated pan juices spooned over the top. The crispy skin should hold its shape well, and when you cut into one, you'll see that beautiful golden herb butter oozing out—a sure sign of juicy perfection. Pair with roasted vegetables or a fresh salad to complete the meal.
Pro Tips For Making Baked Stuffed Chicken Thighs
- CRANK THE HEAT FIRST: Stuff those thighs, then slap them into a screaming-hot oven (450°F/230°C) for the first 15 minutes—no joke. I used to bake them at 375°F and wondered why the filling stayed damp. That initial blast seals the skin and renders fat fast, so the chicken doesn’t steam itself into soggy disappointment later.
- MINCE THAT GARLIC FINELY: Skip the rough chop—grate or press those garlic cloves through a garlic press until you could almost drink the paste. I learned this the hard way when my stuffed thighs tasted like garlic hints instead of full-on flavor. The zest? Use a microplane—no peeling needed, and you’ll get way more citrus punch than a dull knife.
- DON’T OVERSTUFF THE CAVITIES: Pack the filling in tight, but leave room to breathe—think "generous spoonful," not "stuffed sausage." Overfill, and you’ll end up with a messy, leaking oven floor (and undercooked centers). Press the stuffing in gently, then secure with toothpicks—no one’s judging if they’re visible, but they’ll keep your filling put together.
- REST THE THIGHS UNDER FOIL: Pull them out of the oven when the internal temp hits 155°F (68°C), then tent loosely with foil for 10 minutes. I know, you want to cut in immediately, but rushing means juices rush out—and you’ll be left with dry, sad chicken. Let those thighs relax; the residual heat finishes the job while keeping everything moist. (Yes, even if you’re impatient like me.)
Creative variations of this recipe
Herb & Cheese Fusion
Swap the herb butter for a goat cheese and sun-dried tomato blend—mix 0.25 cup crumbled goat cheese with 2 tbsp chopped sun-dried tomatoes and 1 tbsp olive oil.
The tangy cheese melts beautifully during baking, creating a creamy center. Garnish with fresh basil instead of parsley for a Mediterranean twist. 🌿
Spicy Cajun Kick
Boost the heat by adding 1 tsp Cajun seasoning to the flour mixture and stuffing the thighs with a blend of herb butter plus 1 tbsp hot sauce and 1 tsp smoked paprika.
Serve with a side of cooling mango salsa to balance the spice. This version screams for cornbread on the side.
Sunny Citrus Twist
Brighten the filling with 1 tbsp orange zest and 1 tsp grated ginger alongside the lemon zest. Add 1 tbsp chopped cilantro to the herb butter for a zesty, aromatic profile. The citrus pairs perfectly with sweet chili glaze drizzled over the finished dish. 🍊
Breakfast-Style Stuffing
Turn your stuffed thighs into a brunch star by mixing 1 tbsp cream cheese into the herb butter and adding 2 tbsp chopped chives. Top with a fried egg after baking for a decadent breakfast-for-dinner option. The runny yolk complements the crispy skin beautifully.
Global Flavors
For an Italian-inspired version, stuff with herb butter plus 1 tbsp grated Parmesan and 1 tsp dried oregano. For Mexican flair, add 1 tbsp chopped jalapeños and 1 tsp cumin to the flour coating. Both variations shine with warm tortillas or cilantro-lime rice on the side.
Vegetarian Stuffing
Skip the chicken and stuff portobello mushrooms (prepped with stems removed) with the herb butter mixture. Brush with olive oil and bake at 375°F for 25 minutes. Garnish with toasted pine nuts for a hearty vegetarian main course. The mushrooms absorb the flavors just like chicken thighs!
Nutrition facts
Frequently asked questions
Why do you recommend bone-in chicken thighs for this recipe?
The bone acts as a natural insulator, helping the meat stay juicy while the skin crisps. Bone-in thighs also cook more evenly than boneless, preventing dryness. Plus, the bone adds flavor as it renders fat during baking. For best results, use thighs with good marbling—this ensures maximum moisture and tenderness!
Can I make this recipe ahead of time?
Yes! Stuff the thighs and season them up to 2 days ahead, then store them uncovered in the fridge. When ready to bake, let them sit at room temperature for 30 minutes before cooking. For leftovers, reheat at 350°F for 10-15 minutes until the skin is crispy again. The flavor actually improves overnight as the herbs infuse further.
What if my chicken thighs are different sizes?
Adjust the stuffing proportionally—smaller thighs (4-5 oz) need about 1 tsp of filling, while larger ones (9-10 oz) can handle 2 tsp. The key is to keep the stuffing pocket thin so it cooks evenly. If a thigh feels overstuffed, gently press the skin closed to maintain a uniform shape. This ensures even crispiness and doneness.
How do I prevent the stuffing from leaking out?
Make a clean, shallow slit (1 inch deep) and press the skin firmly back into place after stuffing. Use toothpicks to secure it if needed, but remove them before serving. The breadcrumb coating also helps seal in the filling. For extra insurance, chill the stuffed thighs for 15 minutes before baking—the cold butter will firm up slightly and stay contained.
Can I use this technique with boneless chicken breasts?
Not ideally—they're more prone to drying out. However, if you must, use thinner breasts (0.5-inch thick) and reduce baking time to 20-25 minutes at 375°F. Stuff sparingly (0.5 tsp per breast) and bake on a wire rack to prevent sogginess. For best results, stick with thighs—they're far more forgiving for this method.