
Main Courses
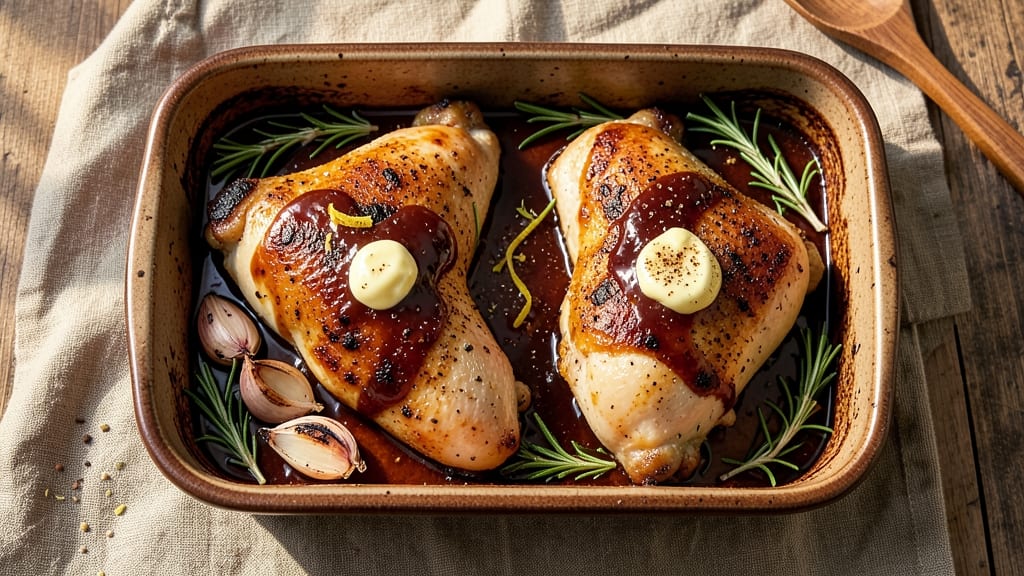
This baked chicken thighs with barbecue sauce recipe delivers crispy golden skin and a sticky, caramelized glaze—all with minimal effort. The secret lies in a high-heat oven bake that transforms ordinary chicken into finger-licking perfection, while the sauce clings to every bite like a sweet-smoky hug.
I perfected this method after years of battling dry, bland chicken—no more rubbery meat or soggy skin here.
The process couldn’t be simpler: bone-in thighs develop richer flavor and stay juicier than boneless cuts, while a quick pre-bake sear locks in moisture before the sauce transforms into a glossy, caramelized crust. Foolproof timing ensures tender meat through and through, never overcooked or underseasoned.
This one-pan wonder cuts cleanup in half, making it ideal for weeknight dinners or game day spreads.
What you’ll end up with is restaurant-quality chicken that’s crispy enough to stand up to the bold barbecue sauce, with meat so tender it practically melts in your mouth.
The sauce doesn’t just drip—it clings, creating that coveted "sticky glaze" that makes every bite worth savoring. Serve with crunchy slaw or buttery cornbread to round out the meal.
This recipe works equally well for meal prep or last-minute gatherings—just adjust the baking time slightly. The beauty lies in its versatility: swap the sauce for honey mustard or teriyaki, or add a sprinkle of smoked paprika for extra depth. Let’s get cooking!
Ingredients for baked chicken thighs with barbecue sauce
Bone-in thighs and bold flavors—this is your shortcut to restaurant-style barbecue chicken.
| Ingredient | Amount | Notes |
|---|---|---|
| Bone-In Chicken Thighs 🍗 | 4 pieces | Skin-on, roughly 6-8 oz each |
| Barbecue Sauce 🍅 | 1 cup | Store-bought or homemade, thick consistency |
| Unsalted Butter 🧈 | 2 tbsp | Melted, full-fat preferred |
| Garlic Cloves 🧄 | 4 cloves | Minced, for extra flavor |
| Fresh Rosemary 🌿 | ½ tsp | Chopped, or 0.25 tsp dried |
| Smoked Paprika 🌶️ | 1 tsp | For depth and color |
| Ground Black Pepper 🌶️ | ½ tsp | Freshly cracked |
| Kosher Salt 🧂 | 1 ½ tsp | Diamond Crystal preferred |
| Olive Oil 🫒 | 1 tbsp | For searing, high smoke point |
| Honey 🍯 | 1 tbsp | For glaze enhancement |
| Cornstarch 🌾 | 1 tbsp | For sauce thickening |
| Fresh Lemon Juice 🍋 | 1 tbsp | Brightens the sauce |
Bone-in thighs are non-negotiable here—they stay juicier and develop deeper flavor than boneless cuts. Look for thighs with good marbling at your local butcher or the meat section of Whole Foods or Kroger. If you can't find them fresh, frozen works just fine—thaw overnight in the fridge. The skin is what creates that crispy texture, so don't peel it off. For the barbecue sauce, I always reach for Sweet Baby Ray's or Stubb's—they've got that perfect balance of sweet and smoky. If you're making your own, keep the consistency thick so it clings to the chicken instead of pooling in the pan.
No bone-in thighs? Bone-in chicken drumsticks work in a pinch, but they'll need about 10 minutes longer in the oven. Short on barbecue sauce? Mix 1/4 cup ketchup, 1 tbsp apple cider vinegar, 1 tbsp brown sugar, and 1/2 tsp smoked paprika for a quick substitute. The honey in the sauce can be swapped for maple syrup if you prefer. For extra crispiness, sprinkle the thighs with 1/2 tsp cornstarch before baking—it helps create that perfect crust. Fresh rosemary is ideal, but dried works at half the amount if you're in a hurry. Just make sure it's food-grade and not from the spice aisle that's been sitting there for years.
These thighs reheat beautifully—just pop them in a 350°F oven for 10-15 minutes until heated through. The sauce will thicken up even more, making it even more clingy. Store leftovers in the fridge for up to 4 days, covered with foil to keep the skin crispy. For meal prep, portion into containers with a little extra sauce on top—it reheats perfectly and tastes even better the next day. The crispy skin softens slightly when reheated, but a quick broil for 2-3 minutes brings it back to perfection.
Why You'll Love This Recipe
- One-Pan Magic: I swear by this—just toss the thighs, butter, and garlic on a sheet pan, slap on that sticky-sweet sauce, and let the oven do the work. No pots, no pans, no stress.
- Cravable Crisp: That butter-basted skin? Chef’s kiss. The rosemary and garlic seep into the meat while the edges get golden and addictive—like a hug from your favorite BBQ joint, but better.
- Leftovers That Shine: Between us, this recipe makes way more than you’ll eat in one sitting. Reheat those thighs the next day, and they’re just as tender—perfect for sandwiches or a lazy lunch. (Yes, even on a Tuesday night.)
- Budget-Friendly Feast: Bone-in thighs stretch further than breasts, and they’re cheaper too. A single pan of these feeds four hungry people for under $15—no fancy ingredients, just pure, satisfying flavor.
Step-by-step instructions for baked chicken thighs with barbecue sauce
This method delivers irresistibly crispy skin and a perfectly balanced sticky glaze every time.
Season and Sear the Chicken Thighs
Preheat your oven to 425°F. Pat the 4 pieces bone-in chicken thighs dry with paper towels—this ensures maximum crispiness. In a small bowl, mix together 1.5 tsp kosher salt, 0.5 tsp ground black pepper, 1 tsp smoked paprika, and 0.5 tsp chopped fresh rosemary. Rub this seasoning generously over both sides of each thigh, pressing it into the skin.
Heat 1 tbsp olive oil in an oven-safe skillet over medium-high heat. Add the thighs skin-side down and let them sear undisturbed for 5-6 minutes until the skin turns deep golden brown and crispy. Flip the thighs and sear the other side for 3-4 minutes until golden. Remove from heat and set aside.
Build the Glazing Sauce
In the same skillet, reduce heat to medium and add 2 tbsp melted unsalted butter. Let it melt completely, then add the 4 cloves minced garlic and cook for 30 seconds until fragrant. Pour in the 1 cup barbecue sauce and 1 tbsp honey, stirring to combine. Let the mixture simmer for 2 minutes to allow the flavors to meld.
In a small bowl, whisk together 1 tbsp cornstarch and 1 tbsp fresh lemon juice until smooth. Slowly pour this mixture into the skillet while stirring constantly. The sauce will thicken within 1-2 minutes—keep stirring until it reaches a glossy, sticky consistency that coats the back of a spoon. Remove from heat and set aside.
Bake to Crispy Perfection
Return the skillet to the oven and place the seared chicken thighs back in, skin-side up. Pour the glazing sauce evenly over the thighs, ensuring they're fully coated. Bake for 25-30 minutes until the internal temperature reaches 175°F and the skin is deeply crispy.
During the last 5 minutes of baking, watch for the sauce to caramelize and form a glossy glaze. If the sauce thickens too much, carefully spoon a little water or broth from the pan onto the thighs to keep it moist. The thighs are done when the skin is crispy, the meat pulls away from the bone easily, and the sauce has thickened into a sticky glaze.
Rest and Serve
Remove the skillet from the oven and let the chicken thighs rest for 5 minutes before serving. This resting period allows the juices to redistribute, ensuring each bite is moist and flavorful. Serve the thighs directly from the skillet, spooning the sticky glaze over the top. The crispy skin contrasts beautifully with the tender meat and sweet-tangy barbecue sauce.
For an extra touch, garnish with additional chopped fresh rosemary or a sprinkle of smoked paprika. The combination of crispy skin, tender meat, and that perfect glaze makes this dish a standout—simple yet impressive, and ready in one pan.
Pro Tips For Making Baked Chicken Thighs With Barbecue Sauce
- CRANK THE HEAT FIRST: I learned this the hard way—skipping the high-heat start means your barbecue sauce turns into a sad, watery glaze instead of a sticky, caramelized crust. Sear the thighs skin-side down in a hot oven (425°F/220°C) for 10 minutes first, then add the sauce. The butter and garlic will sizzle properly, and the skin will crisp like it should.
- SALT THE THIGHS 24 HOURS EARLY: This isn’t the prettiest method, but it’s the tastiest. Bone-in thighs need time to absorb salt—sprinkle them generously with salt before you even think about cooking, then refrigerate uncovered. The skin will dry out slightly, which guarantees crispiness when you bake. (Yes, even if you’re impatient like me.)
- DON’T DROWN THE PAN: After searing, I used to dump all the barbecue sauce at once and wondered why my chicken steamed instead of caramelized. Split the sauce: brush half on right after searing, then bake uncovered for 20 minutes. Add the rest after the thighs hit 165°F (74°C) to keep it glossy, not soggy.
- GARLIC TOO STRONG? MASH IT: Fresh rosemary and raw garlic cloves can overpower the barbecue sauce if you’re not careful. Instead of mincing the garlic finely (which releases too much flavor at once), smash the cloves with the flat side of your knife—just enough to bruise them. This softens the bite without turning your dish into a garlic bomb. (Your future self will thank you.)
Essential equipment for this recipe
Oven-Safe Skillet
An oven-safe skillet is your best friend for this recipe—I swear by a 10-inch cast iron skillet from Lodge because it retains heat beautifully and develops a natural nonstick surface over time.
If you don’t own cast iron, a stainless steel skillet with an oven-safe handle (like All-Clad) works perfectly too. The key is choosing a pan that can handle 425°F without warping or cracking. 🔥
High-Quality Thermometer
Never guess your chicken’s doneness—use a meat thermometer like the ThermoWorks Smoke or Instant Read Thermometer to check the internal temperature. The thighs are perfect at 175°F, and this tool ensures you nail it every time.
I keep mine handy on my counter so I’m never tempted to cut into the meat early. A good thermometer also helps you avoid overcooking, which ruins all the crispy work you’ve done.
Whisk for Sauce
A balloon whisk is perfect for quickly combining the cornstarch and lemon juice into a smooth slurry before thickening the sauce. I prefer OXO Good Grips because the angled wires make whisking effortless, even with thicker sauces.
If you don’t have a whisk, a fork or chopstick works in a pinch—just stir vigorously until the sauce thickens. The goal is to avoid lumps, so don’t rush this step.
Paper Towels
Pat those thighs completely dry before seasoning—this is non-negotiable for crispy skin. I keep a roll of Bounty or Viva near my cutting board because their thick, absorbent sheets handle the job best.
Wet skin = soggy skin, so take your time here. Pro tip: Use a clean kitchen towel to press excess moisture out after the initial patting.
Measuring Spoons
Precision matters when balancing flavors—use stainless steel measuring spoons (like OXO’s set) for accurate measurements of spices, cornstarch, and honey. I avoid plastic spoons because they can warp over time, affecting measurements.
For the 1 tbsp cornstarch, a level scoop is crucial—pack it lightly to avoid clumping in the sauce.
Oven Mitts
Protect your hands with heat-resistant oven mitts—I recommend Silvertown’s silicone-coated gloves for their grip and durability. You’ll be handling a 425°F skillet multiple times, so don’t skimp on protection. A good pair also makes transferring the hot pan from stovetop to oven safer and stress-free. 💪
Nutrition facts
Frequently asked questions
Why do you recommend bone-in chicken thighs instead of boneless?
Bone-in thighs stay juicier and develop richer flavor because the bone acts as a natural insulator, keeping the meat moist. They also hold up better to the high-heat baking process without drying out. Plus, the crispy skin on bone-in cuts creates that perfect contrast with the tender meat—something you lose with boneless versions.
Can I use boneless thighs or drumsticks instead?
Yes, but you'll need adjustments: boneless thighs require 5-7 minutes less baking time (watch for 165°F internal temp), while drumsticks need 10-15 minutes extra due to their shape. For drumsticks, flip them halfway through baking to ensure even crispiness. The sauce ratio stays the same, but boneless cuts may need 1 extra tbsp sauce to prevent dryness.
What if my barbecue sauce is too thin?
Thin sauce won't cling properly—fix it by mixing 1 tsp cornstarch with 1 tsp cold water and stirring it into the sauce off-heat. For extra thickness, simmer the sauce for 2-3 minutes longer until it coats the back of a spoon. If it's still too runny, reduce the amount by 2 tbsp next time and add 1 tbsp apple cider vinegar for balance.
How do I reheat leftovers without losing crispiness?
Reheat in a 400°F oven for 8-10 minutes on a wire rack over a baking sheet—this allows air circulation to crisp the skin. For a quick fix, broil for 2-3 minutes (watch closely!) or air-fry at 375°F for 4 minutes
Can I make this recipe ahead of time?
Assemble the thighs and sauce 1 day ahead, refrigerate uncovered, then bake straight from the fridge (add 5-7 minutes to cooking time). For make-ahead prep, marinate the thighs in the seasoning mix for 4-6 hours before baking—this infuses extra flavor. The sauce can be pre-made up to 3 days ahead and stored in the fridge.