
Main Courses
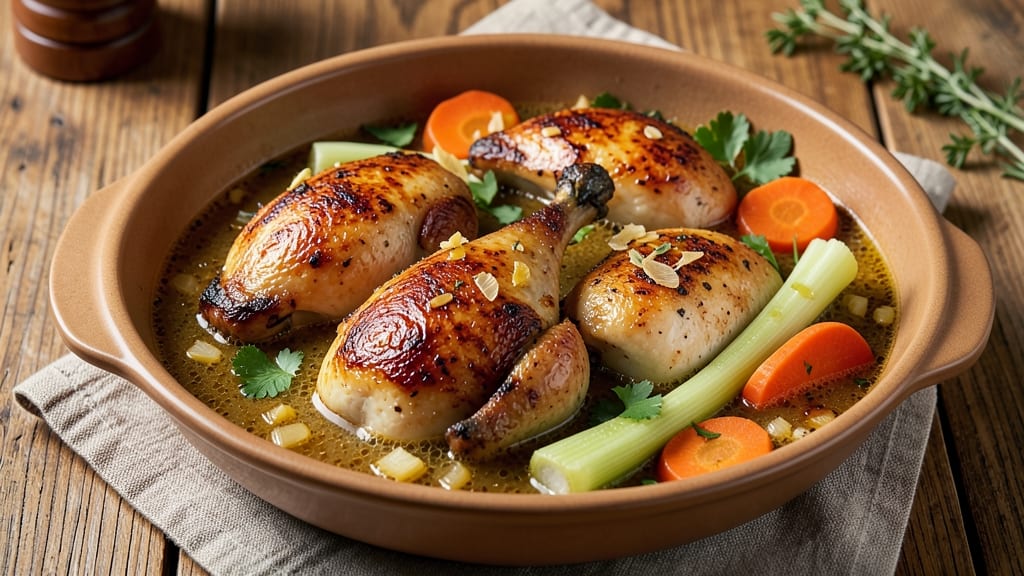
This baked chicken in broth recipe transforms simple ingredients into restaurant-quality tender bites that practically melt in your mouth. The secret lies in cooking the chicken in aromatic broth—first on the stovetop to develop deep flavors, then finished in the oven for juicy perfection.
I’ve perfected this method over years of testing, ensuring every piece stays moist and infused with savory notes.
The process is straightforward but delivers foolproof results: chicken thighs or breasts simmer in a flavorful broth until partially cooked, then finish baking until golden and tender. The broth—whether homemade or store-bought—becomes the star, seeping into the meat and creating a dish that’s both elegant and comforting.
No complicated techniques required, just patience and a little attention to timing.
What you’ll end up with is chicken so tender it falls apart with the slightest touch, bathed in a rich, aromatic broth that’s perfect for serving over rice or as a standalone meal.
The method works equally well for weeknight dinners or special occasions, making it a versatile addition to your recipe arsenal. Ready in under an hour, it’s the kind of dish that turns a simple meal into something memorable.
Pair with roasted vegetables or crusty bread to soak up every last drop of that flavorful broth. The instructions walk you through each step—from prepping the chicken to baking it to perfection—so you can achieve the same results at home. Let’s get started!
Ingredients for baked chicken in broth
Simple ingredients that pack serious flavor—chicken, broth, and aromatic veggies for tender bites you'll crave.
| Ingredient | Amount | Notes |
|---|---|---|
| Chicken Thighs 🍗 | 1 ½ lb | Bone-in, skin-on preferred |
| Chicken Breasts 🍗 | 1 ½ lb | Boneless, skinless, even size |
| Chicken Broth 💧 | 2 cups | Homemade or quality store-bought |
| Yellow Onion 🧅 | 1 whole | Chopped into 1/2-inch pieces |
| Carrots 🥕 | 3 medium | Peeled, sliced into 1/4-inch rounds |
| Celery Stalks 🥬 | 3 whole | Chopped into 1/2-inch pieces |
| Garlic Cloves 🧄 | 4 cloves | Minced or finely chopped |
| Fresh Thyme Leaves 🌿 | ½ cup | Or 1 tbsp dried thyme |
| Fresh Rosemary 🌿 | ¼ cup | Chopped, stems removed |
| Olive Oil 🫒 | 2 tbsp | Extra-virgin for richness |
| Salt 🧂 | 1 ½ tsp | Kosher or sea salt |
| Black Pepper 🌶️ | ½ tsp | Freshly ground preferred |
| Bay Leaves 🌿 | 2 whole | Dried, removed before serving |
| Fresh Parsley 🌿 | ¼ cup | Chopped, for garnish |
The chicken makes this dish shine. Thighs stay juicier than breasts, but either works—just don't mix them. Look for pieces with good marbling at Costco or your local butcher shop. If you're using breasts, pound them to even thickness so they cook through. The broth is where the magic happens—homemade is best, but even the good store-bought stuff like Swanson or Pacific Foods will work. Just skip the low-sodium versions—they lack depth.
No fresh thyme? Dried works at one-third the amount, but fresh has that bright, herbal punch. Rosemary is non-negotiable here—it gives the broth that woodsy backbone. If you can't find fresh, Trader Joe's sells dried sprigs that are perfect. The carrots and celery can be prepped ahead and stored in the fridge for 3-4 days. Want to skip chopping? Baby carrots and celery sticks work in a pinch. The bay leaves add complexity, but if you forget them, don't stress—the dish will still be delicious.
This dish tastes even better the next day—seriously, make extra. Store the chicken and broth separately in airtight containers for 3-4 days in the fridge. For longer storage, freeze the broth (up to 3 months) and thaw it when ready to use. The chicken can be frozen for 2 months, but it's best reheated gently in the broth to keep it moist. Garnish with fresh parsley right before serving—it adds that pop of color and freshness.
Why You'll Love This Recipe
- One-Pan Magic: I swear by this recipe when I’m too tired to wash pots. Toss the chicken thighs and breasts, chopped onions, and carrots onto a sheet pan, pour in the broth, and bake. That’s it—no extra bowls or pans to clean.
- Broth Booster: Here’s what sold me—the way the broth infuses into the chicken while it bakes. The onions caramelize just enough to add sweetness, and the carrots turn tender without falling apart. It’s like a slow cooker’s depth, but with zero effort.
- Leftovers That Don’t Suck: Between us, most baked chicken dries out by day two. Not this. The broth keeps it moist, so I can meal prep a whole tray on Sunday and still have juicy chicken for lunch on Wednesday. Just reheat with a splash of water—no sad, rubbery bites here.
- Budget-Friendly Protein: I buy chicken thighs in bulk because they’re cheaper than breasts and stay juicier. Add the broth, onions, and carrots, and you’ve got a filling, flavorful meal for next to nothing. Honestly, it’s my go-to when I’m trying to stretch groceries without sacrificing taste.
Step-by-step instructions for tender baked chicken in herb broth
Here's how to transform simple chicken into melt-in-your-mouth bites with rich, aromatic broth.
Sear the Chicken for Maximum Flavor
Heat a large oven-safe skillet over medium-high heat and add the 2 tablespoons olive oil. Once shimmering, add the 1.5 pounds chicken thighs and 1.5 pounds chicken breasts, skin-side down if using bone-in thighs. Let them sear undisturbed for 3-4 minutes until golden brown and crispy in spots.
Don't crowd the pan—work in batches if needed. You want that beautiful Maillard reaction happening. Flip the chicken pieces and continue searing for another 2-3 minutes until they're golden on all sides. This initial sear locks in juices and builds deep flavor that will infuse the broth as it bakes.
Build the Aromatic Base
Remove the seared chicken from the skillet and set it aside. In the same pan, add the ½-inch chopped yellow onion, ¼-inch sliced carrots, and ½-inch chopped celery stalks. Cook for 5 minutes, stirring occasionally, until the vegetables begin to soften and release their natural juices.
Add the minced garlic cloves and cook for another 30 seconds until fragrant. Here's where the magic happens: sprinkle in the ½ cup fresh thyme leaves and ¼ cup chopped fresh rosemary, stirring to release their essential oils. The pan should smell intensely aromatic—this is your flavor foundation.
Deglaze and Combine Ingredients
Pour in the 2 cups chicken broth and scrape up all those delicious browned bits from the bottom of the pan with a wooden spoon. Add the 1.5 teaspoons salt, ½ teaspoon black pepper, and 2 whole bay leaves, then return the chicken to the skillet.
Bring the mixture to a gentle simmer over medium heat for 3-4 minutes until the chicken is heated through and the broth begins to reduce slightly. The liquid should coat the bottom of the pan but not pool—this ensures maximum flavor concentration. Taste the broth and adjust seasoning if needed.
Bake to Juicy Perfection
Transfer the skillet to a preheated 375°F oven. Cover tightly with aluminum foil and bake for 25-30 minutes until the chicken reaches an internal temperature of 165°F and is fork-tender. The broth should reduce to a rich, flavorful sauce that clings beautifully to the chicken.
I know it's tempting to peek, but resist! Every time you open the oven, you lose heat and steam, which can dry out the chicken. Instead, trust the time and temperature—you'll know it's done when the chicken pulls apart easily and the broth has thickened into a glossy sauce.
Rest and Serve with Fresh Herbs
Remove the skillet from the oven and let the chicken rest for 5 minutes before serving. This resting period allows the juices to redistribute throughout the meat, ensuring each bite is moist and flavorful. Remove and discard the bay leaves before serving.
Garnish each serving with ¼ cup chopped fresh parsley and serve immediately with the aromatic herb broth spooned over the top. The chicken should be tender enough to fall apart with minimal effort, with each bite bursting with the flavors of thyme, rosemary, and garlic infused in the rich broth.
Pro Tips For Making Baked Chicken In Broth
- SEAR THIGHS FIRST: Skip the slow start—pat the chicken thighs dry, then sear them skin-side down in a hot pan for 4-5 minutes until golden. The crust locks in flavor and keeps them juicier than if you bake them straight from the fridge. (Yes, even if you’re impatient like me, don’t skip this—it’s the thing that matters most.)
- CHOP ONIONS COARSE: Dice that yellow onion into ½-inch chunks, not tiny bits. Big pieces caramelize better in the broth, adding depth without turning to mush. (I learned this the hard way—tiny onions just dissolve into the sauce.)
- DON’T OVERCROWD THE PAN: If using chicken breasts, bake them in a single layer first until they’re just cooked through (165°F), then nestle them into the broth with the thighs. Crowding steams the breasts instead of browning them. (Your future self will thank you for this step.)
- STIR ONCE, HALFWAY: Around 30 minutes in, give the broth a quick stir—just once—to redistribute any settled fond at the bottom. This boosts flavor without turning the carrots to mush. (Sounds weird, but it works: the difference is noticeable.)
Essential equipment for this dish
Oven-Safe Skillet
An oven-safe skillet is your secret weapon for this recipe—I use a 12-inch cast iron skillet from Lodge because it distributes heat evenly and retains it beautifully during baking.
If you don’t have cast iron, a stainless steel skillet (like All-Clad) or a heavy-duty oven-safe Dutch oven works just as well. Avoid nonstick pans—they can’t handle the high heat of searing and may release harmful fumes when baked. 🔥
Instant-Read Thermometer
Never guess the doneness of your chicken again! An instant-read thermometer (I swear by the ThermoWorks ThermoPop) ensures your chicken hits 165°F every time. Insert the probe into the thickest part of the meat—avoid touching bone or the pan.
The second it reads 165°F, your chicken is perfectly cooked. This tool is especially critical for chicken breasts, which can dry out if overcooked.
Wooden Spoon
A wooden spoon is indispensable for deglazing and stirring the broth without scratching your skillet. I reach for a long-handled silicone spoon (like OXO Good Grips) when dealing with hot liquids—it’s heat-resistant and easy to grip.
Avoid metal utensils during the stovetop phase to prevent scraping off those flavorful browned bits that make the broth taste amazing.
Aluminum Foil
Heavy-duty aluminum foil is non-negotiable for covering your skillet during baking. It traps steam, keeping the chicken moist and preventing the broth from evaporating too quickly. I double-layer it for extra insurance, especially if your oven runs hot.
Pro tip: Crimp the edges tightly to create a seal—this ensures maximum flavor retention and even cooking. 💫
Chef’s Knife
A sharp chef’s knife (I love the Mercer Culinary Genesis) is essential for prepping your vegetables efficiently. Chop the onion, carrots, and celery into even pieces—this ensures they cook uniformly and release their flavors at the same rate.
Dull knives are dangerous and make prep frustrating, so invest in a quality blade and hone it regularly. For garlic, a garlic press speeds up the process without sacrificing flavor.
Measuring Spoons
Precision matters when it comes to seasoning! Use stainless steel measuring spoons (like OXO Stainless Steel) for accurate measurements of salt, pepper, and herbs. A pinch of too much salt or too little can throw off the entire dish.
I keep mine in a magnetic strip on my fridge for easy access. For fresh herbs, I eyeball measurements but always taste as I go—adjust to your preference! ✨
Nutrition facts
Frequently asked questions
Can I use chicken breasts instead of thighs?
Yes, but with one key adjustment: pound them to ½-inch thickness so they cook evenly. Chicken breasts cook faster than thighs, so reduce baking time to 20-25 minutes and check for 165°F internal temperature. For extra moisture, add 1 tablespoon butter to the broth during baking.
What if I don't have fresh herbs?
Use dried herbs at one-third the amount (e.g., 1 teaspoon dried thyme instead of ½ cup fresh). For rosemary, ½ teaspoon dried works, but it won’t have the same depth. If you’re missing both, try 1 teaspoon dried oregano or marjoram for a similar earthy note. The dish will still taste great!
Can I make this recipe in a slow cooker?
Sear the chicken as directed, then transfer everything to a 6-quart slow cooker. Cook on LOW for 4-5 hours or HIGH for 2-3 hours until the chicken is tender. The broth will reduce more slowly, so you may need to simmer it uncovered for the last 15 minutes to thicken slightly.
Why did my chicken turn out dry?
Overcooking is the most common cause. Use an instant-read thermometer to check for 165°F—never guess! If using breasts, reduce baking time to 20-25 minutes. Also, avoid opening the oven too early. For extra moisture, add ¼ cup broth before baking or cover with extra foil.
How can I use the leftover broth?
Strain and store it in the fridge for up to 4 days or freeze for 3 months. Use it for soups, risotto, or grains like rice or quinoa. For extra richness, add a splash of heavy cream or a pat of butter when reheating. The herbs will mellow out, but the savory depth remains!