
Main Courses
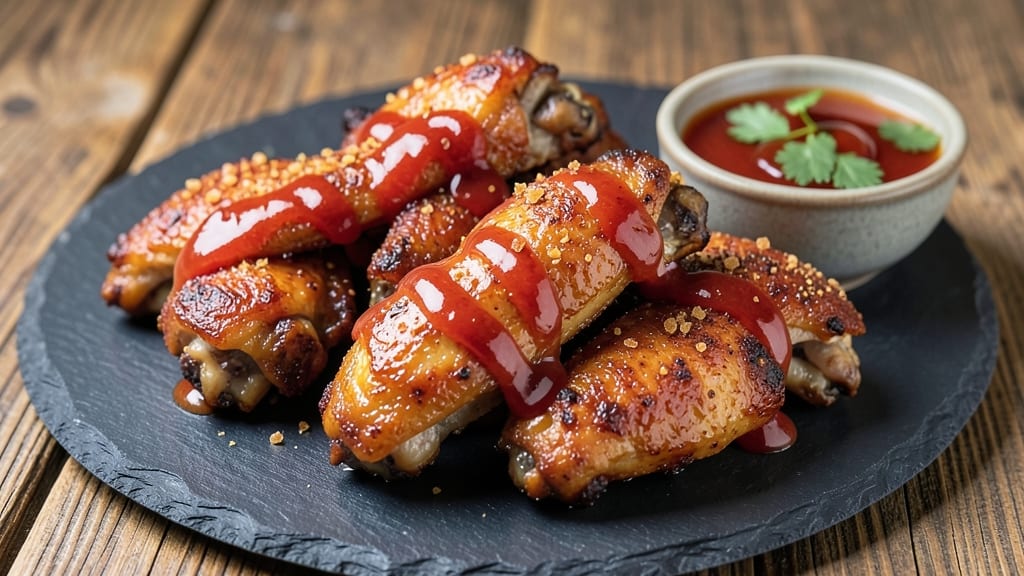
This baked barbecue chicken wings recipe delivers restaurant-quality results with a smoky-sweet glaze that caramelizes into crispy perfection—no deep-frying required. The secret lies in a balanced blend of spices and a 30-minute bake that transforms tender wings into golden, sticky, and irresistibly crunchy bites.
I perfected this method after testing countless variations, ensuring every wing achieves that ideal balance of crispy exterior and juicy interior.
The process begins with a simple yet flavorful marinade that infuses the wings with deep, smoky notes before baking. A homemade barbecue sauce—sweet, tangy, and slightly spicy—brushes onto the wings during the final minutes, creating that coveted caramelized crust.
What sets this recipe apart is the foolproof technique that guarantees consistent results, whether you're feeding a crowd or treating yourself to a satisfying meal.
By the time you pull them from the oven, your wings will be glossy, sticky, and perfectly crispy, with a sauce that clings beautifully to each piece. The aroma alone will have everyone gathering around, and the first bite delivers that perfect harmony of smoky, sweet, and savory flavors.
These wings are ideal for game day, family gatherings, or a well-deserved weeknight indulgence.
Pair them with classic sides like creamy coleslaw or buttery cornbread for a complete meal. The recipe scales effortlessly, so you can easily double or triple the batch without sacrificing quality. Let’s get started on wings that will impress every time.
Ingredients for baked barbeque chicken wings
The perfect blend of smoky, sweet, and savory ingredients transforms simple wings into restaurant-quality bites.
| Ingredient | Amount | Notes |
|---|---|---|
| Chicken Wings 🍗 | 2 lb | Split into drumettes and flats, skin-on preferred |
| Brown Sugar 🍯 | ½ cup | Packed, light or dark variety |
| Ketchup 🍅 | ½ cup | High-quality, no artificial flavors |
| Apple Cider Vinegar 🍎 | ¼ cup | For tangy depth |
| Smoked Paprika 🌶️ | 1 tbsp | For authentic smoky flavor |
| Garlic Powder 🧄 | 1 tbsp | Freshly ground preferred |
| Onion Powder 🧅 | 1 tbsp | For savory base |
| Ground Black Pepper 🌶️ | ½ tsp | Freshly cracked for maximum flavor |
| Olive Oil 🫒 | 2 tbsp | Extra-virgin for richness |
| Honey 🍯 | 1 tbsp | For caramelization |
| Hot Sauce 🔥 | 1 tbsp | Optional for heat |
| Salt 🧂 | 1 tsp | Diamond Crystal kosher salt |
| Fresh Rosemary 🌿 | 2 sprigs | For aromatic depth |
The chicken wings are the foundation—look for skin-on pieces at your local butcher or grocery store's meat counter, as the skin crisps beautifully during baking. Costco or Whole Foods often carry high-quality wings in bulk, but even the standard grocery store selection works if they're fresh and plump. The key is to split them into drumettes and flats for even cooking. For extra flavor, ask the butcher to trim excess fat. If you're prepping ahead, store the wings uncovered in the fridge for up to 2 days to dry-brine them naturally, which enhances crispiness.
Brown sugar is non-negotiable here—it's what creates that coveted caramelized crust. Light or dark doesn't matter, but avoid powdered sugar substitutes. No ketchup on hand? Tomato paste thinned with vinegar works in a pinch, though the flavor will be slightly more concentrated. The smoked paprika is where the magic happens—Penzeys or McCormick brands deliver consistent quality. For a deeper smoky flavor, toast the spices in a dry pan for 30 seconds before mixing. The honey adds the perfect balance of sweetness, but if you're avoiding it, maple syrup works equally well. Hot sauce is optional, but if you add it, taste first—some brands are shockingly spicy.
This recipe scales beautifully, so double or triple the batch for gatherings. The glaze keeps well in the fridge for 5 days—store it in an airtight container with a thin layer of olive oil on top to preserve freshness. For leftovers, reheat wings in a 350°F oven for 10-15 minutes until crispy again. The sauce thickens as it cools, so thin with a splash of water or apple cider vinegar if needed. Freeze uncooked wings for up to 3 months—thaw overnight in the fridge before baking. The rosemary sprigs can be removed after marinating, or left in for a subtle aromatic touch during baking.
Why You'll Love This Recipe
- No-Fuss Prep: I swear by this recipe because it’s literally dump-and-bake. Toss wings in a bowl with brown sugar, ketchup, and vinegar—no measuring cups, no fuss—then pop them in the oven. Even my toddler could help (and she did, sticky fingers and all).
- Sweet-Smoky Magic: That combo of brown sugar caramelizing with smoked paprika? It’s like a hug for your taste buds. The tangy vinegar cuts through the richness, leaving you with wings that are crispy on the outside, sticky-sweet inside, and ridiculously addictive. (Yes, I ate half the batch straight from the pan.)
- Game for Any Gathering: These wings are my go-to for game days, lazy Sundays, or when I need to feed a crowd without stress. Double the batch—it’s still cheap per serving—and they reheat like a dream. My roommates call them “the glue that holds our Thursday nights together.”
- Budget-Friendly Leftovers: Chicken wings are cheap, and this recipe stretches them further than takeout ever could. I make a big tray, save half for lunch, and still have snacks for the week. Plus, the sauce thickens beautifully when reheated—no sad, watery leftovers here. (Between us, I’ve lived off these for three days straight.)
Step-by-step instructions for smoky-sweet baked barbecue chicken wings
This method delivers restaurant-quality wings with a perfectly balanced glaze that caramelizes to a crispy finish.
Prepare the Wings for Maximum Flavor and Crisp
Pat the 2 lb chicken wings dry with paper towels, removing any excess moisture from the skin and meat. This crucial step prevents steaming and ensures a crispy exterior. Separate the wings into drumettes and flats, leaving the skin intact for that coveted crunch.
In a large bowl, toss the wings with the 2 tbsp olive oil until evenly coated. Add the 1 tbsp smoked paprika, 1 tbsp garlic powder, 1 tbsp onion powder, 0.5 tsp ground black pepper, and 1 tsp salt. Mix thoroughly until every wing is uniformly seasoned. The oil helps the spices adhere while preventing them from burning during baking.
Create the Signature Glaze with Perfect Balance
In a medium saucepan, combine the 0.5 cup ketchup, 0.5 cup brown sugar, 0.25 cup apple cider vinegar, 1 tbsp honey, and 1 tbsp hot sauce. Stir over medium heat until the sugar dissolves completely, then bring to a gentle simmer for 3-4 minutes until slightly thickened. You're aiming for a glossy consistency that will cling beautifully to the wings.
Remove from heat and stir in the 2 sprigs fresh rosemary, allowing the aromatic oils to infuse for 5 minutes. The vinegar adds tangy depth while the honey and brown sugar create that signature caramelized crust. Taste and adjust seasoning if needed—this is your flavor foundation.
Bake to Juicy Perfection with Crispy Edges
Preheat your oven to 400°F with a wire rack inserted into a baking sheet. Arrange the seasoned wings in a single layer on the rack, leaving space between each piece for even air circulation. Bake for 25 minutes, then flip each wing and rotate the pan for uniform browning.
After another 20 minutes, brush the wings generously with the glaze mixture, working quickly to coat all surfaces. Return to the oven for a final 10-15 minutes until the glaze is bubbly and caramelized with deep golden-brown spots. The internal temperature should reach 165°F when checked with a meat thermometer.
Finish with Glaze Caramelization and Resting
Remove the wings from the oven and transfer them to a serving platter. Immediately drizzle any remaining glaze over the top and let them rest for 5 minutes. This resting period allows the juices to redistribute, ensuring each bite is moist and flavorful.
For maximum crunch, return the wings to the oven for 2-3 minutes at 425°F if needed. The glaze should be thick enough to hold its shape when the wings are lifted, with a glossy sheen that indicates perfect caramelization. Serve immediately with celery sticks and blue cheese dressing for the ultimate game-day experience.
Pro Tips For Making Baked Barbeque Chicken Wings
- Pat the Wings Dry: You’d be amazed how much crispier your wings get when you spend two minutes blotting them with paper towels before baking. Wet skin = steam = soggy crust. Trust me, the extra 30 seconds now saves you from sticky, limp wings later.
- Preheat Like It’s 1999: Crank your oven to 425°F (220°C) and let it scream for at least 10 minutes before putting those wings in. I used to skip this, and my sauce would just sit there like a sad puddle instead of caramelizing into something worth licking off your fingers.
- Skip the Raw Sugar Burn: Brown sugar clumps like a drama queen when it gets hot. Mix it into your sauce after removing the wings from the oven—just toss them in the warm sauce while they’re still resting. Your sauce won’t turn into a sticky, burnt mess, and your wings stay sticky-sweet, not bitter.
- Rest Before You Ruin: Pull those wings out of the oven, tent them with foil, and let them chill for 5 minutes. I know, you’re hungry now. But cutting into them fresh out of the oven turns your crispy crust into a sad, crumbly pile. Five minutes. That’s all it takes.
Pro cooking tips for great baked barbeque chicken wings
Dry-Brine for Crisp
Pat the wings completely dry with paper towels before seasoning—this is non-negotiable for crispy results. I let them air-dry uncovered on a wire rack in the fridge for 1-2 hours before baking, which amplifies the crunch.
For a shortcut, pat them dry right before seasoning, but the extra time makes all the difference. 💫
Spice Toasting Boost
Toast your smoked paprika, garlic powder, and onion powder in a dry skillet over medium heat for 30 seconds before mixing with the wings. This deepens their flavors and removes any raw taste.
I always do this step—it’s the secret behind that restaurant-quality depth. Use a fine-mesh strainer to catch any burnt bits afterward.
Glaze Consistency Matters
Your glaze should coat the back of a spoon like honey—thick enough to cling but still pourable. If it’s too runny, simmer it longer; if too stiff, thin with 1 tsp apple cider vinegar.
I test consistency by dipping a clean spoon in: if it holds its shape for 5 seconds, it’s perfect. Over-thickened glaze won’t caramelize properly.
Bake in Batches
Crowding the oven steams the wings instead of crisping them. Bake in two batches if needed, using the same baking sheet rotated halfway through. I use a half-sheet pan with a wire rack to maximize airflow. Avoid stacking—even a single layer needs space between wings for even browning.
Final Crisp Boost
For that extra-crispy finish, broil the wings for 1-2 minutes at the end (watch closely!). I crank the oven to 425°F and place the pan on the top rack. The glaze will bubble fiercely—this is normal.
If it burns, reduce to broil setting and check every 30 seconds. The result? Wings that shatter like glass with every bite. 🔥
Rest Before Serving
Never skip the 5-minute rest after baking. The glaze needs time to set, and the juices redistribute for maximum tenderness. I transfer wings to a platter, tent loosely with foil, and let them sit while I warm sides. Serving them immediately means soggy, sticky wings—no one wants that! 🍗
Nutrition facts
Frequently asked questions
Can I bake these wings without the skin for a leaner version?
You can use skinless wings, but you'll lose that signature crispy texture that makes these so special. If you're committed to skinless, pat them extra dry and bake at 425°F for 5-7 minutes longer to achieve some crunch. The flavor will still be excellent, though the texture will be more tender than crispy.
How do I make these wings extra crispy without burning the glaze?
Start with completely dry wings and bake them uncovered on a wire rack for 30 minutes at 425°F before adding the glaze. This creates a crispy foundation. For the final 5 minutes, broil on high with the oven door slightly open to prevent over-browning while keeping the glaze sticky.
Can I prepare the glaze ahead of time?
The glaze keeps well in an airtight container in the fridge for 5 days or freezer for 3 months. Thaw overnight in the fridge before using. For best results, reheat it gently in a saucepan until warm and slightly thickened before brushing on the wings.
What's the best way to reheat leftover wings?
Spread wings on a baking sheet and reheat at 375°F for 10-12 minutes until crispy again. For extra crunch, broil for 1-2 minutes at the end. Microwaving works in a pinch, but the texture suffers—always use the oven for best results.
Can I make this recipe spicier?
Add 1-2 tbsp cayenne pepper to the dry rub or increase the hot sauce to 2 tbsp. For heat without dryness, mix 1 tsp cayenne into the glaze. Start with small amounts—spicy flavors build up during baking, so taste as you go.