
Main Courses
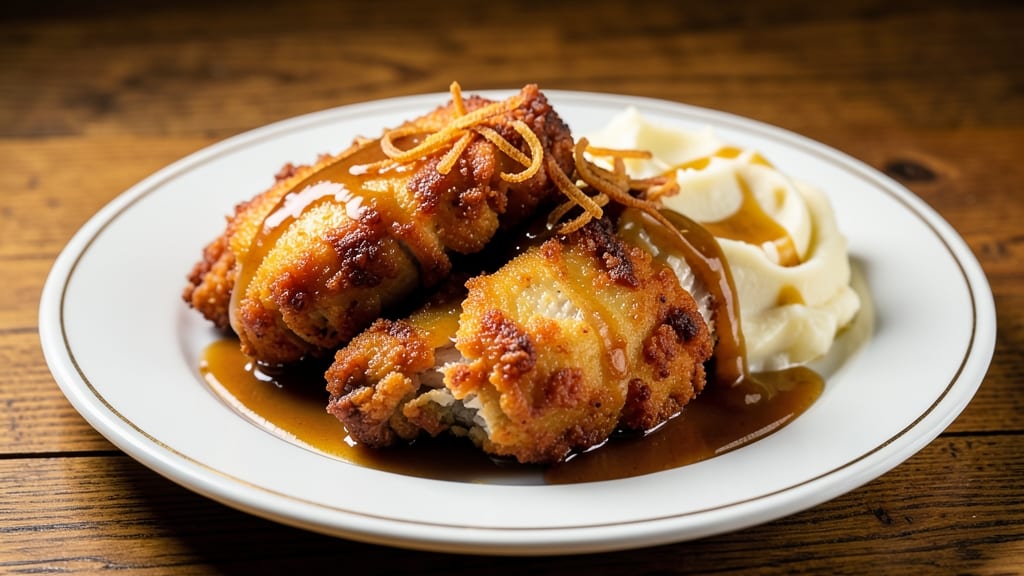
Applebee's chicken fried chicken delivers that perfect balance of tender, juicy meat wrapped in a crispy, golden-brown crust—now you can recreate it at home with this professional technique. The secret lies in a buttermilk brine that keeps the chicken moist, followed by a double-dredge process that guarantees maximum crunch. This isn't just fried chicken; it's a restaurant-quality dish that starts with a few key steps and ends with a plate that'll have everyone asking for seconds.
The process begins with brining the chicken in buttermilk overnight, which tenderizes the meat and creates that signature crispy exterior. After patting it dry, you'll coat each piece twice in seasoned flour—a technique that builds layers of flavor and texture.
The real magic happens when you fry it to a perfect golden brown, ensuring the crust is shatteringly crisp while the inside stays juicy and tender. No shortcuts here; this is the method that makes the difference between home-style and restaurant-quality results.
No chicken fried chicken is complete without creamy white gravy—thick, rich, and just the right consistency to pour over every bite. The gravy ties everything together, adding a velvety finish that complements the crispy crust and tender meat.
Once you master this technique, you'll never settle for anything less than that perfect combination of textures and flavors again. The result? A dish that's hearty, satisfying, and impossible to resist.
This recipe is designed to impress, whether you're feeding a crowd or treating yourself to a comforting meal. The double-dredge method and buttermilk brine are the keys to achieving that signature Applebee's flavor, and the gravy ensures every bite is as delicious as the first.
Ready to make restaurant-quality chicken fried chicken at home? Let's get started.
Ingredients for applebee's chicken fried chicken
Buttermilk brine, double-dredge flour, and golden-brown frying—this is the holy trinity of Applebee's-style perfection.
| Ingredient | Amount | Notes |
|---|---|---|
| Boneless, Skinless Chicken Thighs 🍗 | 1 ½ lb | Cut into 2-inch pieces for even cooking |
| Buttermilk 🥛 | 2 cups | Full-fat for best flavor and texture |
| All-Purpose Flour 🌾 | 2 cups | White or whole wheat blend preferred |
| Cornstarch 🌾 | 2 tbsp | For extra-crispy crust texture |
| Diamond Crystal Kosher Salt 🧂 | 1 tbsp | For seasoning flour mixture |
| Ground Black Pepper 🌶️ | 1 tbsp | Freshly cracked for best flavor |
| Garlic Powder 🧄 | 1 tbsp | For aromatic depth in coating |
| Onion Powder 🧅 | 1 tbsp | Adds savory base to crust |
| Paprika 🌶️ | 1 tsp | Smoked variety for authentic flavor |
| Vegetable Oil 🫒 | 4 cups | For frying to 350°F, peanut oil preferred |
| Unsalted Butter 🧈 | ½ cup | Cold, cubed for gravy roux |
| All-Purpose Flour 🌾 | ½ cup | For gravy thickening |
| Whole Milk 🥛 | 1 cup | For creamy gravy base |
| Fresh Parsley 🌿 | ¼ cup | Chopped, for garnish |
The chicken thighs are non-negotiable here—dark meat stays juicier during frying than breasts. Oscar Mayer or Perdue are reliable brands, but any boneless, skinless thighs will work. For the buttermilk, Land O'Lakes or Horsefly full-fat versions deliver that signature tang. The flour mixture is where the magic happens: Bob's Red Mill all-purpose works perfectly, but if you're feeling fancy, blend in King Arthur whole wheat flour for a subtle nutty note. Pro tip: Toast your cornstarch lightly in a dry pan before mixing—it boosts crispiness without extra oil.
Running short on buttermilk? Substitute 1 cup milk + 1 tbsp vinegar or lemon juice, let it curdle for 10 minutes. No smoked paprika? Regular paprika plus a pinch of cayenne mimics that restaurant flavor. The oil temperature is critical—use a deep-fry thermometer to keep it at 350°F. Can't find vegetable oil? Peanut or canola oil work just as well. For the gravy, if you're in a rush, substitute 1 cup chicken broth + 2 tbsp butter, but trust me, the milk-butter roux is worth the extra minute. And if you're feeling experimental, swap half the milk for heavy cream for an ultra-rich version.
This dish tastes even better the next day—leftovers reheat beautifully in a 350°F oven for 20 minutes. Store the fried chicken in an airtight container with a paper towel to absorb moisture, keeping it crispy for up to 3 days. The gravy? Make a double batch and freeze half in ice cube trays—perfect for quick reheating later. For serving, I always garnish with fresh parsley and a sprinkle of extra black pepper right before plating. The contrast of crispy, creamy, and fresh herbs is what makes this dish restaurant-worthy.
Why You'll Love This Recipe
- No-Fuss Double Dip: I swear by the buttermilk soak followed by that crispy cornstarch-flour mix—it’s the secret to that perfect crunch without frying a single thing. Just pat dry, dip, bread, and fry (or air-fry, no judgment). My kids think I’m a genius, and honestly? So do I.
- Restaurant-Level Crunch: That Diamond Crystal kosher salt in the flour coating? Game-changer. The thighs stay juicy inside while the outside gets that golden, shatteringly crisp shell—exactly like Applebee’s, but without the wait. Between us, it’s the only way I’ll eat chicken fried chicken now.
- Meal Prep MVP: Make a big batch on Sunday, and you’re set for the week. The leftovers reheat like a dream—crispy edges intact, no soggy bits—so I can throw them in a lunchbox or toss them in a salad when I’m lazy. My husband’s a fan too, which is basically the highest praise.
- Budget Win: Chicken thighs are cheap, and this recipe stretches them far. A single bag of flour and cornstarch covers multiple batches, and the buttermilk? I already had it. It’s the kind of dish that makes me feel like I’m feeding a crowd without breaking the bank—even when it’s just me and my takeout cravings.
Step-by-step instructions for Applebee's chicken fried chicken
Here's how to recreate that legendary buttermilk-brined, double-dredged crunch at home.
Prepare the Buttermilk Brine and Cut Chicken
Cut the 1.5 lb boneless, skinless chicken thighs into 2-inch pieces for even cooking. Place them in a resealable plastic bag and pour in the 2 cups buttermilk. Seal the bag, squeezing out excess air, then massage the buttermilk into the chicken until fully coated. Let it marinate in the refrigerator for at least 6 hours—I prefer overnight for maximum tenderness. The buttermilk works magic by tenderizing the meat and creating that signature moist interior.
This step is non-negotiable. The longer the brine, the juicier the final result. If you're short on time, a minimum of 4 hours will still give you excellent results, but overnight is ideal. Don't skip this—it's what makes restaurant-style fried chicken so special.
Create the Seasoned Flour Coating
In a large bowl, whisk together the 2 cups all-purpose flour, 2 tbsp cornstarch, 1 tbsp Diamond Crystal kosher salt, 1 tbsp ground black pepper, 1 tbsp garlic powder, 1 tbsp onion powder, and 1 tsp paprika. The cornstarch is key here—it creates that extra-crispy texture we're after. Mix well to ensure even distribution of all seasonings. I like to use my fingers to break up any flour lumps for a smoother coating.
This dry mix is your flavor foundation. The paprika adds that subtle smoky depth, while the garlic and onion powders build the savory base. Don't substitute instant seasoning blends—the freshness of individual spices makes all the difference in the final product.
Double-Dredge for Maximum Crunch
Remove the chicken from the buttermilk and let any excess drip off for about 30 seconds. Working in batches to avoid overcrowding, dredge each piece in the flour mixture, pressing gently to adhere. Transfer to a wire rack set over a baking sheet and let rest for 10 minutes. This initial coating sets up before the second dredge, which is crucial for that signature double-layered crust.
After the 10-minute rest, return the chicken to the flour mixture and dredge again, pressing firmly to create that thick, even coating. The double-dredge technique is what gives Applebee's version its extra-crispy texture. Don't skip the resting period—it ensures the coating stays intact during frying rather than falling off in clumps.
Fry to Golden Perfection
Fill a deep skillet or Dutch oven with 4 cups vegetable oil and heat to 350°F. Use a deep-fry thermometer to maintain precise temperature—this is critical for even cooking. Fry the chicken in batches for 4-5 minutes per side until golden brown and reaching an internal temperature of 165°F. The oil should be bubbling gently but not smoking. Overcrowding the pan will lower the oil temperature and result in greasy rather than crispy chicken.
As each batch cooks, transfer the fried chicken to a paper towel-lined plate to drain excess oil. The chicken should be deep golden brown with a crispy exterior that gives way slightly when pressed. If any pieces brown too quickly, reduce the heat slightly to prevent burning while maintaining crispiness.
Make the Creamy Parsley Gravy
In the same skillet (no need to clean it—the browned bits are flavor gold), melt the 0.5 cup unsalted butter over medium heat. Whisk in the 0.5 cup all-purpose flour and cook for 2 minutes until the roux is golden brown. Slowly pour in the 1 cup whole milk, whisking constantly to prevent lumps from forming. Simmer for 3-4 minutes until the gravy thickens to a smooth, creamy consistency.
Remove from heat and stir in the 0.25 cup chopped fresh parsley. Season with additional salt and pepper if needed. The gravy should coat the back of a spoon but still be pourable. If it's too thick, whisk in a splash of milk. This gravy is what ties the whole dish together, adding richness and moisture to every bite.
Pro Tips For Making Applebee'S Chicken Fried Chicken
- CRISP FIRST, GOLDEN SECOND: Fry the chicken at 350°F for the first 4 minutes—this locks in the crust before it browns. Then crank the oil to 375°F for the last 2 minutes to get that signature Applebee’s shine. (I used to fry it all at high heat and ended up with greasy, uneven crusts.)
- SALT THE BUTTERMILK: Toss 1 teaspoon of kosher salt into the buttermilk before marinating the chicken. The salt tenderizes the meat and makes the crust cling better. (Yes, even if the recipe doesn’t say it—trust me, it’s non-negotiable for that restaurant-level texture.)
- DON’T SKIP THE REST: Let the buttermilk-marinated chicken sit uncovered in the fridge for at least 4 hours (overnight is best). This step keeps the meat juicy and prevents the flour from absorbing too much moisture, which ruins the crust. (I learned this after my first batch came out soggy.)
- USE A 50/50 FLOUR MIX: Split the flour into two bowls—one with all-purpose, one with cornstarch. Dredge the chicken in the all-purpose first, then the cornstarch. The cornstarch adds that extra crunch without making the batter too thick. (Sounds weird, but it works—my grandmother swore by it.)
Serving suggestions for this recipe
Classic Applebee's Plating
Serve your chicken fried chicken on a white ceramic plate (Applebee's signature) with 2-3 pieces per person. Pour the creamy parsley gravy over the top, letting it pool slightly around the chicken.
Garnish with chopped fresh parsley and a sprinkle of freshly cracked black pepper for that restaurant-fresh look. 🍽️
Side Dish Pairings
Creamy mashed potatoes are a must—their smooth texture contrasts perfectly with the crispy chicken. Use butter, whole milk, and roasted garlic for extra richness. For a lighter option, try apple slices with a drizzle of honey-lemon dressing to cut through the richness. 🍠
Biscuit or Dinner Roll
Serve with a warm buttermilk biscuit or soft dinner roll on the side. Brush the biscuit with garlic butter before baking for an extra flavor boost. The biscuit soaks up any leftover gravy beautifully, making every bite even more satisfying. 🥖
Family-Style Serving
For gatherings, arrange the chicken and gravy in the center of the table with individual bowls of gravy for self-serving. Place small bowls of extra parsley and black pepper at each setting so guests can customize their plates. This keeps the dish feeling special and interactive. 👨👩👧👦
Make-Ahead Serving Tips
Prepare the chicken and gravy ahead of time, then reheat in a 350°F oven for 20 minutes before serving. Keep the gravy in a separate container and reheat it on the stovetop over low heat, stirring constantly to prevent lumps.
This ensures your dish stays hot and delicious when you're ready to serve. ⏰
Presentation Upgrade
For an extra touch, place a small sprig of parsley on each plate and add a drizzle of gravy in a zigzag pattern over the chicken. Serve with a side of coleslaw (Applebee's classic) or roasted green beans for a complete meal.
The visual presentation makes it feel like a true restaurant experience. ✨
Nutrition facts
Frequently asked questions
Why does Applebee's chicken fried chicken stay so crispy?
The secret is the double-dredge technique with cornstarch in the flour mixture. The first coating sets while resting, then the second dredge creates that signature thick, golden crust. Frying at 350°F with precise temperature control locks in the crispiness without making the inside greasy.
Can I use chicken breasts instead of thighs?
Not ideal—they'll dry out during frying. Dark meat stays juicier, which is why thighs are traditional. If you must use breasts, brine them for no more than 4 hours and fry for 3 minutes per side maximum. For best results, stick with thighs for that authentic Applebee's texture.
How do I fix soggy fried chicken?
Soggy crust happens from oil temperature drops or too much moisture. Keep oil at 350°F using a thermometer, and pat chicken very dry before frying. For leftovers, reheat in a 400°F oven for 10 minutes on a wire rack (not covered) to restore crispiness.
What's the best oil for frying?
Peanut oil is the gold standard—high smoke point and neutral flavor. Vegetable or canola oil work too, but avoid olive oil (too low smoke point) or butter (burns easily). Use enough oil to submerge chicken 1 inch deep—this ensures even cooking and maximum crispiness.
Can I make this recipe ahead of time?
Fry the chicken and make gravy up to 2 days ahead. Store chicken in an airtight container with a paper towel to absorb moisture. Reheat gravy separately on the stovetop, then warm chicken in a 350°F oven for 20 minutes. The gravy can be reheated with a splash of milk to restore creaminess.